×
- Hello
- Login or Register
- Quick Links
- Live Chat
- Track Order
- Parts Availability
- RMA
- Help Center
- Contact Us
- Shop for
- BMW Parts
- BMW Accessories
My Garage
My Account
Cart
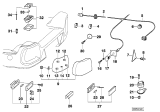
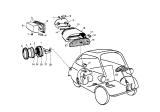
Genuine BMW 2002 Headlight Bulb
Headlamp Bulb- Select Vehicle by Model
- Select Vehicle by VIN
Select Vehicle by Model
orSeries
Model
Year
Select Vehicle by VIN
For the most accurate results, select vehicle by your VIN (Vehicle Identification Number).
5 Headlight Bulbs found


BMW 2002 Long Life Light Bulb
Part Number: 63217160790$5.99 MSRP: $9.66You Save: $3.67 (38%)Ships in 1-3 Business Days


BMW 2002 Rear Light Bulb
Part Number: 63217160793$5.96 MSRP: $7.29You Save: $1.33 (19%)Ships in 1-3 Business Days

BMW 2002 Headlight Bulb
If you are looking for OEM BMW 2002 Headlight Bulb, we highly recommend to shop with us. Not only do we offer budget friendly prices, but we also provide fast delivery. In addition, we have a hassle-free return policy on all genuine BMW 2002 Headlight Bulb that come backed by the manufacturer's warranty.
BMW 2002 Headlight Bulb Parts Questions & Experts Answers
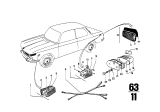
- Q: What steps are involved in renewing the headlight bulb for different types of lamps on BMW 2002?A:Always renew a bulb with one of similar rating and type. For headlamps of the bulb type, open the bonnet and remove the protective cover from the rear of the lamp, then withdraw the bulb holder and remove the bayonet type bulb. The parking lamp bulbs are held in the headlamp reflector by a spring, and when refitting the bulb holder, note the small alignment tag and recess to ensure correct installation. For headlamps of the sealed beam type, open the bonnet and remove the protective cover from the rear of the lamp, pull the plug from the rear, remove the radiator grille, unscrew and remove the sealed beam retaining ring screws, and withdraw the retaining ring and lamp unit. Installation of the sealed beam unit is a reversal of removal, and provided the adjustment screws are not altered, the beam alignment will not change. To access rear lamps, raise the lid of the luggage boot and remove the two knurled nuts retaining the rear lamp cluster, then withdraw the cluster and renew the bulbs as necessary. For the rear number plate lamp, remove the lens/frame assembly from the rear bumper using two screws and extract the festoon type bulb. For the interior lamp, prise the lamp from its recess and extract the festoon type bulb. For front direction indicator lamps, remove the lens/frame assembly with two screws and extract the bayonet fixing type bulb. Access to some instrument panel and warning lamp bulbs is gained by removing the padded cover at the base of the instrument panel and reaching up behind the panel; the bulbs are of wedge-base type and can be released after twisting their plastic holders from their recesses. For the automatic transmission speed selector indicator lamp, pull off the plastic cover from the selector indicator and extract the two bulbs.

