×
- Hello
- Login or Register
- Quick Links
- Live Chat
- Track Order
- Parts Availability
- RMA
- Help Center
- Contact Us
- Shop for
- BMW Parts
- BMW Accessories
My Garage
My Account
Cart
Genuine BMW 2500 Cylinder Head
Head- Select Vehicle by Model
- Select Vehicle by VIN
Select Vehicle by Model
orSeries
Model
Year
Select Vehicle by VIN
For the most accurate results, select vehicle by your VIN (Vehicle Identification Number).
1 Cylinder Head found

BMW 2500 Cylinder Head
If you are looking for OEM BMW 2500 Cylinder Head, we highly recommend to shop with us. Not only do we offer budget friendly prices, but we also provide fast delivery. In addition, we have a hassle-free return policy on all genuine BMW 2500 Cylinder Head that come backed by the manufacturer's warranty.
BMW 2500 Cylinder Head Parts Questions & Experts Answers
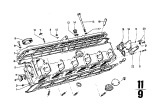
- Q: How to remove, refit, and adjust cylinder head on BMW 2500?A:By removal of engines parts on models with the Fuel injection System, one should pull the battery earth cable and sump the coolant. To dismantle, ease the clamp that is around the manifold of throttle butterfly and at the same time, pull the hose from the splash board to release the air cleaner assembly. It is necessary to take out the screenwash reservoir and disconnect the wiring from the engine and the components linked to it. Remove the HT leads from the coil, and the LT connector and vacuum pipe from the distributor, and take off the distributor cap. Clip back the HT leads from the sparking plugs and little the side of the lead protector tube and taken off the bleed hose. Relax the rocker cover bolts in the reverse sequence and detach the rocker cover and gasket, and hoses 5, 6 and 7 and 8 together with the heater hoses 9 and 10, and heater hose from Expansion tank. Remove the connection of the oil pressure switch cable at hoses 9 and 10, while Hoses 9 and 10, as well as plate 11 must be tightly against the splash board when refitting. Holding the engine in the firing position for No 1 cylinder remove hoses by unscrewing clips 12 and 13, and unplug connector 14, and remove the support bracket 15. Remove the camshaft sprocket with the crankshaft and camshaft stationary to avoid a situation where the crankshaft will turn with the connected pistons, which the camshaft will as well turn with the valves. Disconnect the throttle linkage and intake preheating hose also remove the clamp from the exhaust support at the gearbox since it is also affected in this type, in addition to loosening the triangular flanges on the exhaust silencer before disconnecting the exhaust pipes at the manifold flanges, the gaskets must also be renewed with new ones together with Molycote paste when refitting. Loosen the cylinder head fixing bolts in the reverse order, fit a guide pin to stop the movement of the rocker shaft, remove the remaining bolts and gently remove the cylinder head and discard the gasket. For the models built with carburetters, initial procedures similar to those described above are to disconnect the battery earth cable, to remove the air cleaner assembly and to drain the cooling system; also, various hoses and cables have to be disconnected. The work procedure is removal of the camshaft sprocket, exhaust pipe clamp, and the exhaust pipes and then loosening the cylinder head bolts and inserting the guide plugs and then drawing off the cylinder head with a new gasket discarding the previous head gasket. In the process of refitting note the correct alignment of the camshaft and crankshaft to avoid internal damage. If crankshaft position has been disrupted on it, ensure that piston No 1 is at the top of its bore with ignition timing marks at TDC. Wipe down both the cylinder head joint surfaces as well as the block surfaces for the cylinder head bolts to avoid the lack of enough pressure because of the presence of oil in the threaded holes. Install a new head gasket in the right position and apply sealer at special points. Before tightening the cylinder head, rotate the camshaft so that the unit is in the overlap position of No 6 cylinder and then insert the cylinder head and apply the bolts in three progressive steps of the recommended torque. Replace all other parts in backward order, adjusting the valve gaps before reinserting the rocker cover with a new gasket. In the fuel injection models make sure that earth cable and loom clamp is properly secured. Idle speed should be done after refilling the cooling system and setting an ignition timing. Run some 50 km (30 miles) to let the engine warm, then cool to between 35°C (95°F), and remove the rocker cover to snug the cylinder head bolts, which should be done after running about 1000 km (600 miles) of which the valve clearance can also be checked.

Related BMW 2500 Parts
 BMW 2500 Cylinder Head Gasket
 BMW 2500 Exhaust Valve
 BMW 2500 Intake Valve
 BMW 2500 Rocker Arm
 BMW 2500 Rocker Shaft Spring Kit
 BMW 2500 Timing Cover