×
- Hello
- Login or Register
- Quick Links
- Live Chat
- Track Order
- Parts Availability
- RMA
- Help Center
- Contact Us
- Shop for
- BMW Parts
- BMW Accessories
My Garage
My Account
Cart
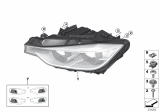
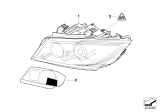
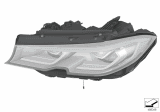
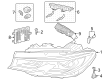
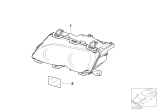
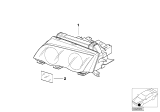
Genuine BMW 330i Headlight
Headlamp- Select Vehicle by Model
- Select Vehicle by VIN
Select Vehicle by Model
orSeries
Model
Year
Select Vehicle by VIN
For the most accurate results, select vehicle by your VIN (Vehicle Identification Number).
52 Headlights found


BMW 330i Left Headlight Assembly
Part Number: 63117365599$545.38 MSRP: $856.31You Save: $310.93 (37%)Ships in 1-3 Business Days


BMW 330i Headlight Driver Side Lh Left
Part Number: 63116942725$463.58 MSRP: $727.87You Save: $264.29 (37%)Ships in 1-3 Business DaysBMW 330i Right Headlight
Part Number: 63117419630$2111.75 MSRP: $2587.03You Save: $475.28 (19%)Ships in 1-3 Business DaysBMW 330i Left Headlight
Part Number: 63117419629$2111.75 MSRP: $2587.03You Save: $475.28 (19%)Ships in 1-3 Business Days
BMW 330i Headlight, Led, Ahl, Right
Part Number: 63118496160$2321.46 MSRP: $2845.74You Save: $524.28 (19%)Ships in 1-3 Business DaysBMW 330i Right Led Headlight
Part Number: 63117419622$2111.75 MSRP: $2587.03You Save: $475.28 (19%)Ships in 1-3 Business DaysBMW 330i Headlight, Halogen
Part Number: 63117365600$545.38 MSRP: $856.31You Save: $310.93 (37%)Ships in 1-3 Business Days
BMW 330i Headlight With Led Technology
Part Number: 63118496154$1937.00 MSRP: $2371.46You Save: $434.46 (19%)Ships in 1-3 Business DaysBMW 330i Headlight, Led, Ahl, Left
Part Number: 63118496159$2321.46 MSRP: $2845.74You Save: $524.28 (19%)Ships in 1-3 Business Days
BMW 330i LED HEADLIGHT RIGHT
Part Number: 63115A4F754$1937.00 MSRP: $2371.46You Save: $434.46 (19%)Ships in 1-2 Business DaysBMW 330i Left Led Headlight
Part Number: 63117419621$2111.75 MSRP: $2587.03You Save: $475.28 (19%)Ships in 1-3 Business Days
BMW 330i Passengers Halogen Headlight Headlamp Replacement
Part Number: 63127165772$119.11 MSRP: $134.35You Save: $15.24 (12%)Ships in 1-3 Business Days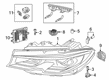
BMW 330i HEADLIGHT, LED, AHL, RIGHT
Part Number: 63115A243A4$2321.46 MSRP: $2845.74You Save: $524.28 (19%)Ships in 1-3 Business DaysBMW 330i LED HEADLIGHT AHL RIGHT
Part Number: 63117886944$2321.46 MSRP: $2845.74You Save: $524.28 (19%)Ships in 1-2 Business DaysBMW 330i LED HEADLIGHT LEFT
Part Number: 63115A4F761$2321.46 MSRP: $2845.74You Save: $524.28 (19%)Ships in 1-2 Business DaysBMW 330i Left Headlight
Part Number: 63127165771$119.11 MSRP: $134.35You Save: $15.24 (12%)Ships in 1-3 Business DaysBMW 330i Left Headlight
Part Number: 63117161669$1117.59 MSRP: $1754.73You Save: $637.14 (37%)Ships in 1-3 Business DaysBMW 330i LED HEADLIGHT RIGHT
Part Number: 63115A4F762$2321.46 MSRP: $2845.74You Save: $524.28 (19%)Ships in 1-2 Business DaysBMW 330i Headlight, Laser Light, Right
Part Number: 63118496168$3379.37 MSRP: $4153.43You Save: $774.06 (19%)Ships in 1-3 Business Days
BMW 330i Right Headlight
Part Number: 63126902764$356.81 MSRP: $412.82You Save: $56.01 (14%)Ships in 1-3 Business Days
| Page 1 of 3 |Next >
1-20 of 52 Results
BMW 330i Headlight
If you are looking for OEM BMW 330i Headlight, we highly recommend to shop with us. Not only do we offer budget friendly prices, but we also provide fast delivery. In addition, we have a hassle-free return policy on all genuine BMW 330i Headlight that come backed by the manufacturer's warranty.
BMW 330i Headlight Parts Questions & Experts Answers
- Q: What are the instructions for adjusting the headlights and fog lights on BMW 330i?A:All covered models have halogen bulbs for the high beam. On earlier models, the low-beam bulb is also a halogen type. On later models, the low-beam bulb is a Xenon type, also called High Intensity Discharge (HID). Some models have an electrically operated headlight beam adjustment system which is controlled through the switch in the instrument panel. On these models, ensure that the switch is set to the off position before adjusting the headlight aim. Each headlight has an adjusting screw for vertical adjustment. The headlight vertical adjustment screw is accessed from behind the headlight, while the horizontal screw (If equipped) is accessed through a hole In the Inner fender. There is no horizontal adjustment screw. There are several ways to adjust the headlights. The simplest method requires an open area with a blank wall and a level floor. Position masking tape vertically on the wall in reference to the vehicle centerline and the centerlines of both headlights. Position a horizontal tape line in reference to the centerline of the headlights. It might be easier to position the tape on the wall with the vehicle parked only a few inches away. Adjustment should be made with the vehicle parked 25 feet from the wall, sitting level, the gas tank full, and no unusually heavy load in the vehicle. The high-intensity zone should be vertically centered with the exact center about three inches below the horizontal line. Have the headlights adjusted by a qualified technician at the earliest opportunity. For fog lights, park the vehicle 25 feet from the wall. Tape a horizontal line on the wall that represents the height of the fog lights and tape another line four inches below that line. Using the adjusting screw on each fog light, adjust the pattern on the wall so that the top of the fog light beam meets the lower line on the wall. The adjustment screw on F-series chassis models is accessed through a small hole in the fog light fascia in the bumper cover.


