×
- Hello
- Login or Register
- Quick Links
- Live Chat
- Track Order
- Parts Availability
- RMA
- Help Center
- Contact Us
- Shop for
- BMW Parts
- BMW Accessories
My Garage
My Account
Cart
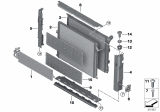
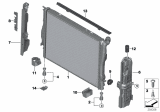
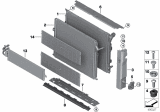
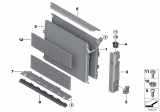
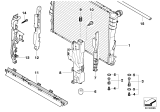
Genuine BMW 330i Radiator
Cooling Radiator- Select Vehicle by Model
- Select Vehicle by VIN
Select Vehicle by Model
orSeries
Model
Year
Select Vehicle by VIN
For the most accurate results, select vehicle by your VIN (Vehicle Identification Number).
17 Radiators found


BMW 330i Radiator
Part Number: 17118741830$396.42 MSRP: $585.17You Save: $188.75 (33%)Ships in 1 Business Day


BMW 330i Radiator
Part Number: 17118482622$396.42 MSRP: $585.17You Save: $188.75 (33%)Ships in 1-3 Business Days

BMW 330i Radiator
Part Number: 17117562079$356.78 MSRP: $526.66You Save: $169.88 (33%)Ships in 1-3 Business Days


BMW 330i Radiator
Part Number: 17118482623$396.42 MSRP: $585.17You Save: $188.75 (33%)Ships in 1-3 Business Days


BMW 330i Engine Cooling Radiator
Part Number: 17119071517$364.67 MSRP: $487.84You Save: $123.17 (26%)Ships in 1-3 Business Days
BMW 330i Radiator
Part Number: 17118625421$396.42 MSRP: $585.17You Save: $188.75 (33%)Ships in 1-3 Business Days
BMW 330i Radiator
Part Number: 17119071518$364.67 MSRP: $487.84You Save: $123.17 (26%)Ships in 1-3 Business Days
BMW 330i Radiator
Part Number: 17119071519$364.67 MSRP: $487.84You Save: $123.17 (26%)Ships in 1-3 Business Days


BMW 330i Radiator
Part Number: 17117559273$356.78 MSRP: $526.66You Save: $169.88 (33%)Ships in 1-3 Business Days
BMW 330i Radiator
Part Number: 17118666811$374.60 MSRP: $552.97You Save: $178.37 (33%)Ships in 1-3 Business Days
BMW 330i Radiator
Part Number: 17118666739$416.23 MSRP: $614.41You Save: $198.18 (33%)Ships in 1-3 Business Days
BMW 330i Radiator
Part Number: 17115A30678$416.23 MSRP: $614.41You Save: $198.18 (33%)Ships in 1-3 Business Days
BMW 330i Radiator
Part Number: 17118625430$396.42 MSRP: $585.17You Save: $188.75 (33%)Ships in 1-3 Business Days
BMW 330i Radiator
Part Number: 17118625422$396.42 MSRP: $585.17You Save: $188.75 (33%)Ships in 1-3 Business Days
BMW 330i Radiator
Part Number: 17115A30676$416.23 MSRP: $614.41You Save: $198.18 (33%)Ships in 1-3 Business Days
BMW 330i Radiator
Part Number: 17118666748$416.23 MSRP: $614.41You Save: $198.18 (33%)Ships in 1-3 Business Days
BMW 330i Radiator
If you are looking for OEM BMW 330i Radiator, we highly recommend to shop with us. Not only do we offer budget friendly prices, but we also provide fast delivery. In addition, we have a hassle-free return policy on all genuine BMW 330i Radiator that come backed by the manufacturer's warranty.
BMW 330i Radiator Parts Questions & Experts Answers
- Q: How to remove a radiator on BMW 330i?A:To remove the radiator, start by draining the cooling system. Then, remove the air intake duct, air filter housing, and electric cooling fan and shroud. Pry out the wire clips and disconnect the radiator upper and lower coolant hoses, as well as the coolant hose from the automatic transmission fluid cooler if applicable. On E-series chassis models with an automatic transmission, remove the mounting bolt and detach the fluid cooler hoses from the radiator. On F-series chassis models, unlock the transmission oil cooler lines and disconnect the hose(s) from the radiator. Finally, remove the radiator upper mounting bolts and pull the top of the radiator rearwards and upwards to remove it. For inspection, reverse-flush the radiator if there is suspected blockage. Clean dirt and debris from the radiator fins using compressed air or a soft brush. If necessary, a radiator specialist can perform a flow test to check for internal blockage. Leaking radiators should be referred to a specialist for repair, as welding or soldering may cause damage. Inspect the radiator lower mounts for damage or deterioration and replace if needed. To install the radiator, lower it into position and secure it with retaining bolts. Ensure the fan cowl is correctly located and secure it with clips. Reconnect the hoses and check the condition of the O-ring seals in the radiator fittings, replacing any that are defective. Finally, refill the cooling system.


