×
- Hello
- Login or Register
- Quick Links
- Live Chat
- Track Order
- Parts Availability
- RMA
- Help Center
- Contact Us
- Shop for
- BMW Parts
- BMW Accessories
My Garage
My Account
Cart
Genuine BMW Z4 Automatic Transmission Shift Levers
Automatic Transmission Shifter- Select Vehicle by Model
- Select Vehicle by VIN
Select Vehicle by Model
orSeries
Model
Year
Select Vehicle by VIN
For the most accurate results, select vehicle by your VIN (Vehicle Identification Number).
12 Automatic Transmission Shift Levers found


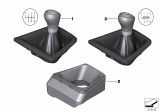
BMW Z4 Leather Gear Lever Knob With/Gaiter/6-Speed
Part Number: 25112284094$241.12 MSRP: $294.91You Save: $53.79 (19%)Ships in 1-3 Business Days


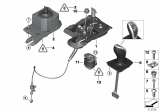
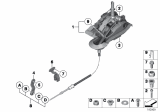
BMW Z4 Transmission Gear Shifter Box
Part Number: 61319213647$823.30 MSRP: $1077.23You Save: $253.93 (24%)Ships in 1-3 Business Days
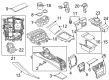
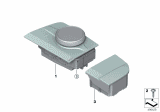
BMW Z4 Control Panel Center Console
Part Number: 61315A7DFE4$1213.32 MSRP: $1587.53You Save: $374.21 (24%)Ships in 1-2 Business Days
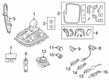
BMW Z4 Controller
Part Number: 65825A371B2$454.00 MSRP: $588.94You Save: $134.94 (23%)Ships in 1-3 Business Days

BMW Z4 Gear Shift
Part Number: 25167514885$971.21 MSRP: $1233.38You Save: $262.17 (22%)Ships in 1-3 Business Days
BMW Z4 Controller
Part Number: 65825A12F47$403.04 MSRP: $530.88You Save: $127.84 (25%)Ships in 1-3 Business Days
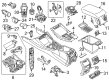
BMW Z4 Shift Housing
Part Number: 25167587527$655.49 MSRP: $912.98You Save: $257.49 (29%)Ships in 1-3 Business Days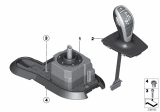
BMW Z4 Transmission Gear Shifter Box
Part Number: 61319259427$866.66 MSRP: $1133.95You Save: $267.29 (24%)Ships in 1-3 Business Days
BMW Z4 Control Panel Center Console
Part Number: 61315A7DFE7$1213.32 MSRP: $1587.53You Save: $374.21 (24%)Ships in 1-2 Business Days
BMW Z4 Control Panel Center Console
Part Number: 61315A7DFD2$1213.32 MSRP: $1587.53You Save: $374.21 (24%)Ships in 1-2 Business Days
BMW Z4 Controller
Part Number: 65825A371B0$462.15 MSRP: $599.52You Save: $137.37 (23%)Ships in 1-3 Business Days

BMW Z4 Automatic Transmission Shift Levers
If you are looking for OEM BMW Z4 Automatic Transmission Shift Levers, we highly recommend to shop with us. Not only do we offer budget friendly prices, but we also provide fast delivery. In addition, we have a hassle-free return policy on all genuine BMW Z4 Automatic Transmission Shift Levers that come backed by the manufacturer's warranty.
BMW Z4 Automatic Transmission Shift Levers Parts Questions & Experts Answers
- Q: How to remove the Automatic Transmission Shift Levers selector lever assembly on BMW Z4?A:To remove the Automatic Transmission Shift Levers assembly, first raise the vehicle and support it securely on jackstands, ensuring the Automatic Transmission Shift Levers is in position P. Loosen the selector cable clamping nut on the transmission lever from underneath the vehicle, then unscrew the locknut securing the selector outer cable and remove it from the support bracket on the transmission. In the passenger cabin, pull the knob from the Automatic Transmission Shift Levers with a strong tug, avoiding any twisting to prevent damage to the turning lock. Carefully pry up the lever trim with the lever boot from the center console and disconnect the wiring connectors from the underside of the trim, noting their installed locations. Remove the two trim retaining screws at the rear of the Automatic Transmission Shift Levers opening, lift the trim, and disconnect the wiring connectors from the underside. Pull out the storage tray from above the ashtray, then remove the four retaining screws and pull the ashtray/switch frame back from the center console, pressing the switches out of the frame and disconnecting their wiring connectors while noting their positions. Loosen the interlock cable clamping screw and disconnect any wiring connectors attached to the Automatic Transmission Shift Levers assembly, then remove the three screws securing the lever assembly to the floor and maneuver the assembly up from its location, unhooking the interlock cable as it is withdrawn. For installation, reverse the removal process while adjusting the interlock cable, pushing the boot down the lever until the locking groove is exposed before installing the gear knob, and adjusting the selector cable upon completion.

Related BMW Z4 Parts
 BMW Z4 Shift Knob
 BMW Z4 Cup Holder
 BMW Z4 Muffler
 BMW Z4 Neutral Safety Switch
 BMW Z4 Air Bag Clockspring
 BMW Z4 Automatic Transmission Shift Position Sensor Switch
 BMW Z4 Automatic Transmission Shifter
 BMW Z4 Back Glass Lift Support
 BMW Z4 Back Up Light
 BMW Z4 Back Up Light Switch
 BMW Z4 Muffler Hanger Straps
Browse by Year
2025 Automatic Transmission Shift Levers 2024 Automatic Transmission Shift Levers 2023 Automatic Transmission Shift Levers 2022 Automatic Transmission Shift Levers 2021 Automatic Transmission Shift Levers 2016 Automatic Transmission Shift Levers 2015 Automatic Transmission Shift Levers 2014 Automatic Transmission Shift Levers 2013 Automatic Transmission Shift Levers 2012 Automatic Transmission Shift Levers 2011 Automatic Transmission Shift Levers 2010 Automatic Transmission Shift Levers 2009 Automatic Transmission Shift Levers 2008 Automatic Transmission Shift Levers 2007 Automatic Transmission Shift Levers 2006 Automatic Transmission Shift Levers 2005 Automatic Transmission Shift Levers 2004 Automatic Transmission Shift Levers 2003 Automatic Transmission Shift Levers