×
- Hello
- Login or Register
- Quick Links
- Live Chat
- Track Order
- Parts Availability
- RMA
- Help Center
- Contact Us
- Shop for
- BMW Parts
- BMW Accessories
My Garage
My Account
Cart
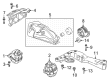
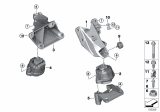
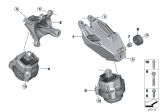
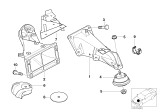
Genuine BMW Z4 Engine Mount
Engine Motor Mount- Select Vehicle by Model
- Select Vehicle by VIN
Select Vehicle by Model
orSeries
Model
Year
Select Vehicle by VIN
For the most accurate results, select vehicle by your VIN (Vehicle Identification Number).
31 Engine Mounts found


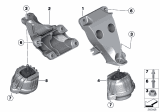
BMW Z4 ENGINE MOUNT, LEFT
Part Number: 22117581617$142.71 MSRP: $195.40You Save: $52.69 (27%)Ships in 1-3 Business Days


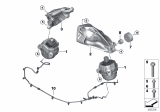
BMW Z4 Engine Mount
Part Number: 22116760330$129.10 MSRP: $176.76You Save: $47.66 (27%)Ships in 1-3 Business Days


BMW Z4 Engine Mount - Right
Part Number: 22116773744$205.35 MSRP: $242.11You Save: $36.76 (16%)Ships in 1-3 Business Days


BMW Z4 ENGINE MOUNT, LEFT
Part Number: 22116860465$142.71 MSRP: $195.40You Save: $52.69 (27%)Ships in 1-3 Business Days


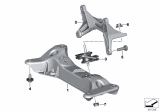
BMW Z4 Right Supporting Bracket
Part Number: 22111094694$37.78 MSRP: $45.62You Save: $7.84 (18%)Ships in 1-2 Business Days


BMW Z4 Engine Mount Bracket Left
Part Number: 22116769321$88.69 MSRP: $108.87You Save: $20.18 (19%)Ships in 1-3 Business Days


BMW Z4 TRANSMISSION BEARING SET
Part Number: 22319897249$142.71 MSRP: $195.40You Save: $52.69 (27%)Ships in 1-3 Business Days
BMW Z4 Engine Mount - Right
Part Number: 22116768852$129.10 MSRP: $176.76You Save: $47.66 (27%)Ships in 1-3 Business Days
BMW Z4 Engine Mount
Part Number: 22116768853$129.10 MSRP: $176.76You Save: $47.66 (27%)Ships in 1-3 Business Days
BMW Z4 ENGINE SUPPORTING BRACKET, R
Part Number: 22116876202$183.98 MSRP: $200.23You Save: $16.25 (9%)Ships in 1-3 Business Days
BMW Z4 ENGINE SUPPORTING BRACKET, R
Part Number: 22116876206$147.16 MSRP: $160.15You Save: $12.99 (9%)Ships in 1-3 Business Days
BMW Z4 Engine Mount Right
Part Number: 22116860466$142.71 MSRP: $195.40You Save: $52.69 (27%)Ships in 1-3 Business Days
BMW Z4 ENGINE SUPPORTING BRACKET, L
Part Number: 22116876205$169.27 MSRP: $184.22You Save: $14.95 (9%)Ships in 1-3 Business Days
BMW Z4 Engine Mount
Part Number: 22116779970$121.29 MSRP: $160.88You Save: $39.59 (25%)Ships in 1-3 Business Days
BMW Z4 Engine Support Bracket Front Left
Part Number: 22116760317$132.43 MSRP: $144.13You Save: $11.70 (9%)Ships in 1-3 Business Days

BMW Z4 Gearbox Supporting Bracket
Part Number: 22316796615$94.56 MSRP: $101.19You Save: $6.63 (7%)Ships in 1-3 Business DaysBMW Z4 Engine Mount - Passenger Side
Part Number: 22116793240$229.50 MSRP: $270.58You Save: $41.08 (16%)Ships in 1-3 Business Days
BMW Z4 Engine Mount Right
Part Number: 22116769322$94.88 MSRP: $116.47You Save: $21.59 (19%)Ships in 1-3 Business Days
BMW Z4 Engine Mount Right
Part Number: 22116772154$180.78 MSRP: $247.52You Save: $66.74 (27%)Ships in 1-3 Business Days


| Page 1 of 2 |Next >
1-20 of 31 Results
BMW Z4 Engine Mount
If you are looking for OEM BMW Z4 Engine Mount, we highly recommend to shop with us. Not only do we offer budget friendly prices, but we also provide fast delivery. In addition, we have a hassle-free return policy on all genuine BMW Z4 Engine Mount that come backed by the manufacturer's warranty.
BMW Z4 Engine Mount Parts Questions & Experts Answers
- Q: How to replace engine mounts and ensure proper installation on BMW Z4?A:Two engine mounts are used, one on either side of the engine. If improved access is required, raise the front of the vehicle and support it securely on jackstands. Check the mount rubber for any cracks, hardening, or separation from the metal; replace the engine mounts if any damage or deterioration is evident. Ensure that all mount bolts and nuts are securely tightened. Using a large screwdriver or a crowbar, check for wear in the mounts by carefully prying against them to assess free play. If this is not possible, enlist the aid of an assistant to move the engine/transmission back-and-forth or side-to-side while observing the mounts. While some free play is expected, excessive wear should be obvious. If excessive free play is found, first check that the fasteners are correctly secured, then replace any worn components as necessary. To support the engine, use a hoist and lifting chain connected to the engine lifting brackets or position a jack and block of wood under the Oil Pan, ensuring the engine is adequately supported before proceeding. Remove the nuts securing the left and right-hand engine mount brackets to the mounts, unbolt the mount brackets from the engine block, and remove the mounts. Disconnect the engine ground straps from the mount. Remove the nuts securing the mounts to the body, then take out the mounts. Installation is the reverse of removal, ensuring that the metal protector plates are in position on the mounts and securely tightening all fasteners.

Related BMW Z4 Parts

Browse by Year
2025 Engine Mount 2024 Engine Mount 2023 Engine Mount 2022 Engine Mount 2021 Engine Mount 2020 Engine Mount 2019 Engine Mount 2016 Engine Mount 2015 Engine Mount 2014 Engine Mount 2013 Engine Mount 2012 Engine Mount 2011 Engine Mount 2010 Engine Mount 2009 Engine Mount 2008 Engine Mount 2007 Engine Mount 2006 Engine Mount 2005 Engine Mount 2004 Engine Mount 2003 Engine Mount