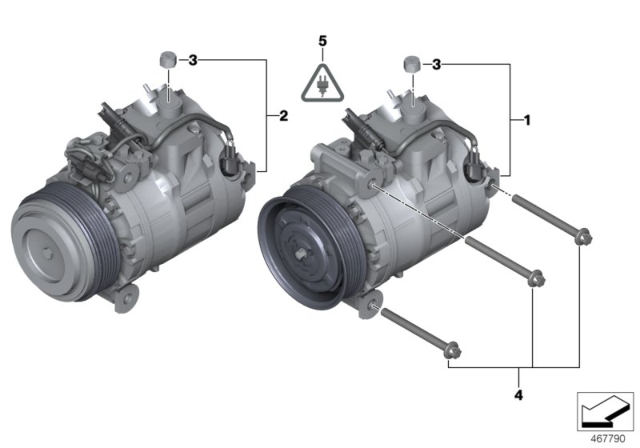
Make sure this part fits your vehicle

BMW 64526918749 Air Conditioning Compressor With Magnetic Coupling

2007-2013 BMW 64-52-6-918-749

BMW 64526918749 Air Conditioning Compressor With Magnetic Coupling
  • Part Description
    Rp Ac Compressor.W.Magnetic Coupling
  • Manufacturer
    BMW
Customer Questions & Answers
$1003.26 MSRP: $1371.32
You Save: $368.06 (27%)
1
ADD TO CART
Ships in 1-3 Business Days
  • Product Specifications

    BrandGenuine BMW
    Manufacturer Part Number64526918749
    Part DescriptionRp Ac Compressor.W.Magnetic Coupling
    Other NamesCompressor
    Item Weight14.50 Pounds
    ConditionNew
    Fitment TypeDirect Replacement
    ManufacturerBMW
    SKU64526918749
    WarrantyThis genuine BMW part is guaranteed by BMW's factory warranty.
    Shipping & ReturnShipping Policy Return Policy
    Warning: California’s Proposition 65
  • Vehicle Fitment

    Year Make Model Submodel
    2011-2013 BMW 328iCoupe N52 Engine(E92)
    2011-2013 BMW 328i xDriveCoupe N52 Engine(E92)
    2007-2010 BMW X33.0si(E83)

Customer Questions & Answers

Q:
Should I get this part or another part for my car? Posted by BMWPartsDeal Specialist
A:
You can Select Your Vehicle to check if 64526918749 fits your vehicle.
Posted by BMWPartsDeal Specialist
Q:
How to remove and install a A/C Accumulator,A/C Compressor,A/C Condenser,A/C Evaporator Core and A/C Expansion Valve? Posted by Customer
A:
Have the air conditioning refrigerant discharged and recovered by a dealer or air conditioning shop. Remove the heater assembly. Peel off the rubber grommet from the lines and remove the screw securing the line clamp. Carefully cut through the foam seal at the top of the heater assembly. Remove the upper heater housing mounting screws and housing. Disconnect the positioning motor electrical connectors and outlet temperature sensor plug as the housing is removed. Lift out the plastic flap, then lift the A/C Evaporator Core from the housing. Recover the plastic cap from the lower edge of the A/C Evaporator Core. Installation is the reverse of removal, but note that the A/C Accumulator should also be replaced. Have the refrigerant recharged by the shop that recovered it and top up the coolant level.Have the air conditioning refrigerant discharged and recovered by a dealer or air conditioning shop. Remove the plastic cap from the center of the cowl trim panel. Two different types of the cap are installed: one with a central slot, removed by rotating it 45 degrees counterclockwise, and one without a central slot, which can be pried out. If the cap or seal is damaged, they must be replaced. Failure to do so may result in water leaks. Remove the bolt in the center of the cowl. Discard the bolt; a new one must be installed. Remove the bolt at each outer end of the supports, then hold the rubber grommet in place and slide the supports out. Do not allow the grommet to fall. Discard the bolts; new ones must be installed.Working at the rear of the engine compartment, remove the bolts and remove the cabin air filter cover. Slide the filter from the housing. Release the catches and remove the left and right-hand plastic covers from behind the strut towers on each side of the engine compartment. Unclip the hose from the left-hand cover. Depress the clips and pull the cable guide forwards from the cabin air filter lower housing. Release the catch and remove the mounting bolt on each side, then slide the cabin air filter lower housing forwards and maneuver it out. Remove the mounting bolts and detach the refrigerant lines from the expansion valve at the firewall. Discard the line seals; new ones must be installed. Remove the mounting bolts and remove the expansion valve. Discard the O-ring seals; new ones must be installed. Installation is the reverse of removal. Have the refrigerant recharged by the shop that recovered it and top off the coolant level. The A/C Accumulator should be replaced when: There is dirt in the air conditioning system. The compressor has been replaced. The condenser or A/C Evaporator Core has been replaced. A leak has emptied the air conditioning system. The air conditioning system has been opened for more than 24 hours. Remove the condenser. Unscrew the cap from the condenser. Remove the snap-ring securing the A/C Accumulator insert. Using an old bolt, pull the insert from the A/C Accumulator. Install the new desiccant sack into the new insert and mount it to the condenser. The remainder of the installation is the reverse of removal. Have the air conditioning refrigerant discharged and recovered by a dealer or air conditioning shop. On 3.0L engines, remove the thermostat. Remove the mounting bolts and disconnect the air conditioning lines from the compressor. Discard the O-ring seals; new ones must be installed during assembly. Seal/plug the openings to prevent contamination. Remove the drive belt, then disconnect the electrical connector from the compressor. Firmly apply the parking brake, then raise the front of the vehicle and support it securely on jackstands. Remove the mounting fasteners and remove the engine splash shield. On 2.0L engines, remove the charge air inlet duct. Working underneath the vehicle, remove the compressor mounting bolts and the compressor. Installation is the reverse of removal, noting the following points: Prior to installing the compressor, it is essential to add the correct amount of refrigerant oil.Always use new seals when reconnecting the refrigerant lines.Replace the A/C Accumulator.Have the refrigerant recharged by the shop that recovered it. Using a blunt, flat-bladed tool, carefully pry the sensor from the center of the instrument panel. Disconnect the electrical connector and secure the harness from falling into the instrument panel with tape. Installation is the reverse of removal. Remove the mounting bolts, then pull the trim panel under the passenger's side of the instrument panel downward and rearward. Disconnect the footwell light electrical connector as the panel is withdrawn. Disconnect the sensor electrical connector, then withdraw the sensor from the heater housing. Installation is the reverse of removal. The pressure sensor is located on the refrigerant line on the left-hand side of the engine compartment. Have the air conditioning refrigerant discharged by a BMW dealer or air conditioning shop. Remove the mounting bolts and move the heat shield to one side. Disconnect the sensor electrical connector and unscrew the sensor. Plug/seal the openings to prevent contamination. Installation is the reverse of removal. Tighten the sensor securely and have the refrigerant recharged by a BMW dealer or air conditioning shop.The condenser is located in front of the radiator. Have the air conditioning refrigerant discharged and recovered by a BMW dealer or air conditioning shop. Remove the upper radiator grille. Release the mounting lugs and tilt the bumper to one side. Remove the mounting screws and withdraw the bumper. Remove the mounting bolts and remove the condenser. Seal/plug the openings to prevent contamination. Installation is the reverse of removal. Tighten the mounting bolts to the specified torque.Have the air conditioning refrigerant discharged and recovered by a BMW dealer or air conditioning shop. Remove the passenger's side air intake duct. Unclip the cable from the front of the fuse/relay module carrier. Release the mounting lugs and maneuver the fuse/relay module carrier from the bracket. Disconnect the electrical connector from the expansion valve and remove the mounting bolts. Discard the O-ring seals; new ones must be installed during assembly. Remove the mounting bolts and remove the A/C Evaporator Core. Installation is the reverse of removal. Tighten the mounting bolts to the specified torque.It's important to note that working with the air conditioning system requires special tools and knowledge. If you are not comfortable or experienced with this type of work, it's recommended to seek help from a professional mechanic or technician.
Posted by BMWPartsDeal Specialist
If you have any questions about this product, please don't hesitate to ask us. We will be happy to help you!

Genuine BMW Part 64526918749, the Right Choice

Your vehicle deserves only genuine OEM BMW parts and accessories. To ensure reliability, purchase BMW part # 64526918749 Air Conditioning Compressor With Magnetic Coupling. It is sometimes referred to as BMW A/C Compressor. Our BMW parts and accessories are expedited directly from authorized BMW dealers strategically located all across the U.S. and are backed by the manufacturer's 12 month, 12,000 mile warranty. OEM BMW parts are the best for restoring your vehicle to factory condition performance. This part fits 2011-2013 BMW 328i, 2011-2013 BMW 328i xDrive, 2007-2010 BMW X3.

Affordable, reliable and built to last, BMW part # 64-52-6-918-749 Air Conditioning Compressor With Magnetic Coupling stands out as the smart option. BMWPartsDeal.com is your prime online source with the biggest and best selection of genuine BMW parts and accessories at giant discounted prices. We have the OEM BMW parts and accessories you need at the wholesale prices. BMWPartsDeal.com has you covered no matter what type of BMW vehicle you drive.

Why choose BMW Parts Deal

  • Dedicated Service

    Your complete satisfaction is our #1 goal

  • Lowest Prices

    Best deals on genuine OE parts from dealerships

  • Fast Delivery

    Orders are processed and delivered promptly