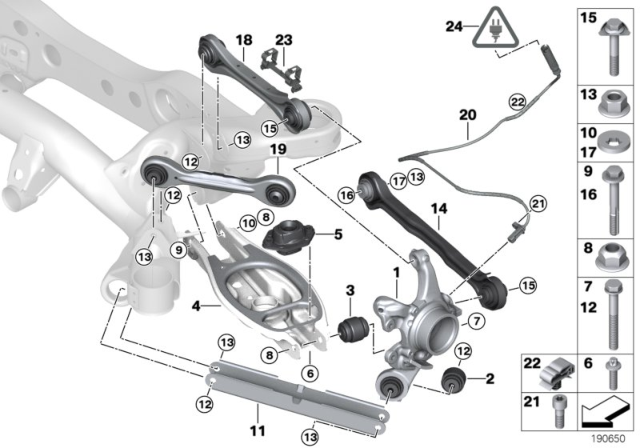
Replace trailing arm bushings in sets and check wheel alignment if the trailing arm is removed. Begin by raising the car and removing the rear wheel, then support the rear wheel bearing carrier with a suitable jack before removing the trailing arm. When working at the wheel bearing carrier, use BMW special tools 33 4 465, 33 4 466, 33 4 475, 33 4 474, and 33 4 472 to remove the bushing from the wheel bearing carrier. Compress the new bushing with tools 33 4 451, 33 4 452, 33 4 454, and 33 4 453, inserting it into tool 33 4 473 with the spray-on point facing upwards. Align the slot at the specified angle with the spray-on points facing the rear of the vehicle when installing the bushing into the wheel bearing carrier. Use the same set of tools to slightly draw the rubber bushing into the wheel bearing carrier, then remove tool 33 4 450 and press the rubber bushing in fully. For the rear subframe, mark the bushing slot alignment and use tools 33 4 472, 33 4 474, 33 4 475, 33 4 466, and 33 4 465 to remove the bushing from the subframe, cleaning the rubber bushing mounting hole afterward. When installing the bushing into the subframe, align the slot at the specified angle with the spray-on points facing the rear of the vehicle, and ensure the rubber mount slot aligns with the mark on the subframe. Use tools 33 4 471, 33 4 474, 33 4 475, 33 4 466, and 33 4 465 to slightly draw the rubber bushing into the subframe, then remove tool 33 4 450 and apply a thin coating of Loctite 638 to the rubber bushing before pressing it in fully. The remainder of the installation follows the reverse of removal, ensuring to use new self-locking nuts and tightening fasteners to final torque only after the vehicle has been lowered and the suspension has settled. Have the car professionally aligned upon completion of the job.