×
- Hello
- Login or Register
- Quick Links
- Live Chat
- Track Order
- Parts Availability
- RMA
- Help Center
- Contact Us
- Shop for
- BMW Parts
- BMW Accessories
My Garage
My Account
Cart
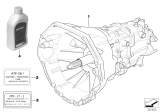
Genuine 2003 BMW X5 Transmission Assembly
Trans Assembly- Select Vehicle by Model
- Select Vehicle by VIN
Select Vehicle by Model
orSeries
Model
Year
Select Vehicle by VIN
For the most accurate results, select vehicle by your VIN (Vehicle Identification Number).
11 Transmission Assemblies found

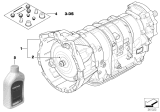
2003 BMW X5 Exchange Automatic Transmission Eh
Part Number: 24007511023$4177.48 MSRP: $5279.32You Save: $1101.84 (21%)Ships in 1-3 Business DaysProduct Specifications- Other Name: Exch. automatic transmission EH
- Item Weight: 217.60 Pounds
- Condition: New
- Fitment Type: Direct Replacement
- SKU: 24007511023
- Warranty: This genuine part is guaranteed by BMW's factory warranty.

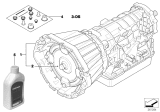
2003 BMW X5 Exchange Automatic Transmission Eh
Part Number: 24001423950$4012.83 MSRP: $5471.71You Save: $1458.88 (27%)Ships in 1-3 Business DaysProduct Specifications- Other Name: Exch. automatic transmission EH; Transmission
- Item Weight: 209.80 Pounds
- Condition: New
- Fitment Type: Direct Replacement
- SKU: 24001423950
- Warranty: This genuine part is guaranteed by BMW's factory warranty.

2003 BMW X5 Exchange Automatic Transmission Eh
Part Number: 24007518604$4258.06 MSRP: $5382.29You Save: $1124.23 (21%)Ships in 1-3 Business DaysProduct Specifications- Other Name: Exch. automatic transmission EH
- Item Weight: 209.80 Pounds
- Condition: New
- Fitment Type: Direct Replacement
- SKU: 24007518604
- Warranty: This genuine part is guaranteed by BMW's factory warranty.

2003 BMW X5 Exchange Automatic Transmission Eh
Part Number: 24001423541$4659.68 MSRP: $5891.69You Save: $1232.01 (21%)Ships in 1-3 Business DaysProduct Specifications- Other Name: Exch. automatic transmission EH
- Item Weight: 217.60 Pounds
- Condition: New
- Fitment Type: Direct Replacement
- SKU: 24001423541
- Warranty: This genuine part is guaranteed by BMW's factory warranty.

2003 BMW X5 Exchange 6 Speed Gearbox
Part Number: 23007563054$3528.57 MSRP: $4418.13You Save: $889.56 (21%)Ships in 1-3 Business DaysProduct Specifications- Other Name: Transmission
- Item Weight: 108.70 Pounds
- Condition: New
- Fitment Type: Direct Replacement
- SKU: 23007563054
- Warranty: This genuine part is guaranteed by BMW's factory warranty.

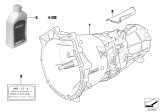
2003 BMW X5 Exchange 5 Speed Gearbox
Part Number: 23001434652$2832.77 MSRP: $3534.50You Save: $701.73 (20%)Ships in 1-3 Business DaysProduct Specifications- Item Weight: 110.80 Pounds
- Condition: New
- Fitment Type: Direct Replacement
- SKU: 23001434652
- Warranty: This genuine part is guaranteed by BMW's factory warranty.

2003 BMW X5 Exchange 6 Speed Gearbox
Part Number: 23001434488$11078.25 MSRP: $13864.80You Save: $2786.55 (21%)Ships in 1-3 Business DaysProduct Specifications- Replaced by: 23007508410
- Item Weight: 113.90 Pounds
- Condition: New
- Fitment Type: Direct Replacement
- SKU: 23001434488
- Warranty: This genuine part is guaranteed by BMW's factory warranty.

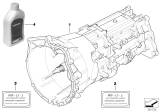
2003 BMW X5 Exchange 6 Speed Gearbox
Part Number: 23007501757$22255.61 MSRP: $27729.58You Save: $5473.97 (20%)Product Specifications- Item Weight: 111.80 Pounds
- Condition: New
- Fitment Type: Direct Replacement
- SKU: 23007501757
- Warranty: This genuine part is guaranteed by BMW's factory warranty.

 Product Specifications
- Replaces: 23-00-1-434-306, 23-00-1-222-793
- Item Weight: 205.80 Pounds
- Condition: New
- Fitment Type: Direct Replacement
- SKU: 23001434485
- Warranty: This genuine part is guaranteed by BMW's factory warranty.
 Product Specifications
- Other Name: Exch. automatic transmission EH; Transmission
- Item Weight: 213.70 Pounds
- Condition: New
- Fitment Type: Direct Replacement
- SKU: 24007525324
- Warranty: This genuine part is guaranteed by BMW's factory warranty.
 Product Specifications
- Other Name: Exch. automatic transmission EH; Transmission
- Item Weight: 215.60 Pounds
- Condition: New
- Fitment Type: Direct Replacement
- SKU: 24007512588
- Warranty: This genuine part is guaranteed by BMW's factory warranty.
2003 BMW X5 Transmission Assembly
Are you in need of a high-quality yet affordable OEM 2003 BMW X5 Transmission Assembly? Look no further. Our website boasts an extensive selection of genuine 2003 BMW X5 Transmission Assembly, all priced competitively. Plus, our top-notch customer service and speedy delivery options ensure a seamless shopping experience for you.
2003 BMW X5 Transmission Assembly Parts Questions & Experts Answers
- Q: What are the steps involved in removing and reinstalling the Transmission Assembly on the 2003 BMW X5?A: Disconnect the negative cable from the battery, ensuring to read the battery disconnection cautions beforehand. At the front of the engine compartment, remove expansion rivets and release the duct at the air box, then take off the air intake hood. Release the expansion rivets at the top of the fan shroud and raise it slightly. At the rear of the engine compartment, rotate the plenum cover plastic retainers a quarter turn to remove the plenum cover and the interior ventilation microfilter housing, followed by the plenum housing bulkhead. Install an engine support brace across the engine bay and raise the engine slightly to relieve the load on the engine mounts, then raise and safely support the vehicle. Remove the splash guard under the engine and the front end reinforcement. Underneath the engine, remove the right engine mount upper nut and the left engine mount lower bolts, then take out the exhaust system and exhaust heat shield. With the selector lever in PARK, hold the linkage stationary and loosen the selector lever cable clamping nut, slide out the cable retaining clip, and detach the cable from the transmission range switch. Remove the front stabilizer bar and the front driveshaft, being prepared to catch any dripping fluid. For the rear driveshaft, remove the center bearing support fasteners, support the center of the driveshaft, detach the rear driveshaft flex-disc from the transfer case, and lower the center of the driveshaft sufficiently to disengage the flex-disc from the transfer case flange, tying the driveshaft to the side. Free the harnesses for the oxygen sensors and automatic transmission electrical connectors from the rear support for the transfer case and transmission, then support the transmission on a jack. Remove the mounting fasteners for the rear support of the transmission and transfer case, then lower the support and remove the transfer case. Remove the right side engine splash guard bracket, and working underneath the front of the transmission, rotate the bayonet lock on the transmission harness connector to detach it and detach the cable from the transmission housing. Lower the transmission slightly, taking care to avoid damage to engine compartment components due to lack of clearance at the rear of the engine. Drain the ATF from the transmission and, where applicable, disconnect the vehicle speed sensor harness connector. Unclip the crankshaft sensor wiring harness from the spring clips on the transmission housing. At the left front of the transmission, remove the ATF cooler line clamp mounting nut from the transmission bellhousing and the ATF cooler line banjo bolt, being prepared to catch any dripping ATF. Plug open ATF lines and fittings, detach the ATF cooler line from the right front of the transmission, and secure both ATF lines to the left side using stiff wire. At the steering rack spindle, matchmark the spindle collar to the rack housing, remove the pinch bolt, and separate the steering shaft from the rack spindle. Raise the engine using the engine support brace, remove the left engine mount, and install a special tool in place of the engine mount. Remove the access plug in the cover plate behind and below the engine oil pan, then use the crankshaft vibration damper center bolt to rotate the engine to access the torque converter mounting bolts. Insert a pry bar through the transmission bellhousing opening to counterhold the flywheel teeth and loosen the torque converter bolts, rotating the engine to repeat on the remaining bolts. Remove the transmission bellhousing bolts and pull the transmission back and down, lowering the jack slowly while ensuring no lines, hoses, or wires become snagged. Avoid allowing the torque converter to fall off the transmission input shaft by using a special tool to hold it in place during removal. Blow out the oil cooler lines with low-pressure compressed air and flush the cooler with clean ATF twice, wearing safety glasses while working with compressed air and not reusing the ATF used for flushing. Inspect the engine drive plate and flywheel for cracks or elongated holes, replacing them if necessary. If the torque converter seal is leaky or the position of the torque converter on the transmission input shaft was disturbed during removal, replace the torque converter seal. Before reinstalling the transmission, check the bellhousing centering dowel sleeves and replace them if damaged. The installation is the reverse of removal, ensuring the torque converter is seated correctly in the transmission during final installation, using a special tool to align the mounting tabs on the torque converter with the indentations on the drive plate and flywheel, installing new sealing washers or O-rings on the ATF cooling line fittings, adjusting the gearshift mechanism, and filling the transmission with clean ATF, taking care to hold the bolts stationary while tightening the nuts to avoid damaging the driveshaft flex-disc rubber.


