×
- Hello
- Login or Register
- Quick Links
- Live Chat
- Track Order
- Parts Availability
- RMA
- Help Center
- Contact Us
- Shop for
- BMW Parts
- BMW Accessories
My Garage
My Account
Cart
Genuine 2006 BMW X5 Fuel Level Sensor
Gas Gauge Sensor- Select Vehicle by Model
- Select Vehicle by VIN
Select Vehicle by Model
orSeries
Model
Year
Select Vehicle by VIN
For the most accurate results, select vehicle by your VIN (Vehicle Identification Number).
1 Fuel Level Sensor found


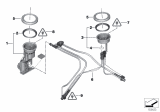
2006 BMW X5 Left Fuel Level Sensor
Part Number: 16116762044$336.42 MSRP: $400.04You Save: $63.62 (16%)Ships in 1-3 Business DaysProduct Specifications- Other Name: Fuel Gauge Sending Unit, Sending Unit
- Position: Driver Side
- Item Weight: 1.10 Pounds
- Condition: New
- Fitment Type: Direct Replacement
- SKU: 16116762044
- Warranty: This genuine part is guaranteed by BMW's factory warranty.
2006 BMW X5 Fuel Level Sensor
Are you in need of a high-quality yet affordable OEM 2006 BMW X5 Fuel Level Sensor? Look no further. Our website boasts an extensive selection of genuine 2006 BMW X5 Fuel Level Sensor, all priced competitively. Plus, our top-notch customer service and speedy delivery options ensure a seamless shopping experience for you.
2006 BMW X5 Fuel Level Sensor Parts Questions & Experts Answers
- Q: How to access the fuel level sensor and fuel pump located on the 2006 BMW X5?A: Right side fuel pump Fuel Level Sensor is shown, and accessing the left side Fuel Level Sensor is similar. Begin by lifting the front edge of the rear seat cushion up and forward. Next, remove the fastener for the center seatbelt and feed the end of the seatbelt through the opening in the rear seat cushion. Release the electrical connector for the heated seat if it is equipped, and then remove the rear seat cushion. After that, take out the sound-absorbing foam and rubber grommet. Peel back the insulation to expose the fuel pump access cover, then remove the fasteners and fold back the access cover. The installation process is the reverse of removal, ensuring to reconnect the seat belt and heated seat harness if equipped.