×
- Hello
- Login or Register
- Quick Links
- Live Chat
- Track Order
- Parts Availability
- RMA
- Help Center
- Contact Us
- Shop for
- BMW Parts
- BMW Accessories
My Garage
My Account
Cart
Genuine 2006 BMW X5 Timing Chain
Engine Timing Chain- Select Vehicle by Model
- Select Vehicle by VIN
Select Vehicle by Model
orSeries
Model
Year
Select Vehicle by VIN
For the most accurate results, select vehicle by your VIN (Vehicle Identification Number).
5 Timing Chains found


2006 BMW X5 Upper Engine Timing Chain
Part Number: 11311432177$37.97 MSRP: $57.72You Save: $19.75 (35%)Ships in 1-3 Business DaysProduct Specifications- Other Name: Timing Chain; Camshaft Chain
- Position: Upper
- Replaces: 11-31-1-730-188
- Item Weight: 1.40 Pounds
- Item Dimensions: 9.2 x 6.2 x 2.0 inches
- Condition: New
- Fitment Type: Direct Replacement
- SKU: 11311432177
- Warranty: This genuine part is guaranteed by BMW's factory warranty.


2006 BMW X5 Engine Timing Chain
Part Number: 11311432176$65.16 MSRP: $99.07You Save: $33.91 (35%)Ships in 1-3 Business DaysProduct Specifications- Other Name: Timing Chain; Secondary Chain
- Replaces: 11-31-1-730-189
- Item Weight: 1.40 Pounds
- Item Dimensions: 9.4 x 6.1 x 2.0 inches
- Condition: New
- Fitment Type: Direct Replacement
- SKU: 11311432176
- Warranty: This genuine part is guaranteed by BMW's factory warranty.


2006 BMW X5 Chain
Part Number: 11417576915$29.28 MSRP: $30.82You Save: $1.54 (5%)Ships in 1-3 Business DaysProduct Specifications- Item Weight: 1.40 Pounds
- Condition: New
- Fitment Type: Direct Replacement
- SKU: 11417576915
- Warranty: This genuine part is guaranteed by BMW's factory warranty.


2006 BMW X5 Engine Timing Chain
Part Number: 11317504468$83.32 MSRP: $128.80You Save: $45.48 (36%)Ships in 1-3 Business DaysProduct Specifications- Other Name: Timing Chain
- Item Weight: 1.40 Pounds
- Condition: New
- Fitment Type: Direct Replacement
- SKU: 11317504468
- Warranty: This genuine part is guaranteed by BMW's factory warranty.

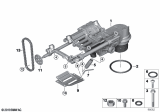
2006 BMW X5 Oil Pump Chain
Part Number: 11417527113$51.78 MSRP: $78.72You Save: $26.94 (35%)Ships in 1-3 Business DaysProduct Specifications- Other Name: Chain
- Replaced by: 11418482270
- Item Weight: 1.40 Pounds
- Condition: New
- Fitment Type: Direct Replacement
- SKU: 11417527113
- Warranty: This genuine part is guaranteed by BMW's factory warranty.
2006 BMW X5 Timing Chain
Are you in need of a high-quality yet affordable OEM 2006 BMW X5 Timing Chain? Look no further. Our website boasts an extensive selection of genuine 2006 BMW X5 Timing Chain, all priced competitively. Plus, our top-notch customer service and speedy delivery options ensure a seamless shopping experience for you.
2006 BMW X5 Timing Chain Parts Questions & Experts Answers
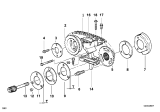
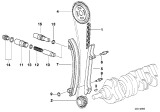
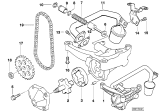
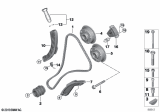
- Q: How to install the Timing Chain on 2006 BMW X5?A: Ensure camshafts are locked in TDC position using BMW special tool set 11 3 240, then inspect timing chain sprockets, guide rail, and tensioner rail for damage, replacing any worn or damaged parts. If sprockets are replaced due to wear, also replace the chain. Install the primary timing chain to the crankshaft sprocket and hang the upper end from the exhaust camshaft. If necessary, replace the crankshaft front seal in the timing chain cover. To install the lower timing chain cover, clean the sealing surfaces, use new gaskets and a coolant pipe O-ring, remove dowel pins from the engine block, drive dowels into the cover until they slightly protrude, apply a small bead of silicon sealer to the corners where the timing cover meets the cylinder head and engine block, tap the cover into position, install all bolts hand tight, including two Torx bolts from above, install the secondary chain lower guide, and tighten cover mounting bolts alternately and in stages. Install the oil pan with a new gasket, reinstall the crankshaft vibration damper using the specified tools, and have a second person hold the special tool while tightening the vibration damper mounting bolt. Remove the crankshaft locking tool, fit the top sprocket to the primary timing chain, and install it on the exhaust camshaft so that the pointer on the sprocket aligns with the cylinder head sealing surface. Position the sprocket so that chain slack is on the tensioner rail side, insert the special tool in the cylinder head, and screw in the adjustment screw until it contacts the tensioning rail and removes chain slack. Ensure the arrow on the upper primary sprocket lines up with the upper edge of the cylinder head, repositioning if necessary. Install and tighten down threaded locating studs in the end of the exhaust camshaft, then install the secondary chain tensioner on the cylinder head while keeping it compressed. Fit the exhaust camshaft splined sleeve, aligning the gap in the sleeve splines with the corresponding gap on the camshaft splines, and slide the splined shaft onto the exhaust camshaft, ensuring the locating tooth fits into the spline gaps. Push the splined shaft in further to rotate the splined sleeve until the threaded holes in the primary chain sprocket are centered in the splined sleeve slots. Place the intake and exhaust sprockets in the special tool, position the spline gap on the intake sprocket, and place the secondary chain on the sprockets. Remove the chain and sprockets from the tool and slide them onto the camshafts, confirming that the gap in the intake sprocket splines aligns with the corresponding gap in the camshaft splines. Align the locating tooth of the splined shaft with the gaps on the camshaft and sprocket, sliding the splined shaft onto the intake camshaft until approximately 1 mm of splines are visible. Install the intake camshaft spring plate so that the FRONT mark is visible, and install mounting nuts finger tight. Insert sprocket mounting bolts on the exhaust side camshaft assembly, initially tightening to approximately 5 Nm and then backing off by half a turn. Fit the thrust spacer on the exhaust camshaft, install the spring plate ensuring the F mark is visible, and if it is not, install the spring plate with the convex side facing forward. Install the exhaust camshaft impulse wheel, aligning the pointer with the top edge of the cylinder head, and install mounting nuts finger tight. Pull out the exhaust camshaft splined shaft to stop, press down on the secondary chain tensioner, and remove the tensioner lock-down tool. Preload the primary chain by tightening the adjusting screw to the specified torque, preload the exhaust camshaft spring plate by pressing on the impulse wheel while tightening the mounting nuts finger tight, and install the VANOS setup bracket to the front of the cylinder head timing case, tightening down uniformly until in full contact with the cylinder head. Ensure gasket material is removed from the face of the cylinder head, clean the sealing face, and keep it free of oil. Secure the camshaft sprockets and impulse wheels by tightening the mounting screws on the exhaust camshaft impulse wheel and the mounting nuts on the exhaust and intake sprocket assemblies to approximately 5 Nm, then torque down to final specifications. Remove the crankshaft locking tool, turn the engine over twice in the direction of rotation until cylinder 1 intake and exhaust camshaft lobes face each other, and secure the crankshaft in TDC position with the special tool. Measure clearances with the special tool over the camshafts, noting that the intake side may be up to 1 mm above the surface of the cylinder head when the camshaft timing is set correctly. Reassemble the engine or reset camshaft timing if necessary. Remove the setup bracket from the front of the cylinder head, reinstall the VANOS unit, install the intake camshaft oil baffle, and install the cylinder head cover, checking for correct seating of half-moon seals and using sealant at corners of half-moon cutouts. Secure all coolant hoses, thermostat housing, and engine coolant drains, install a new engine oil filter and oil, refill and bleed the cooling system, and use a scan tool to check VANOS operation with the engine idling.
