×
- Hello
- Login or Register
- Quick Links
- Live Chat
- Track Order
- Parts Availability
- RMA
- Help Center
- Contact Us
- Shop for
- BMW Parts
- BMW Accessories
My Garage
My Account
Cart
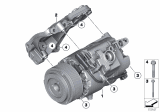
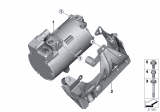
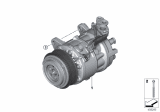
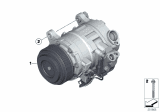
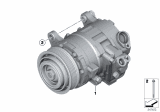
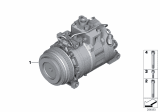
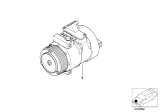
Genuine BMW A/C Compressor
Air Conditioning Compressor- Select Vehicle by Model
- Select Vehicle by VIN
Select Vehicle by Model
orSeries
Model
Year
Select Vehicle by VIN
For the most accurate results, select vehicle by your VIN (Vehicle Identification Number).
169 A/C Compressors found


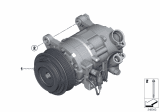
BMW Air Conditioning Compressor With Magnetic Coupling
Part Number: 64529330825$1057.58 MSRP: $1473.03You Save: $415.45 (29%)Ships in 1-3 Business DaysProduct Specifications- Other Name: Rp Ac Compressor.W.Magnetic Coupling; Compressor

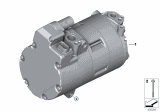
BMW ELECTRIC A/C COMPRESSOR
Part Number: 64529496106$1657.98 MSRP: $2309.29You Save: $651.31 (29%)Ships in 1-3 Business DaysProduct Specifications- Other Name: Compressor
- Replaces: 64-52-9-364-872, 64-52-9-364-867, 64-52-6-998-210

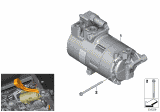
BMW ELECTRIC A/C COMPRESSOR
Part Number: 64529496107$1579.03 MSRP: $2199.32You Save: $620.29 (29%)Ships in 1-3 Business DaysProduct Specifications- Other Name: Compressor
- Replaces: 64-52-9-343-806, 64-52-6-830-620, 64-52-9-364-868, 64-52-9-347-662, 64-52-9-320-855

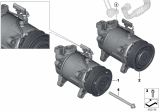
BMW Air Conditioning Compressor With Magnetic Coupling
Part Number: 64526994082$1335.43 MSRP: $1860.03You Save: $524.60 (29%)Ships in 1-3 Business DaysProduct Specifications- Other Name: Rp Ac Compressor.W.Magnetic Coupling; Compressor

BMW Air Conditioning Compressor With Magnetic Coupling
Part Number: 64529399060$1057.58 MSRP: $1473.03You Save: $415.45 (29%)Ships in 1-3 Business DaysProduct Specifications- Other Name: Rp Ac Compressor.W.Magnetic Coupling; Compressor
- Replaces: 64-52-9-217-868

BMW ELECTRIC A/C COMPRESSOR
Part Number: 64529496112$1657.98 MSRP: $2309.29You Save: $651.31 (29%)Ships in 1-3 Business DaysProduct Specifications- Other Name: Compressor

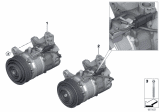
BMW Air Conditioning Compressor With Magnetic Coupling
Part Number: 64529299328$1106.06 MSRP: $1540.56You Save: $434.50 (29%)Ships in 1-3 Business DaysProduct Specifications- Other Name: Rp Ac Compressor.W.Magnetic Coupling; Compressor

BMW ELECTRIC A/C COMPRESSOR
Part Number: 64529496108$1579.03 MSRP: $2199.32You Save: $620.29 (29%)Ships in 1-3 Business DaysProduct Specifications- Other Name: Compressor
- Replaces: 64-52-9-343-808, 64-52-6-998-208, 64-52-9-364-870, 64-52-6-830-621, 64-52-9-332-199

BMW RP A/C COMPRESSOR WITH MAGNE
Part Number: 64529890655$1335.43 MSRP: $1860.03You Save: $524.60 (29%)Ships in 1-3 Business DaysProduct Specifications- Other Name: Compressor
- Replaces: 64-52-6-995-918

BMW AIR COND.COMPRESSOR W/ MAGNE
Part Number: 64527948809$1335.43 MSRP: $1860.03You Save: $524.60 (29%)Ships in 1-3 Business DaysProduct Specifications- Other Name: Compressor
BMW Electric Air Conditioning Compressor
Part Number: 64526998208$1579.03 MSRP: $2199.32You Save: $620.29 (29%)Ships in 1-3 Business DaysProduct Specifications- Other Name: Electric A/C Compressor
- Replaced by: 64529496108

BMW Air Conditioning Compressor With Magnetic Coupling
Part Number: 64529399059$1057.58 MSRP: $1473.03You Save: $415.45 (29%)Ships in 1-3 Business DaysProduct Specifications- Other Name: Rp Ac Compressor.W.Magnetic Coupling; Compressor

BMW A/C COMPRESSOR W/O MAGNETIC
Part Number: 64529482996$1228.13 MSRP: $1710.58You Save: $482.45 (29%)Ships in 1-3 Business DaysProduct Specifications- Other Name: Compressor

BMW Air Conditioning Compressor Without Magnetic Coupling
Part Number: 64506805025$969.12 MSRP: $1349.82You Save: $380.70 (29%)Ships in 1-3 Business DaysProduct Specifications- Other Name: Rp Air Con.Compres.Without Magnetic Coupling; Compressor
- Replaces: 64-52-9-396-722, 64-52-9-216-467


BMW Air Conditioning Compressor Without Magnetic Coupling
Part Number: 64529185144$969.12 MSRP: $1349.82You Save: $380.70 (29%)Ships in 1-3 Business DaysProduct Specifications- Other Name: Rp Air Con.Compres.Without Magnetic Coupling; Compressor
- Replaces: 64-50-9-121-760
BMW Air Conditioning Compressor With Magnetic Coupling
Part Number: 64529217868$1057.58 MSRP: $1473.03You Save: $415.45 (29%)Ships in 1-3 Business DaysProduct Specifications- Other Name: Rp Ac Compressor.W.Magnetic Coupling
- Replaced by: 64529399060

BMW Air Conditioning Compressor With Magnetic Coupling
Part Number: 64509154072$1057.58 MSRP: $1473.03You Save: $415.45 (29%)Ships in 1-3 Business DaysProduct Specifications- Other Name: Rp Ac Compressor.W.Magnetic Coupling; Compressor

BMW Air Conditioning Compressor
Part Number: 64526918000$1198.83 MSRP: $1669.77You Save: $470.94 (29%)Ships in 1-3 Business DaysProduct Specifications- Other Name: Rp Air Conditioning Compressor; Compressor


BMW AIR COND.COMPRESSOR W/ MAGNE
Part Number: 64525A5C710$1335.43 MSRP: $1860.03You Save: $524.60 (29%)Product Specifications- Other Name: Compressor
- Replaces: 64-52-5-A21-D11, 64-52-6-842-618, 64-52-5-A43-FB3
BMW Electric Air Conditioning Compressor
Part Number: 64529332199$1579.03 MSRP: $2199.32You Save: $620.29 (29%)Ships in 1-3 Business DaysProduct Specifications- Other Name: Electric A/C Compressor
- Replaced by: 64529496108
| Page 1 of 9 |Next >
1-20 of 169 Results
BMW A/C Compressor
Keeping the smooth operation of a BMW vehicle relies on the condition of the A/C Compressor. A broken BMW A/C Compressor can lead to big performance issues and even a complete vehicle breakdown. To prevent such problems, you could regularly maintain your car and replace your parts. At BMWPartsDeal, we offer high-quality BMW A/C Compressor, all designed to keep your vehicle running at its best. Choose BMWPartsDeal for your auto parts needs, you will get your vehicle back to great performance, and save a lot by avoiding costly future repair jobs.
BMW A/C Compressor Parts Questions & Experts Answers
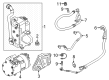
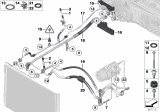
- Q: How to properly disconnect and replace the A/C Compressor on the BMW X5?A:Following manufacturer's instructions, connect an approved refrigerant recovery, recycling, or recharging unit to the NC system and discharge the system. Raise the car and support it safely, then remove the splash shield from under the engine. Mark the A/C drive belt with the direction of rotation and remove it. Working above the right front of the engine compartment, squeeze the plastic junction at the secondary air valve to separate the air intake hose and tie it to the side to gain access to the NC compressor. Disconnect the electrical harness connector from the NC compressor and remove the refrigerant line flange bolts from the compressor. Immediately plug the lines and ports to prevent contamination, then support the compressor while removing the mounting bolts and take out the compressor. Depending on the model, the compressor may be mounted with three or four bolts, and installation is the reverse of removal. Replace sealing O-rings when reconnecting refrigerant lines, and if installing a new compressor or if the compressor is off the vehicle for more than 24 hours, replace the receiver-drier unit. Install and tension the A/C drive belt, noting the previously made direction mark, and recharge the A/C system following the equipment manufacturer's instructions, checking the refrigerant capacity. When starting a new compressor for the first time, switch the A/C system ON, set air vents to OPEN, start the engine and allow it to idle, set blower output to 75% of maximum, and run the A/C for at least two minutes at idle speed (under 1500 rpm).

Related BMW Parts
 BMW Blower Motor
 BMW A/C Idler Pulley
 BMW Blower Motor Resistor
 BMW A/C Clutch
 BMW A/C Expansion Valve
 BMW A/C Condenser Fan
 BMW A/C Switch
Browse by Model
128i A/C Compressor 135i A/C Compressor 228i A/C Compressor 318i A/C Compressor 318is A/C Compressor 318ti A/C Compressor 320i A/C Compressor 323Ci A/C Compressor 323i A/C Compressor 325Ci A/C Compressor 325e A/C Compressor 325i A/C Compressor 325is A/C Compressor 325ix A/C Compressor 325xi A/C Compressor 328Ci A/C Compressor 328i A/C Compressor 328i xDrive A/C Compressor 328is A/C Compressor 328xi A/C Compressor 330Ci A/C Compressor 330e A/C Compressor 330i A/C Compressor 330xi A/C Compressor 335d A/C Compressor 335i A/C Compressor 335xi A/C Compressor 340i A/C Compressor 428i A/C Compressor 430i A/C Compressor 435i A/C Compressor 440i A/C Compressor 524td A/C Compressor 525i A/C Compressor 528e A/C Compressor 528i A/C Compressor 530i A/C Compressor 533i A/C Compressor 535d A/C Compressor 535i A/C Compressor 535i xDrive A/C Compressor 540i A/C Compressor 545i A/C Compressor 550i A/C Compressor 633CSi A/C Compressor 635CSi A/C Compressor 640i A/C Compressor 645Ci A/C Compressor 650i A/C Compressor 733i A/C Compressor 735i A/C Compressor 735iL A/C Compressor 740i A/C Compressor 740iL A/C Compressor 745Li A/C Compressor 745i A/C Compressor 750Li A/C Compressor 750i A/C Compressor 750iL A/C Compressor 840Ci A/C Compressor 850CSi A/C Compressor 850Ci A/C Compressor Alpina B7 A/C Compressor Bavaria A/C Compressor M2 A/C Compressor M235i A/C Compressor M240i A/C Compressor M3 A/C Compressor M340i A/C Compressor M4 A/C Compressor M440i A/C Compressor M5 A/C Compressor M6 A/C Compressor M8 A/C Compressor X1 A/C Compressor X2 A/C Compressor X3 A/C Compressor X4 A/C Compressor X5 A/C Compressor X5 M A/C Compressor X6 A/C Compressor X7 A/C Compressor XM A/C Compressor Z3 A/C Compressor Z3 M A/C Compressor Z4 A/C Compressor Z8 A/C Compressor i3 A/C Compressor i4 A/C Compressor i5 A/C Compressor i8 A/C Compressor iX A/C Compressor
View More