×
- Hello
- Login or Register
- Quick Links
- Live Chat
- Track Order
- Parts Availability
- RMA
- Help Center
- Contact Us
- Shop for
- BMW Parts
- BMW Accessories
My Garage
My Account
Cart
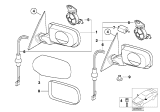
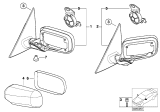
Genuine BMW 328i Side View Mirrors
Outside Rear View Mirror- Select Vehicle by Model
- Select Vehicle by VIN
Select Vehicle by Model
orSeries
Model
Year
Select Vehicle by VIN
For the most accurate results, select vehicle by your VIN (Vehicle Identification Number).
195 Side View Mirrors found


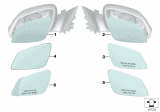
BMW 328i Mirror Glass Heated Convex Right
Part Number: 51167441036$144.71 MSRP: $208.20You Save: $63.49 (31%)Ships in 1-3 Business Days


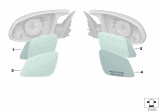
BMW 328i Mirror Glass Heated Convex Right
Part Number: 51167285004$113.20 MSRP: $160.15You Save: $46.95 (30%)Ships in 1-3 Business Days


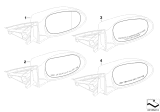
BMW 328i Mirror Glass Heated Convex Right
Part Number: 51167285010$347.63 MSRP: $504.46You Save: $156.83 (32%)Ships in 1-3 Business Days

BMW 328i Mirror Glass Heated Plane Left
Part Number: 51167390617$101.03 MSRP: $142.93You Save: $41.90 (30%)Ships in 1-2 Business Days


BMW 328i Mirror Glass Heated Plane Left
Part Number: 51167285009$295.49 MSRP: $428.80You Save: $133.31 (32%)Ships in 1-3 Business Days


BMW 328i Mirror Glass Heated Convex Right
Part Number: 51168059570$133.56 MSRP: $192.17You Save: $58.61 (31%)Ships in 1-2 Business Days


BMW 328i Mirror Glass Heated Convex Right
Part Number: 51167230980$337.20 MSRP: $489.32You Save: $152.12 (32%)Ships in 1-3 Business Days


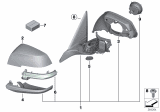
BMW 328i Left Heated Outside Mirror
Part Number: 51167345677$660.77 MSRP: $864.56You Save: $203.79 (24%)Ships in 1-2 Business DaysBMW 328i Mirror Glass Heated Plane Left
Part Number: 51167285003$96.22 MSRP: $136.14You Save: $39.92 (30%)Ships in 1-3 Business Days
BMW 328i Right Heated Outside Mirror
Part Number: 51167345662$540.09 MSRP: $706.67You Save: $166.58 (24%)Ships in 1-3 Business Days
BMW 328i Left Heated Outside Mirror
Part Number: 51168245129$205.05 MSRP: $235.23You Save: $30.18 (13%)Ships in 1-3 Business Days
BMW 328i Left Outside Mirror Heated With Memory
Part Number: 51167003437$226.28 MSRP: $259.58You Save: $33.30 (13%)Ships in 1-3 Business Days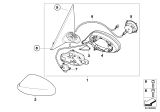
BMW 328i Right Heated Outside Mirror
Part Number: 51168046438$540.84 MSRP: $707.65You Save: $166.81 (24%)Ships in 1-3 Business Days
BMW 328i Right Heated Outside Mirror
Part Number: 51167459084$603.61 MSRP: $789.77You Save: $186.16 (24%)Ships in 1-3 Business DaysBMW 328i Left Heated Outside Mirror
Part Number: 51167345673$603.61 MSRP: $789.77You Save: $186.16 (24%)Ships in 1-3 Business DaysBMW 328i Right Heated Outside Mirror
Part Number: 51167245184$795.28 MSRP: $1040.56You Save: $245.28 (24%)Ships in 1-3 Business DaysBMW 328i Left Heated Outside Mirror
Part Number: 51167245151$635.06 MSRP: $830.92You Save: $195.86 (24%)Ships in 1-3 Business DaysBMW 328i Right Heated Outside Mirror
Part Number: 51167345678$660.77 MSRP: $864.56You Save: $203.79 (24%)Ships in 1-3 Business DaysBMW 328i Right Heated Outside Mirror
Part Number: 51167345654$352.60 MSRP: $457.39You Save: $104.79 (23%)Ships in 1-3 Business DaysBMW 328i Memory Bus Heated Outside Mirror Left
Part Number: 51167153075$549.34 MSRP: $641.07You Save: $91.73 (15%)Ships in 1-3 Business Days
| Page 1 of 10 |Next >
1-20 of 195 Results
BMW 328i Side View Mirrors
If you are looking for OEM BMW 328i Side View Mirrors, we highly recommend to shop with us. Not only do we offer budget friendly prices, but we also provide fast delivery. In addition, we have a hassle-free return policy on all genuine BMW 328i Side View Mirrors that come backed by the manufacturer's warranty.
BMW 328i Side View Mirrors Parts Questions & Experts Answers
- Q: How to remove and install the Mirror Cover and Side View Mirrors on the BMW 328i?A:Begin by removing the door inner trim panel to take out the exterior mirror assembly. Take off the plastic trim carefully from the front of the door frame. To remove the mirror from the door, unplug the mirror electrical connector and remove Torx bolts that hold it in place. Get rid of a rubber seal between a mirror and a door. Tilt that outer side of this mirror towards its center, then insert a wide plastic or wooden wedge between that outer edge and housing of this mirror glass. Gently separate glass from motor and take away from your mirror. Whenever necessary, disconnect wiring connectors for heating elements on mirrors. After you remove such glass, then do proceed with what you did with this one glass as well as eliminate one bolt holding it in place. Remove its engine by dragging it outside of housing attached to your window together with disconnection of electric connectors to it is external surface only when all clips are accessible upon removal of such glasses while mounting clips were detached safely after taking off glasses too before pulling out any cover shielding casing's rear part thereby preventing any debris from entering inside via ventilation passage that could interfere negatively with adjusting mechanisms available within an instrument cluster right behind where speedometer cables pass through before securing flexible covering screws into respective holes required thereon closer towards you but still far enough apart not touching each other ; depending which type has once been used (either screw type or plug type), use appropriate tooling like ratchet wrenches fitted either onto socketed spanners equal sizes providing good grip over heads during removal process due their geometry difference thus avoid rounding ends due excessive tightening; be sure wear safety goggles protective clothing since need pull away firmly grasp reversely rotate body slightly applying sufficient force rotating using arm joint until reaches maximum allowed limit therefore expose actual hinges access these interference points positioned above headlights Once securely installed they should stay secure so make sure tighten fasteners properly before replacing covers connecting terminal(s).

Browse by Year
2016 Side View Mirrors 2015 Side View Mirrors 2014 Side View Mirrors 2013 Side View Mirrors 2012 Side View Mirrors 2011 Side View Mirrors 2010 Side View Mirrors 2009 Side View Mirrors 2008 Side View Mirrors 2007 Side View Mirrors 2000 Side View Mirrors 1999 Side View Mirrors 1998 Side View Mirrors 1997 Side View Mirrors 1996 Side View Mirrors