×
- Hello
- Login or Register
- Quick Links
- Live Chat
- Track Order
- Parts Availability
- RMA
- Help Center
- Contact Us
- Shop for
- BMW Parts
- BMW Accessories
My Garage
My Account
Cart
Genuine BMW 330i Exhaust Manifold
Engine Exhaust Manifold- Select Vehicle by Model
- Select Vehicle by VIN
Select Vehicle by Model
orSeries
Model
Year
Select Vehicle by VIN
For the most accurate results, select vehicle by your VIN (Vehicle Identification Number).
8 Exhaust Manifolds found


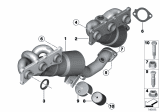
BMW 330i Exchange Exhaust Manifold With Catalyst
Part Number: 18407545309$1292.07 MSRP: $1632.21You Save: $340.14 (21%)Ships in 1-3 Business Days
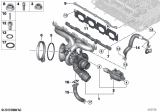
BMW 330i Exchange Exhaust Turbocharger With Exhaust Manifold
Part Number: 11658631891$2762.86 MSRP: $3598.77You Save: $835.91 (24%)Ships in 1-3 Business Days
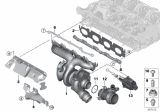
BMW 330i EXCHANGE TURBOCHARGER WITH E
Part Number: 11658662073$2750.47 MSRP: $3598.77You Save: $848.30 (24%)Ships in 1-3 Business Days
BMW 330i Exhaust Turbocharger W.Exhaust Manifold
Part Number: 11657637563$2762.86 MSRP: $3598.77You Save: $835.91 (24%)Ships in 1-3 Business Days
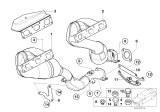
BMW 330i Exchange Exhaust Manifold With Catalyst
Part Number: 18407514502$2988.89 MSRP: $3972.75You Save: $983.86 (25%)Ships in 1-3 Business Days
BMW 330i Exchange Exhaust Manifold With Catalyst
Part Number: 18407514503$2988.89 MSRP: $3972.75You Save: $983.86 (25%)Ships in 1-3 Business Days

BMW 330i Exhaust Manifold
The BMW 330i Exhaust Manifold is one of the many parts that improve the model's performance and functionality. An important component in controlling intake reversion, the Exhaust Manifold is particularly significant in terms of helping disperse hot exhaust gases away from the engine so that efficiency is not threatened. Originally suited for the BMW 330i models, this Exhaust Manifold increases the air-to-fuel mixing for performance and safety. Exhaust Manifold is one of the vital components of the engine; incorrect ratio in a damaged Exhaust Manifold will lead to health hazards due to exhaust leakage. Specifically, the turbocharged 2.0L engine of the BMW 330i with its power of 255 hp needs a high-quality Exhaust Manifold that provides low resistance for the flow of exhaust gases and high velocity of gases. This not only raises the efficiency of the power output, but also leads to enhance the smoothness of the car driving. Diesel particulate filter of the BMW 330i has longer life span of the Exhaust Manifold and variation of the design that meets the need of different drivers in the market. The outstanding performance and reliability that is intrinsic in the BMW 330i can be evidenced by the nicely done Exhaust Manifold which is central to the vehicle. Sporty character and luxurious features define the BMW 330i and maintain the tradition of the 3 series family, thus, the role of the Exhaust Manifold in the car's performance cannot be underestimated.
If you are looking for OEM BMW 330i Exhaust Manifold, we highly recommend to shop with us. Not only do we offer budget friendly prices, but we also provide fast delivery. In addition, we have a hassle-free return policy on all genuine BMW 330i Exhaust Manifold that come backed by the manufacturer's warranty.
BMW 330i Exhaust Manifold Parts Questions & Experts Answers
- Q: How to remove the upper intake manifold and the lower exhaust manifold on a BMW 330i?A:To remove the intake manifold on a 2.0L engine, start by disconnecting the negative battery cable. Then, remove the engine cover, strut tower crossbrace, and sound insulator. Disconnect the wiring harness clips and move the harness out of the way. Remove the PCM control unit, release the quick-connectors for the fuel tank vent valve, and disconnect the electrical connectors to the fuel tank vent valve and throttle valve. Remove the charge air cooler hose and the intake plenum mounting nuts. Install the new intake plenum gaskets and tighten the nuts in stages. For a 3.0L engine, remove the Fuel Injectors and air filter housing. Disconnect the wiring plugs from the Throttle Body/manifold and release the wiring harness/cables from the retaining clips/bolts. Disconnect the breather hose from the manifold and remove the manifold retaining bolts. Lift the manifold and disconnect the hose on the base of the tank venting valve. Disconnect any hoses or wiring harnesses from the retaining clips on the manifold and support bracket. Remove the manifold from the cylinder head and check the condition of the seals. Replace them if necessary. To remove the exhaust manifolds on a 3.0L engine, raise the front of the vehicle and remove the engine splash shield. Remove the nuts securing the manifold outlets to the exhaust system and disconnect the electrical connectors for the oxygen sensors. Remove the cover over the ignition coils and the coolant expansion tank. Remove the rear and front exhaust manifolds, taking care not to damage the oxygen sensors. Discard the gaskets. When installing the exhaust manifolds, apply anti-seize high-temperature grease to the manifold studs and always replace the gaskets. Tighten the manifold nuts to the specified torque.

Related BMW 330i Parts
 BMW 330i Emblem
 BMW 330i Seat Belt
 BMW 330i Headlight
 BMW 330i Oxygen Sensor
 BMW 330i Door Handle
 BMW 330i Door Lock
 BMW 330i Window Regulator
 BMW 330i Catalytic Converter
 BMW 330i EGR Valve
 BMW 330i Window Motor
 BMW 330i Hood Latch
 BMW 330i Exhaust Pipe
Browse by Year
2025 Exhaust Manifold 2024 Exhaust Manifold 2023 Exhaust Manifold 2022 Exhaust Manifold 2021 Exhaust Manifold 2020 Exhaust Manifold 2019 Exhaust Manifold 2018 Exhaust Manifold 2017 Exhaust Manifold 2006 Exhaust Manifold 2005 Exhaust Manifold 2004 Exhaust Manifold 2003 Exhaust Manifold 2002 Exhaust Manifold 2001 Exhaust Manifold