×
- Hello
- Login or Register
- Quick Links
- Live Chat
- Track Order
- Parts Availability
- RMA
- Help Center
- Contact Us
- Shop for
- BMW Parts
- BMW Accessories
My Garage
My Account
Cart
Genuine BMW 330i Shock Absorber
Suspension Shock Absorber- Select Vehicle by Model
- Select Vehicle by VIN
Select Vehicle by Model
orSeries
Model
Year
Select Vehicle by VIN
For the most accurate results, select vehicle by your VIN (Vehicle Identification Number).
47 Shock Absorbers found


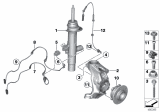
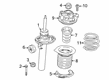
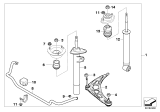
BMW 330i Left Front Spring Strut
Part Number: 37116874517$662.38 MSRP: $1021.43You Save: $359.05 (36%)Ships in 1-3 Business Days


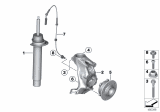
BMW 330i Front Right Suspension Strut
Part Number: 37116874518$662.38 MSRP: $1021.43You Save: $359.05 (36%)Ships in 1-3 Business Days


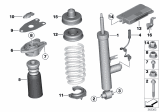
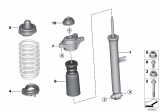
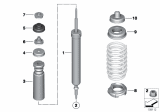
BMW 330i Rear Shock Absorber
Part Number: 37126874513$409.62 MSRP: $649.44You Save: $239.82 (37%)Ships in 1-3 Business Days

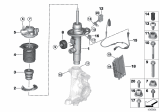
BMW 330i Spring Strut Front Left VDC
Part Number: 37106895053$682.25 MSRP: $1052.07You Save: $369.82 (36%)Ships in 1-3 Business Days


BMW 330i Spring Strut Front Right VDC
Part Number: 37106895054$682.25 MSRP: $1052.07You Save: $369.82 (36%)Ships in 1-3 Business Days
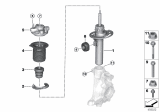
BMW 330i Front Right Spring Strut
Part Number: 31316888454$305.84 MSRP: $467.59You Save: $161.75 (35%)Ships in 1-3 Business Days
BMW 330i SHOCK ABSORBER, FRONT RIGHT
Part Number: 31305A9A1E2$305.84 MSRP: $467.59You Save: $161.75 (35%)Ships in 1-2 Business Days
BMW 330i Suspension Strut Front
Part Number: 31316873797$296.93 MSRP: $453.96You Save: $157.03 (35%)Ships in 1-3 Business DaysBMW 330i Front Spring Strut
Part Number: 31316873800$335.52 MSRP: $512.96You Save: $177.44 (35%)Ships in 1-3 Business Days
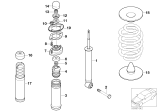
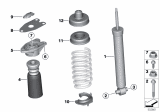
BMW 330i Rear Spring Strut
Part Number: 33526879301$232.80 MSRP: $329.37You Save: $96.57 (30%)Ships in 1-3 Business Days
BMW 330i Rear Suspension-Shock Absorber
Part Number: 33521095913$176.22 MSRP: $249.32You Save: $73.10 (30%)Ships in 1-3 Business DaysBMW 330i Left Front Spring Strut
Part Number: 31316888455$345.61 MSRP: $528.39You Save: $182.78 (35%)Ships in 1-3 Business DaysBMW 330i Rear Spring Strut
Part Number: 33526879302$260.84 MSRP: $372.20You Save: $111.36 (30%)Ships in 1-3 Business Days
BMW 330i Front Left Suspension Strut
Part Number: 31312282459$454.57 MSRP: $533.14You Save: $78.57 (15%)Ships in 1-3 Business Days
BMW 330i Rear Shock Absorber
Part Number: 33526771725$153.26 MSRP: $240.93You Save: $87.67 (37%)Ships in 1-3 Business Days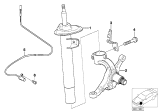
BMW 330i Front Right Shock Absorber Spring Strut
Part Number: 31316750792$454.57 MSRP: $533.14You Save: $78.57 (15%)Ships in 1-3 Business Days
BMW 330i Front Left Spring Strut
Part Number: 31316750791$454.57 MSRP: $533.14You Save: $78.57 (15%)Ships in 1-3 Business Days
BMW 330i Rear Shock Absorber
Part Number: 33526873799$159.65 MSRP: $250.98You Save: $91.33 (37%)Ships in 1-3 Business Days
BMW 330i Rear Left Shock Absorber
Part Number: 33526771729$176.25 MSRP: $277.07You Save: $100.82 (37%)Ships in 1-3 Business DaysBMW 330i Left Front Spring Strut
Part Number: 31316888453$305.84 MSRP: $467.59You Save: $161.75 (35%)Ships in 1-3 Business Days
| Page 1 of 3 |Next >
1-20 of 47 Results
BMW 330i Shock Absorber
The Shock Absorber of BMW 330i vehicles help the suspension assembly where the strut functions, giving stability and control. These components assist in reduction of bouncing and in the cushioning of shock impulses leading to enhanced ride quality and handling. Explaining the styles of shock absorbers used by BMW is that it has used both types of twin and mono-tube that work differently in that they have distinct ways of regulating the movement of hydraulic fluid to generate the optimum bounding as required under the kind of driving being done. Other developments such as PSD and ASD even go ahead to define the additional characteristics of the typical shock absorber, while features like ESR and MRS call for semi active and active suspending mechanisms that in a way make head and tail light of the comfort control process.
If you are looking for OEM BMW 330i Shock Absorber, we highly recommend to shop with us. Not only do we offer budget friendly prices, but we also provide fast delivery. In addition, we have a hassle-free return policy on all genuine BMW 330i Shock Absorber that come backed by the manufacturer's warranty.
BMW 330i Shock Absorber Parts Questions & Experts Answers
- Q: How to remove and inspect a front shock absorber assembly on BMW 330i?A:Block the rear wheels, apply the parking brake, raise the front of the vehicle, support it on jackstands, and remove the appropriate wheel. Remove the fasteners and the engine under-shield. Take off the brake disc. Trace the wiring to disconnect the ABS wheel speed sensor and brake pad wear sensor, then unclip the wiring. Detach the ride height sensor rod from the control arm, if equipped. Loosen the bolt connecting the control arm to the front subframe. Detach the control arm, tension strut, and tie-rod end from the hub carrier. While counterholding the ball joint shank, remove the stabilizer bar link nut, discard it, and note that the brake hose bracket is retained by this nut. Support the hub carrier with a floor jack. For models with strut tower braces, remove the cowl trim panel cap and the associated bolts. For all models, from within the engine compartment, remove the strut upper mounting nuts and lower the strut assembly. Note alignment marks between the mounting plate and vehicle body. Once the strut is removed, clean it and mount it upright in a vise. Remove the bolt attaching the suspension strut to the hub carrier, and the ABS sensor wiring bracket. Then, using a spring compressor, compress the coil spring. Access the strut upper mount retaining nut, remove it, and take off the associated components. Inspect all parts for wear or damage, replacing as necessary. Check the strut and coil spring for any signs of damage. Reassemble the strut, ensuring all parts are correctly positioned. During installation, tighten all fasteners to their specified torque, replace self-locking nuts, and once completed, it's recommended to check the front wheel alignment and steering angle sensor calibration if the vehicle has active steering.


