×
- Hello
- Login or Register
- Quick Links
- Live Chat
- Track Order
- Parts Availability
- RMA
- Help Center
- Contact Us
- Shop for
- BMW Parts
- BMW Accessories
My Garage
My Account
Cart
Genuine BMW M3 Wheel Bearing
Hub Bearing- Select Vehicle by Model
- Select Vehicle by VIN
Select Vehicle by Model
orSeries
Model
Year
Select Vehicle by VIN
For the most accurate results, select vehicle by your VIN (Vehicle Identification Number).
13 Wheel Bearings found


BMW M3 Front Wheel Hub With Bearing
Part Number: 31207857506$319.89 MSRP: $472.21You Save: $152.32 (33%)Ships in 1-3 Business Days
BMW M3 Angular Contact Ball Bearing,Radial
Part Number: 33416775842$102.72 MSRP: $142.90You Save: $40.18 (29%)Ships in 1-3 Business Days
BMW M3 Drive Flange Hub
Part Number: 33402283220$135.58 MSRP: $191.82You Save: $56.24 (30%)Ships in 1-3 Business Days
BMW M3 Angular-Contact Ball Bearing Unit
Part Number: 33412282675$151.51 MSRP: $214.37You Save: $62.86 (30%)Ships in 1-3 Business Days
BMW M3 Angular Contact Ball Bearing,Radial
Part Number: 33416762317$97.34 MSRP: $135.42You Save: $38.08 (29%)Ships in 1-3 Business Days
BMW M3 Wheel Hub With Bearing
Part Number: 31208095641$353.55 MSRP: $521.90You Save: $168.35 (33%)Ships in 1-3 Business Days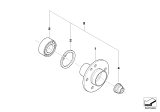
BMW M3 Angular Contact Ball Bearing,Radial
Part Number: 33411090505$105.34 MSRP: $107.23You Save: $1.89 (2%)Ships in 1-3 Business Days
BMW M3 Front Wheel Hub With Bearing
Part Number: 31222282670$319.89 MSRP: $472.21You Save: $152.32 (33%)Ships in 1-3 Business Days
BMW M3 WHEEL HUB WITH BEARING, FRON
Part Number: 31108095643$353.55 MSRP: $521.90You Save: $168.35 (33%)Ships in 1-3 Business Days
BMW M3 Service Kit, Wheel Bearing, Rear
Part Number: 33412295519$92.10 MSRP: $124.00You Save: $31.90 (26%)Ships in 1-3 Business Days
BMW M3 Front Wheel Hub With Bearing
Part Number: 31222229501$405.87 MSRP: $476.01You Save: $70.14 (15%)Ships in 1-3 Business Days
BMW M3 Front Wheel Hub With Bearing
Part Number: 31212225362$1113.10 MSRP: $1316.75You Save: $203.65 (16%)
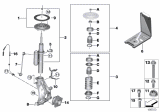
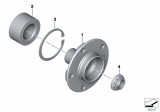
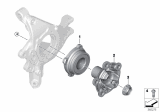
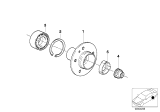
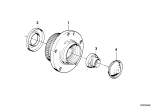
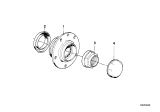
BMW M3 Wheel Bearing
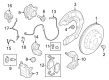
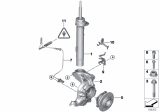
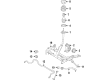
The Wheel Bearing of BMW M3 cars refers to a system through which the wheels are supposed to rotate for the vehicle to work properly and safely. There are 3 arrangements of hub and bearing assemblies with the regular unit assembly involving the ABS sensor as the most standard one. Worn bearings can either be loose or are not properly fitted thus creates noise and vibration and may even cause the wheels to fall off. To look for problems the wheel should be rotate, check the hub, and use dial indicator for play. Tapered roller bearings are antifriction bearings with separate movable roller assemblies that can be replaced; therefore, these bearings have to be carefully inspected before racing and should be properly greased. In summing up, the Wheel Bearing is a crucial component that has the responsibility of conveying a smooth and safe drive to BMW M3 cars.
If you are looking for OEM BMW M3 Wheel Bearing, we highly recommend to shop with us. Not only do we offer budget friendly prices, but we also provide fast delivery. In addition, we have a hassle-free return policy on all genuine BMW M3 Wheel Bearing that come backed by the manufacturer's warranty.
BMW M3 Wheel Bearing Parts Questions & Experts Answers
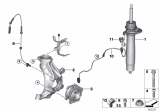
- Q: How to remove and install the rear wheel hub and wheel bearing on BMW M3?A:The rear hub is press-fit into the rear wheel bearing, which in turn is press-fit into the trailing arm. When replacing the rear hub, the rear wheel bearing must also be replaced since removing the hub destroys the bearing. If only the wheel bearing needs replacement, the hub can be reused unless damaged or bent. Specialized tools are essential for removal and installation since the bearing and hub are press-fit. Some tools allow hub and bearing removal and replacement without taking out the trailing arm; when using these, always follow the tool manufacturer's instructions. If using a hydraulic press, the trailing arm must be removed, and on E36 models, this necessitates an alignment check due to changes in toe alignment. The rear wheel bearings, being press-fit, cannot be serviced without damage. If they are noisy or loose, they must be replaced. Disconnect the negative battery cable, raise the vehicle, remove the wheel center cap, loosen the rear axle nut, take off the wheel assembly, and remove the halfshaft assembly. Then, remove the brake caliper and bracket assembly, ensuring no tension on the brake hose. If possible, use a slide hammer tool with a stub axle puller adapter to remove the stub axle from the trailing arm, followed by the large snapring. Next, remove the rear parking brake shoes, springs, and adjusters and the rear trailing arm. Use a hydraulic press to push out the stub axle and the bearing. If the inner bearing race remains on the stub axle, use a puller or chisel to remove it. Clean the stub axle, removing any burrs. For installation, consider freezing the bearing after placing it in a plastic bag and lightly lubricating it to ease the process. Check the trailing arm for damage, clean the area where the bearing goes, ensuring no sharp edges. Using a press, install the bearing into the trailing arm, followed by the snapring. Install any necessary dust shields, support the inner bearing race, and press the stub axle into the race. Reattach the trailing arm, ensuring alignment marks on E36 models. The remaining assembly is the reverse of removal, using a new axle nut and ensuring all fasteners are tightened. Finally, check and adjust the rear wheel alignment if needed.

Related BMW M3 Parts
 BMW M3 Drive Shaft
 BMW M3 Pinion Bearing
 BMW M3 Differential
 BMW M3 Axle Shaft
 BMW M3 ABS Sensor
 BMW M3 CV Boot
 BMW M3 CV Joint
Browse by Year
2025 Wheel Bearing 2024 Wheel Bearing 2023 Wheel Bearing 2022 Wheel Bearing 2021 Wheel Bearing 2018 Wheel Bearing 2017 Wheel Bearing 2016 Wheel Bearing 2015 Wheel Bearing 2013 Wheel Bearing 2012 Wheel Bearing 2011 Wheel Bearing 2010 Wheel Bearing 2009 Wheel Bearing 2008 Wheel Bearing 2006 Wheel Bearing 2005 Wheel Bearing 2004 Wheel Bearing 2003 Wheel Bearing 2002 Wheel Bearing 2001 Wheel Bearing 1999 Wheel Bearing 1998 Wheel Bearing 1997 Wheel Bearing 1996 Wheel Bearing 1995 Wheel Bearing 1991 Wheel Bearing 1990 Wheel Bearing 1989 Wheel Bearing 1988 Wheel Bearing