×
- Hello
- Login or Register
- Quick Links
- Live Chat
- Track Order
- Parts Availability
- RMA
- Help Center
- Contact Us
- Shop for
- BMW Parts
- BMW Accessories
My Garage
My Account
Cart
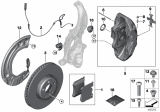
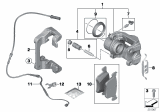
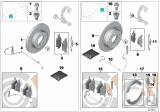
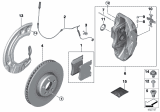
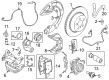
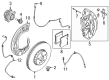
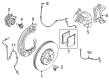
Genuine BMW X3 Brake Pads
Disc Brake Pad Set- Select Vehicle by Model
- Select Vehicle by VIN
Select Vehicle by Model
orSeries
Model
Year
Select Vehicle by VIN
For the most accurate results, select vehicle by your VIN (Vehicle Identification Number).
18 Brake Pads found


BMW X3 Rear Brake Pad Set
Part Number: 34216867175$119.99 MSRP: $188.63You Save: $68.64 (37%)Ships in 1-3 Business Days


BMW X3 Brake Pads Asbes Repair Kit
Part Number: 34216890353$119.99 MSRP: $188.63You Save: $68.64 (37%)Ships in 1-3 Business Days


BMW X3 Disc Brake Pad Set Front
Part Number: 34106888777$132.34 MSRP: $208.04You Save: $75.70 (37%)Ships in 1-3 Business Days


BMW X3 Front Disc Brake Pad Set
Part Number: 34106884497$132.34 MSRP: $208.04You Save: $75.70 (37%)Ships in 1-3 Business Days


BMW X3 Brake Pads Rear
Part Number: 34216862202$101.06 MSRP: $156.22You Save: $55.16 (36%)Ships in 1-3 Business Days


BMW X3 Front Disc Brake Pad Set
Part Number: 34116888457$282.11 MSRP: $447.28You Save: $165.17 (37%)Ships in 1-3 Business Days


BMW X3 Disc Brake Pad Repair Kit
Part Number: 34106856191$126.05 MSRP: $198.15You Save: $72.10 (37%)Ships in 1-3 Business Days


BMW X3 Disc Brake Pad Repair Kit
Part Number: 34216885452$111.40 MSRP: $172.20You Save: $60.80 (36%)Ships in 1-3 Business Days


BMW X3 Brake-Rear Pads Repair Kit
Part Number: 34213403241$96.00 MSRP: $148.39You Save: $52.39 (36%)Ships in 1-3 Business Days


BMW X3 Disc Brake Pad Set Front
Part Number: 34113404362$119.74 MSRP: $188.24You Save: $68.50 (37%)Ships in 1-3 Business Days
BMW X3 Disc Brake Pad Set Front
Part Number: 34116889570$282.11 MSRP: $447.28You Save: $165.17 (37%)
BMW X3 REPAIR KIT, BRAKE PADS, FRON
Part Number: 34108064561$604.28 MSRP: $966.35You Save: $362.07 (38%)Ships in 1-3 Business DaysBMW X3 Brake Pads Asbes Repair Kit
Part Number: 34216892641$106.09 MSRP: $164.00You Save: $57.91 (36%)Ships in 1-3 Business DaysBMW X3 Rear Disc Brake Pad Set
Part Number: 34216885451$111.40 MSRP: $172.20You Save: $60.80 (36%)Ships in 1-3 Business DaysBMW X3 Disc Brake Pad Set
Part Number: 34106884492$132.34 MSRP: $208.04You Save: $75.70 (37%)Ships in 1-3 Business Days
BMW X3 REPAIR KIT BRAKE PADS ASBEST
Part Number: 34208842965$136.62 MSRP: $214.78You Save: $78.16 (37%)Ships in 1-3 Business Days
BMW X3 REPAIR KIT BRAKE PADS ASBEST
Part Number: 34108842388$295.53 MSRP: $468.56You Save: $173.03 (37%)Ships in 1-3 Business Days
BMW X3 Brake Pads Asbes Repair Kit
Part Number: 34108852291$138.64 MSRP: $217.94You Save: $79.30 (37%)Ships in 1-2 Business Days
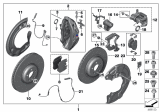
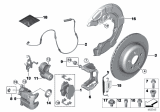
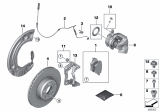
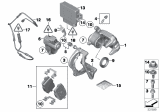
BMW X3 Brake Pads
If you are looking for OEM BMW X3 Brake Pads, we highly recommend to shop with us. Not only do we offer budget friendly prices, but we also provide fast delivery. In addition, we have a hassle-free return policy on all genuine BMW X3 Brake Pads that come backed by the manufacturer's warranty.
BMW X3 Brake Pads Parts Questions & Experts Answers
- Q: Can brake pads be replaced without disconnecting the brake fluid hose or bleeding the brakes on BMW X3?A:Brake pads can be replaced without disconnecting the brake fluid hose from the caliper or bleeding the brakes, and rotors can be replaced without disassembling the wheel hub and bearing, with front and rear brake pad replacement procedures being similar and requiring pads to be replaced in sets. Begin by raising the car and supporting it safely before removing the wheels. Disc brake pad wear can be checked through an opening in the caliper once the wheel is removed by measuring the pad friction lining thickness and comparing it to the specified values. Unbolt the caliper from the steering knuckle for further inspection of brake pad thickness, brake rotor condition, caliper seal condition, and caliper slider bolts. After inspection, replace parts as needed, and pry off the Brake Caliper anti-rattle spring. Carefully remove the brake pad wear sensor from the brake pad using fingers, then remove plastic caps from caliper mounting bolts and the caliper guide bolts with a 17 mm Allen wrench before removing the caliper from the bracket. It is important not to let the brake caliper assembly hang from the brake hose; instead, support it from the chassis with strong wire. If there is a ridge on the brake rotor edge, press the caliper pistons back into the caliper before removal. Check the brake rotor thickness and inspect for rust or damage, replacing or machining the rotors as necessary. Remove the brake pads, noting that the inner brake pad has a spring to locate it in the caliper piston. Compress the caliper piston using a special tool or equivalent, taking care to prevent brake fluid reservoir overflow by removing some fluid with a clean syringe beforehand. Check the caliper dust boots for damage and replace if necessary, then clean the contact surfaces between the caliper and caliper carrier. Apply a thin coating of anti-squeal compound to the caliper contact face, avoiding grease on the brake pad backing plate, and ensure the caliper rubber dust sleeve does not come in contact with the compound. When installing directional brake pads, ensure marked pads are installed correctly, and if applicable, insert the brake pad wear sensor into the cutout in the new pad, pushing it into place until it locks. Route the pad wear sensor wiring through the caliper opening and under the bleeder dust cap. The remainder of the installation follows the reverse order of removal, including cleaning the brake caliper guide bolts and replacing them if not in perfect condition without greasing. Top off the brake fluid to the maximum marking, pump the brake pedal several times to ensure contact between the brake pads and rotors, check the brake fluid level, and top off if necessary. Finally, hold the ignition key in the accessory position for at least 30 seconds without starting the engine to clear fault codes in memory and turn off the brake pad warning light.

Related BMW X3 Parts


Browse by Year
2025 Brake Pads 2024 Brake Pads 2023 Brake Pads 2022 Brake Pads 2021 Brake Pads 2020 Brake Pads 2019 Brake Pads 2018 Brake Pads 2017 Brake Pads 2016 Brake Pads 2015 Brake Pads 2014 Brake Pads 2013 Brake Pads 2012 Brake Pads 2011 Brake Pads 2010 Brake Pads 2009 Brake Pads 2008 Brake Pads 2007 Brake Pads 2006 Brake Pads 2005 Brake Pads 2004 Brake Pads