×
- Hello
- Login or Register
- Quick Links
- Live Chat
- Track Order
- Parts Availability
- RMA
- Help Center
- Contact Us
- Shop for
- BMW Parts
- BMW Accessories
My Garage
My Account
Cart
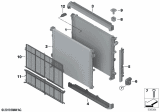
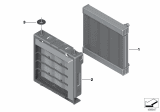
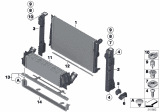
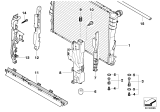
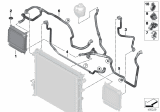
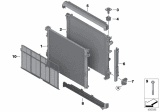
Genuine BMW X3 Radiator
Cooling Radiator- Select Vehicle by Model
- Select Vehicle by VIN
Select Vehicle by Model
orSeries
Model
Year
Select Vehicle by VIN
For the most accurate results, select vehicle by your VIN (Vehicle Identification Number).
22 Radiators found


BMW X3 Radiator
Part Number: 17119468695$374.60 MSRP: $552.97You Save: $178.37 (33%)Ships in 1-3 Business Days


BMW X3 Radiator
Part Number: 17119797807$416.23 MSRP: $614.41You Save: $198.18 (33%)Ships in 1-3 Business Days

BMW X3 Radiator
Part Number: 17118642743$416.23 MSRP: $614.41You Save: $198.18 (33%)Ships in 1-3 Business Days

BMW X3 Remote Mounted Radiator
Part Number: 17118620207$349.66 MSRP: $516.16You Save: $166.50 (33%)Ships in 1-3 Business Days


BMW X3 Radiator
Part Number: 17118623350$396.42 MSRP: $585.17You Save: $188.75 (33%)Ships in 1-3 Business Days


BMW X3 Radiator
Part Number: 17119797808$416.23 MSRP: $614.41You Save: $198.18 (33%)Ships in 1-3 Business Days

BMW X3 Engine Coolant Radiator
Part Number: 17118642742$416.23 MSRP: $614.41You Save: $198.18 (33%)Ships in 1-3 Business Days
BMW X3 Radiator
Part Number: 17118623369$396.42 MSRP: $585.17You Save: $188.75 (33%)Ships in 1-3 Business Days

BMW X3 Radiator
Part Number: 17113400013$350.47 MSRP: $517.34You Save: $166.87 (33%)Ships in 1-2 Business Days


BMW X3 Radiator
Part Number: 17118642747$374.60 MSRP: $552.97You Save: $178.37 (33%)Ships in 1-2 Business Days

BMW X3 REMOTE RADIATOR
Part Number: 17119468698$249.74 MSRP: $368.66You Save: $118.92 (33%)Ships in 1-2 Business DaysBMW X3 Radiator Assy
Part Number: 17113403551$319.70 MSRP: $471.93You Save: $152.23 (33%)Ships in 1-3 Business Days
BMW X3 Radiator
Part Number: 17119487318$416.23 MSRP: $614.41You Save: $198.18 (33%)Ships in 1-3 Business Days
BMW X3 Radiator
Part Number: 17118665241$495.22 MSRP: $737.33You Save: $242.11 (33%)Ships in 1-3 Business Days
BMW X3 Radiator
Part Number: 17118642746$416.23 MSRP: $614.41You Save: $198.18 (33%)Ships in 1-3 Business DaysBMW X3 Radiator
Part Number: 17118642745$416.23 MSRP: $614.41You Save: $198.18 (33%)Ships in 1-3 Business Days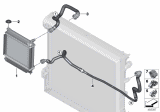
BMW X3 External Radiator
Part Number: 17118630028$249.74 MSRP: $368.66You Save: $118.92 (33%)Ships in 1-3 Business DaysBMW X3 Radiator
Part Number: 17113415693$356.78 MSRP: $526.66You Save: $169.88 (33%)Ships in 1-3 Business DaysBMW X3 Radiator
Part Number: 17113414986$356.78 MSRP: $526.66You Save: $169.88 (33%)Ships in 1-3 Business DaysBMW X3 Radiator
Part Number: 17118623366$396.42 MSRP: $585.17You Save: $188.75 (33%)Ships in 1-3 Business Days
| Page 1 of 2 |Next >
1-20 of 22 Results
BMW X3 Radiator
If you are looking for OEM BMW X3 Radiator, we highly recommend to shop with us. Not only do we offer budget friendly prices, but we also provide fast delivery. In addition, we have a hassle-free return policy on all genuine BMW X3 Radiator that come backed by the manufacturer's warranty.
BMW X3 Radiator Parts Questions & Experts Answers
- Q: How to remove and install a radiator on BMW X3?A:To remove and install the radiator, first raise the car and support it safely, then remove the splash shield from under the engine. Drain the radiator and remove the electric cooling fan and cowl. Release the hose retaining clips and disconnect the upper and lower coolant hose fittings. On the right side of the radiator, release the hose retaining clips and disconnect the lower coolant hose fitting. Underneath the radiator, disconnect the harness connector from the coolant level sensor in the coolant expansion tank. For vehicles with automatic transmission, disconnect the automatic transmission fluid cooler lines from the ATF cooler at the quick disconnect unions by pushing the hose toward the oil cooler and pressing the black locking ring into the hose fitting while pulling the hose off the cooler, ensuring a drain pan is ready to catch any spilled ATF. Alternatively, the ATF cooler can be removed from the radiator by pulling up on the quick release clips. On the left side of the radiator, remove the screw and loosen the fastener for the radiator mount, and on the right side, loosen the fastener for the radiator mount. Tilt the radiator inwards and lift it out of the engine compartment. Installation is the reverse of removal, ensuring the radiator seats firmly in the lower mounts, the electric cooling fan cowl clips are secure at the bottom, and the cooling system is refilled and bled while checking for leaks.

Related BMW X3 Parts
 BMW X3 Water Pump
 BMW X3 Cooling Hose
 BMW X3 Radiator Hose
 BMW X3 Coolant Reservoir
 BMW X3 Fan Shroud
 BMW X3 Fan Blade
 BMW X3 Radiator Cap
 BMW X3 Radiator fan
Browse by Year
2025 Radiator 2024 Radiator 2023 Radiator 2022 Radiator 2021 Radiator 2020 Radiator 2019 Radiator 2018 Radiator 2017 Radiator 2016 Radiator 2015 Radiator 2014 Radiator 2013 Radiator 2012 Radiator 2011 Radiator 2010 Radiator 2009 Radiator 2008 Radiator 2007 Radiator 2006 Radiator 2005 Radiator 2004 Radiator