×
- Hello
- Login or Register
- Quick Links
- Live Chat
- Track Order
- Parts Availability
- RMA
- Help Center
- Contact Us
- Shop for
- BMW Parts
- BMW Accessories
My Garage
My Account
Cart
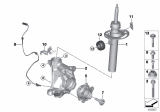
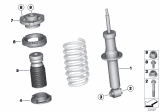
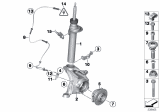
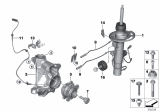
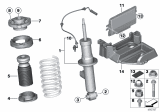
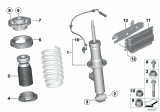
Genuine BMW X3 Shock Absorber
Suspension Shock Absorber- Select Vehicle by Model
- Select Vehicle by VIN
Select Vehicle by Model
orSeries
Model
Year
Select Vehicle by VIN
For the most accurate results, select vehicle by your VIN (Vehicle Identification Number).
49 Shock Absorbers found


BMW X3 Front Spring Strut Left Left Set
Part Number: 31316871779$391.48 MSRP: $598.52You Save: $207.04 (35%)


BMW X3 Rear Shock Absorber
Part Number: 33526796317$286.85 MSRP: $409.32You Save: $122.47 (30%)Ships in 1-3 Business Days
BMW X3 Front Right Spring Strut
Part Number: 31316871780$391.48 MSRP: $598.52You Save: $207.04 (35%)


BMW X3 Front Left Suspension Strut
Part Number: 31316796315$380.07 MSRP: $581.07You Save: $201.00 (35%)Ships in 1-3 Business Days


BMW X3 Front Right Spring Strut
Part Number: 31306880606$523.96 MSRP: $807.98You Save: $284.02 (36%)Ships in 1-3 Business Days
BMW X3 Front Left Suspension Strut
Part Number: 31306880605$523.96 MSRP: $807.98You Save: $284.02 (36%)Ships in 1-3 Business DaysBMW X3 Rear Left Or Right Shock Absorber Spring Coil Strut
Part Number: 33526871801$295.47 MSRP: $421.62You Save: $126.15 (30%)Ships in 1-3 Business DaysBMW X3 Rear Spring Strut
Part Number: 33526871802$333.86 MSRP: $476.40You Save: $142.54 (30%)Ships in 1-3 Business Days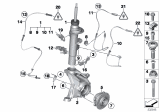
BMW X3 Front Left Suspension Gas Shock Absorber
Part Number: 37116797025$847.82 MSRP: $1307.39You Save: $459.57 (36%)Ships in 1-3 Business Days
BMW X3 Front Left Vdc Spring Strut
Part Number: 37106887157$1178.91 MSRP: $1817.96You Save: $639.05 (36%)Ships in 1-3 Business DaysBMW X3 Front Right Spring Strut
Part Number: 31316796316$380.07 MSRP: $581.07You Save: $201.00 (35%)Ships in 1-3 Business DaysBMW X3 Front Right Vdc Spring Strut
Part Number: 37106887158$1178.91 MSRP: $1817.96You Save: $639.05 (36%)Ships in 1-3 Business DaysBMW X3 Front Left Vdc Spring Strut
Part Number: 37106887933$873.28 MSRP: $1346.66You Save: $473.38 (36%)Ships in 1-3 Business Days
BMW X3 Rear Shock Absorber
Part Number: 37126799911$639.89 MSRP: $920.97You Save: $281.08 (31%)Ships in 1-3 Business DaysBMW X3 Front Right Suspension Strut
Part Number: 37116797028$847.82 MSRP: $1307.39You Save: $459.57 (36%)Ships in 1-3 Business DaysBMW X3 Front Left Suspension Strut
Part Number: 37116797027$847.82 MSRP: $1307.39You Save: $459.57 (36%)Ships in 1-3 Business DaysBMW X3 Front Right Vdc Spring Strut
Part Number: 37106887934$873.28 MSRP: $1346.66You Save: $473.38 (36%)Ships in 1-3 Business Days
BMW X3 Rear Spring Strut Vdc
Part Number: 37106887152$889.75 MSRP: $1280.58You Save: $390.83 (31%)Ships in 1-3 Business DaysBMW X3 Shock Absorber
Part Number: 33526796422$324.13 MSRP: $462.52You Save: $138.39 (30%)Ships in 1-3 Business Days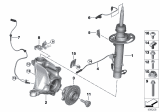
BMW X3 Spring Strut Front Right VDC
Part Number: 37108067506$1178.91 MSRP: $1817.96You Save: $639.05 (36%)Ships in 1-3 Business Days
| Page 1 of 3 |Next >
1-20 of 49 Results
BMW X3 Shock Absorber
If you are looking for OEM BMW X3 Shock Absorber, we highly recommend to shop with us. Not only do we offer budget friendly prices, but we also provide fast delivery. In addition, we have a hassle-free return policy on all genuine BMW X3 Shock Absorber that come backed by the manufacturer's warranty.
BMW X3 Shock Absorber Parts Questions & Experts Answers
- Q: How should shock absorbers be replaced in pairs on BMW X3?A:It is recommended to replace shock absorbers only in pairs, that is, only left or right ones. Take out cargo area trim and lift the vehicle to take off the rear wheels. Place revolve and prevent the falling of the Trailing Arm by placing an adjustable jack stand from under the trailing arm and then, take off the lower mounting bolt of the shock absorber. Trailing arm should be supported before removing the lower shock absorber bolt as damage to drive axle CV joints may result. Inside the cargo area, unscrew the fastener and get rid of it and likewise, lift the dust cap off. If necessary stabilise the shock absorber by holding it from below and then take out the upper mounting nuts and pull out the shock absorber from the wheel housing. Transfer the mounting plate, dust cover and bump stop and other such parts to the new shock absorber and check for damages and change the worn out components as and when required. The process of installation is virtually the reversal of that of withdrawal and all threaded bolts, nuts, and mated surfaces for the assembly are purged. Place the shock absorber mounting plate on the body with new self-locking nuts: tighten the fasteners only after the car has been lowered and the suspension has settled. Last of all, ensure that the rear drive axle is well positioned in the differential.

Related BMW X3 Parts


Browse by Year
2025 Shock Absorber 2024 Shock Absorber 2023 Shock Absorber 2022 Shock Absorber 2021 Shock Absorber 2020 Shock Absorber 2019 Shock Absorber 2018 Shock Absorber 2017 Shock Absorber 2016 Shock Absorber 2015 Shock Absorber 2014 Shock Absorber 2013 Shock Absorber 2012 Shock Absorber 2011 Shock Absorber 2010 Shock Absorber 2009 Shock Absorber 2008 Shock Absorber 2007 Shock Absorber 2006 Shock Absorber 2005 Shock Absorber 2004 Shock Absorber