×
- Hello
- Login or Register
- Quick Links
- Live Chat
- Track Order
- Parts Availability
- RMA
- Help Center
- Contact Us
- Shop for
- BMW Parts
- BMW Accessories
My Garage
My Account
Cart
Genuine BMW Z3 Timing Cover
Engine Timing Cover- Select Vehicle by Model
- Select Vehicle by VIN
Select Vehicle by Model
orSeries
Model
Year
Select Vehicle by VIN
For the most accurate results, select vehicle by your VIN (Vehicle Identification Number).
5 Timing Covers found


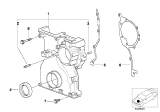
BMW Z3 Timing Case Cover Bottom
Part Number: 11141436720$348.23 MSRP: $451.73You Save: $103.50 (23%)
BMW Z3 Timing Case Cover, Top
Part Number: 11141432232$854.94 MSRP: $1118.62You Save: $263.68 (24%)Ships in 1-3 Business Days
BMW Z3 Timing Case Cover Bottom
Part Number: 11141439646$385.00 MSRP: $499.42You Save: $114.42 (23%)Ships in 1-3 Business Days

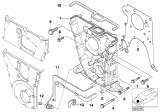


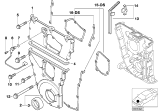
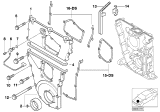
BMW Z3 Timing Cover
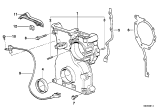
In Automobiles, BMW Z3 in particular the Timing Cover is a very important part that protects the timing system which can use a timing belt, timing chain, or cam belt. Made of aluminum, plastic, or steel, the Timing Cover shields the interior parts from debris that may end up causing destruction in the part. Most covers are fitted with gaskets that improve on the protection of the timing belt. However, Timing Covers like any other auto part are not immune to failure and as such should be replaced when they develop some of the above mentioned signs to prevent having a dangerous car on the road. Although the overview provided here does not detail the differences of different Timing Cover types among various models of Z3, stressing on the material and gasket inclusion, ensures the need to retain this part for the optimal performance of the engine of the concomitant car.
If you are looking for OEM BMW Z3 Timing Cover, we highly recommend to shop with us. Not only do we offer budget friendly prices, but we also provide fast delivery. In addition, we have a hassle-free return policy on all genuine BMW Z3 Timing Cover that come backed by the manufacturer's warranty.
BMW Z3 Timing Cover Parts Questions & Experts Answers
- Q: How to remove and install the Timing Cover on BMW Z3?A:The M20 engine in BMW vehicles is unique in that it uses a timing belt instead of the typical timing chain. The timing belt should be replaced according to specific intervals, including every 4 years, every other Service II, after 50,000 miles (80,000 km), or whenever removal is necessary for a repair. To remove the timing belt, start by disconnecting the negative battery cable and removing the distributor cap, rotor, and inner distributor cover. Then, remove the distributor guard plate (which also serves as the upper Timing Cover) by taking out the attaching bolts and nut. Rotate the crankshaft to set the No. 1 piston at TDC of its compression stroke, ensuring that the camshaft sprocket arrow aligns with the mark on the cylinder head. Remove the Radiator, lower splash guard, and belts for the alternator, power steering, and air conditioning. Take off the crankshaft pulley and vibration damper, and if applicable, remove the crankshaft hub bolt using a gear puller. Loosen the alternator bracket bolt and swing the bracket out of the way, then remove the TDC transmitter and lower timing belt protective cover. Loosen the timing belt tensioner roller bolts and push the roller in to remove the belt, followed by removing the intermediate shaft sprocket bolt and sprocket. Loosen the oil pan bolts and remove the front pan bolts that go into the timing cover, using a thin blade to loosen the oil pan gasket. Remove the bolts holding the cover and lift it off the engine. To install the timing belt, first replace the oil pan gasket and seals in the cover if necessary. Install the timing cover using new gaskets and tighten the bolts to the specified torque. Install the intermediate shaft sprocket and tension the timing belt. Install the lower timing protective cover, TDC sender, alternator bracket, crankshaft hub, vibration damper, upper Timing Cover, and distributor cap. Finally, install the accessories and belts, the splash shield, and fill the cooling system with coolant mixture. Bleed the cooling system and reconnect the negative battery cable. It is important to inspect the timing belt for any signs of damage or wear, such as hardening of the rubber, cracks or peeling of the backing, missing teeth, or abnormal wear. If any of these conditions are present, the belt should be replaced, unless it is already within the recommended replacement interval.


