×
- Hello
- Login or Register
- Quick Links
- Live Chat
- Track Order
- Parts Availability
- RMA
- Help Center
- Contact Us
- Shop for
- BMW Parts
- BMW Accessories
My Garage
My Account
Cart
Genuine BMW 335i CV Boot
Axle Boot- Select Vehicle by Model
- Select Vehicle by VIN
Select Vehicle by Model
orSeries
Model
Year
Select Vehicle by VIN
For the most accurate results, select vehicle by your VIN (Vehicle Identification Number).
4 CV Boots found

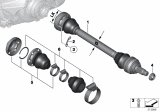
BMW 335i Interior Repair Kit Bellows
Part Number: 33217547081$116.49 MSRP: $156.84You Save: $40.35 (26%)Ships in 1-3 Business Days
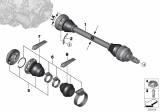
BMW 335i Interior Repair Kit Bellows
Part Number: 33207550164$116.11 MSRP: $156.32You Save: $40.21 (26%)Ships in 1-3 Business Days
BMW 335i Exterior Repair Kit Bellows
Part Number: 33217547080$77.38 MSRP: $104.18You Save: $26.80 (26%)Ships in 1-3 Business Days
BMW 335i Exterior Repair Kit Bellows
Part Number: 33207546049$98.80 MSRP: $133.02You Save: $34.22 (26%)Ships in 1-3 Business Days
BMW 335i CV Boot
If you are looking for OEM BMW 335i CV Boot, we highly recommend to shop with us. Not only do we offer budget friendly prices, but we also provide fast delivery. In addition, we have a hassle-free return policy on all genuine BMW 335i CV Boot that come backed by the manufacturer's warranty.
BMW 335i CV Boot Parts Questions & Experts Answers
- Q: How should CV Boot be inspected for cracks and damage on BMW 335i?A:Inspect CV joint protective boots for cracks and damage, as failure of the rubber boots allows water and dirt to enter the joint, leading to quick damage. Leaks are most likely to occur around drive shaft and CV boot mounting flanges. CV boot replacement is addressed in the section on Rear Axle Differential.
