×
- Hello
- Login or Register
- Quick Links
- Live Chat
- Track Order
- Parts Availability
- RMA
- Help Center
- Contact Us
- Shop for
- BMW Parts
- BMW Accessories
My Garage
My Account
Cart
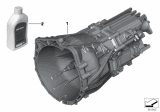
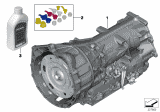
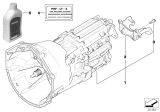
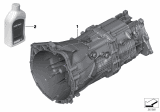
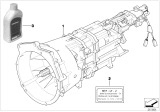
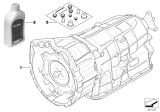
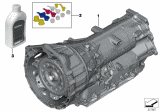
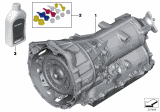
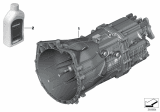
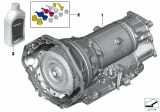
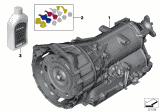
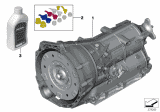
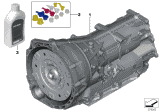
Genuine BMW Transmission Assembly
Trans Assembly- Select Vehicle by Model
- Select Vehicle by VIN
Select Vehicle by Model
orSeries
Model
Year
Select Vehicle by VIN
For the most accurate results, select vehicle by your VIN (Vehicle Identification Number).
871 Transmission Assemblies found

BMW Exchange 6 Speed Gearbox
Part Number: 23007633990$4983.40 MSRP: $6265.68You Save: $1282.28 (21%)Ships in 1-3 Business DaysProduct Specifications- Other Name: Transmission

BMW Exchange Automatic Transmission Eh
Part Number: 24008601688$8614.49 MSRP: $10910.53You Save: $2296.04 (22%)Ships in 1-3 Business DaysProduct Specifications- Other Name: Exch. automatic transmission EH

BMW Exchange 6 Speed Gearbox
Part Number: 23002283601$5235.39 MSRP: $6648.62You Save: $1413.23 (22%)Ships in 1-3 Business DaysProduct Specifications- Other Name: Transmission

BMW Exchange 6 Speed Gearbox
Part Number: 23008609416$3915.15 MSRP: $4909.06You Save: $993.91 (21%)Ships in 1-3 Business Days
BMW Rp Automatic Transmission Eh
Part Number: 24005A05AB7$10166.89 MSRP: $12852.65You Save: $2685.76 (21%)Ships in 1-3 Business DaysProduct Specifications- Other Name: RP AUTOMATIC TRANSMISSION, E; Transmission

BMW Exchange 6 Speed Sequential Gearbox
Part Number: 23002229786$12995.50 MSRP: $16264.30You Save: $3268.80 (21%)Ships in 1-3 Business DaysProduct Specifications- Other Name: Transmission

BMW Exchange Automatic Transmission Eh
Part Number: 24007594375$6443.54 MSRP: $8182.90You Save: $1739.36 (22%)Ships in 1-3 Business DaysProduct Specifications- Other Name: Exch. automatic transmission EH; Transmission

BMW Exchange Automatic Transmission Eh
Part Number: 24008632464$8249.72 MSRP: $10476.63You Save: $2226.91 (22%)Ships in 1-3 Business DaysProduct Specifications- Other Name: Exch. automatic transmission EH; Transmission

BMW Exchange Automatic Transmission Eh
Part Number: 24008627132$8612.39 MSRP: $10910.53You Save: $2298.14 (22%)Ships in 1-3 Business DaysProduct Specifications- Other Name: Exch. automatic transmission EH; Transmission

BMW 6-Speed Manual Transmission
Part Number: 23007858800$6216.87 MSRP: $7832.10You Save: $1615.23 (21%)Ships in 1-3 Business DaysProduct Specifications- Other Name: Transmission
- Replaces: 23-00-2-284-700, 23-00-7-857-700

BMW Exchange Automatic Transmission Eh
Part Number: 24008609706$8637.59 MSRP: $10910.53You Save: $2272.94 (21%)Ships in 1-3 Business DaysProduct Specifications- Other Name: Exch. automatic transmission EH; Transmission

BMW Rp Automatic Transmission Eh
Part Number: 24009487559$10170.25 MSRP: $12852.65You Save: $2682.40 (21%)Ships in 1-2 Business DaysProduct Specifications- Other Name: RP AUTOMATIC TRANSMISSION, E; Transmission
- Replaces: 24-00-8-486-831

BMW Exchange Automatic Transmission Eh
Part Number: 24008627134$8612.39 MSRP: $10910.53You Save: $2298.14 (22%)Ships in 1-3 Business DaysProduct Specifications- Other Name: Exch. automatic transmission EH; Transmission

BMW Exchange Automatic Transmission Eh
Part Number: 24008605571$8637.59 MSRP: $10910.53You Save: $2272.94 (21%)Ships in 1-3 Business DaysProduct Specifications- Other Name: Exch. automatic transmission EH; Transmission

BMW Exchange Automatic Transmission Eh
Part Number: 24007642274$10120.69 MSRP: $12852.65You Save: $2731.96 (22%)Ships in 1-3 Business DaysProduct Specifications- Other Name: Exch. automatic transmission EH; Transmission
- Replaced by: 24007642254

BMW Exchange Automatic Transmission Eh
Part Number: 24007644638$8622.89 MSRP: $10910.53You Save: $2287.64 (21%)Ships in 1-3 Business DaysProduct Specifications- Other Name: Exch. automatic transmission EH; Transmission

BMW Automatic Transmission Eh
Part Number: 24009896186$10170.25 MSRP: $12852.65You Save: $2682.40 (21%)Ships in 1-3 Business DaysProduct Specifications- Other Name: Transmission

BMW Rp Automatic Transmission Eh
Part Number: 24008744956$10170.25 MSRP: $12852.65You Save: $2682.40 (21%)Ships in 1-3 Business DaysProduct Specifications- Other Name: RP AUTOMATIC TRANSMISSION, E

BMW Automatic Transmission Eh
Part Number: 24008742388$10170.25 MSRP: $12852.65You Save: $2682.40 (21%)Ships in 1-3 Business DaysProduct Specifications- Other Name: Transmission
- Replaced by: 24005B3B8B0

BMW Exchange 6 Speed Gearbox
Part Number: 23002283151$6696.80 MSRP: $8319.25You Save: $1622.45 (20%)Product Specifications- Other Name: Transmission
| Page 1 of 44 |Next >
1-20 of 871 Results
BMW Transmission Assembly
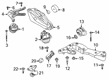
Keeping the smooth operation of a BMW vehicle relies on the condition of the Transmission Assembly. A broken BMW Transmission Assembly can lead to big performance issues and even a complete vehicle breakdown. To prevent such problems, you could regularly maintain your car and replace your parts. At BMWPartsDeal, we offer high-quality BMW Transmission Assembly, all designed to keep your vehicle running at its best. Choose BMWPartsDeal for your auto parts needs, you will get your vehicle back to great performance, and save a lot by avoiding costly future repair jobs.
BMW Transmission Assembly Parts Questions & Experts Answers
- Q: How to remove and install the automatic transmission assembly on the BMW 328i?A:On 8-speed transmissions, to prevent severe damage to the engine block, the section of bolt threads that protrude out of the transmission must be checked for damage or corrosion before trying to remove them. If there is corrosion, it must be removed and the threads completely cleaned. If there was corrosion, replace the bolts once they have been removed. Note: This is an involved operation. Read through the procedure thoroughly before starting work and ensure that adequate lifting tackle or jacking/support equipment is available. A suitable tool will be required to align the torque converter when installing the transmission, and new fluid pipe O-rings may be required. For removal, disconnect the negative battery cable. Raise the vehicle and support it securely on jackstands, ensuring it's raised sufficiently for the transmission's clearance. Remove the bolts and the engine/transmission splash shield. Remove the bolts and the front reinforcement brace/plate. Remove the starter motor. Remove the exhaust system and heat shield, then unbolt the exhaust mounting crossmember. Remove the driveshaft. On 6-speed models, disconnect the shift cable from the transmission. Disconnect the wiring plugs under the transmission bellhousing and remove the cover plate mounting bolts. Mark the torque converter's position, unscrew the torque converter bolts, and note that a special tool must be installed for 8-speed models to prevent the converter from rotating. Support the transmission using a jack, and ensure it's adequately supported. Remove the crossmember from the rear. Place a block of wood between the engine oil pan and the steering gear. Rotate the electrical connector collar counterclockwise and pull the wiring plug from the transmission case. Unbolt the fluid cooler pipe brackets and disconnect the fluid lines. Remove the engine-to-transmission bolts, ensuring the torque converter remains in place. Insert a bar to hold the torque converter back. Lower the transmission and withdraw it, ensuring the torque converter remains in position. For installation, ensure transmission locating dowels are in position. Align the torque converter with the driveplate and turn the driveplate to align a bolt hole. Maneuver the transmission into position, install the engine-to-transmission bolts, and tighten them. Install the torque converter-to-driveplate bolt and tighten it. Turn the crankshaft for access to the remaining bolt locations and tighten them. The remainder of installation is the reverse of removal, noting specific points: Tighten all fasteners where applicable, check the condition of the fluid pipe O-rings and replace if necessary, install the driveshaft, the starter motor, reconnect the shift cable, and check the transmission fluid.
- Q: What are the various ways manual transmission assembly issues can manifest and what steps can be taken to address them on BMW M3?A:Symptoms of a transmission problem can be such as, noise on shifting into the forward gears such as grinding, this will required one to check the clutch release system, adjust the mechanical or cable linkages depending on the type of the system or refill the hydraulic fluid in case the clutch release system is hydraulically operated. In particular, worn synchronisers or sliding sleeves may be repaired or replaced only with the help of transmission removal and similar is with damaged gear engagement dogs. If the transmission jumps out of gear, it can be shifted by worn shift shaft detent springs, synchroniser sliding sleeves or gear engagement dogs, as well as worn crankshaft thrust bearings which would need dismantling of the engine and crankshaft in turn. Problems in shifting may include improper clutch adjustment, worn synchronizers, a seized pilot bearing and a seized shift linkage, which may require the removal of worn bushings. Leakages could be from over fillings, blocked vents, or from leakages in the cast iron, seals or gaskets which require overhauling of the fillings and changing of the affected cast iron, seals or gaskets.
- Q: How to disconnect and remove the manual transmission assembly and transfer case on BMW X5?A:Disconnect the negative cable from the battery, ensuring to read the battery disconnection cautions beforehand. Raise and safely support the vehicle, then remove the front end reinforcement. Separate the exhaust system from the front exhaust pipe and place it aside, followed by removing the heat shield to the right of the transmission. Next, remove the front stabilizer bar and the front drive shaft, being prepared to catch any dripping fluid. For the rear driveshaft, remove the center bearing support fasteners while supporting the center of the driveshaft, detach the rear driveshaft flex-disc from the transfer case, and lower the center of the driveshaft to disengage the flex-disc from the transfer case flange, tying the driveshaft to the side. Disconnect the harness connector from the back-up light switch on the transmission and free the harnesses for the oxygen sensors and back-up light switch from the rear support for the transfer box and transmission. Support the transmission on a transmission jack, remove the mounting fasteners for the rear support of the transmission and transfer case, and lower the support. For a 6-speed transmission, detach the xDrive servomotor harness connectors at the transfer case. Lower the transmission jack slowly, allowing the engine and transmission assembly to tilt back and down slightly, being cautious of engine compartment components due to clearance issues at the rear of the engine. Unbolt the clutch slave cylinder from the side of the transmission without disconnecting the fluid hose, suspending it from the chassis with stiff wire, and unbolt it slowly to prevent air from entering the hydraulic system while avoiding operating the clutch pedal with the slave cylinder removed. Remove the shift rod clip and disconnect the shift linkage from the selector shaft coupling, then disconnect the shift console from the top of the transmission. Support the front of the engine with a tall jack stand or hydraulic jack, remove the transmission mounting Tone-head bolts while noting their length and location, and remove the transmission by pulling it backward until the input shaft clears the clutch disc splines, then pull it downwards and lower the transmission jack. Ensure the bellhousing alignment dowel sleeves are correctly located and replace any damaged sleeves. Inspect the clutch, clutch release bearing, and flywheel, repairing as necessary, and check and repair the transmission seals. When reinstalling the transmission, transfer parts from the old transmission if installing a new one, thoroughly clean the input shaft and clutch disc splines, and lightly lubricate the transmission input shaft before installation. To avoid difficulties in future transmission removal, use washers with Torx-head mounting bolts. Reinstall the transfer case and its support, centering the rear transfer case output flange in the driveshaft tunnel before tightening the support bracket bolts. Reinstall the driveshafts using new self-locking nuts, ensuring to hold the bolts stationary while tightening the nuts to avoid damaging the flex-disc rubber. Refill the transfer case and the transmission before starting or towing the vehicle.

 Gearbox")

Related BMW Parts


Browse by Model
128i Transmission Assembly 135i Transmission Assembly 228i Transmission Assembly 318i Transmission Assembly 318is Transmission Assembly 318ti Transmission Assembly 320i Transmission Assembly 323Ci Transmission Assembly 323i Transmission Assembly 325Ci Transmission Assembly 325e Transmission Assembly 325i Transmission Assembly 325is Transmission Assembly 325ix Transmission Assembly 325xi Transmission Assembly 328Ci Transmission Assembly 328i Transmission Assembly 328i xDrive Transmission Assembly 328is Transmission Assembly 328xi Transmission Assembly 330Ci Transmission Assembly 330e Transmission Assembly 330i Transmission Assembly 330xi Transmission Assembly 335d Transmission Assembly 335i Transmission Assembly 335xi Transmission Assembly 340i Transmission Assembly 428i Transmission Assembly 430i Transmission Assembly 435i Transmission Assembly 440i Transmission Assembly 524td Transmission Assembly 525i Transmission Assembly 528e Transmission Assembly 528i Transmission Assembly 530i Transmission Assembly 533i Transmission Assembly 535d Transmission Assembly 535i Transmission Assembly 535i xDrive Transmission Assembly 540i Transmission Assembly 545i Transmission Assembly 550i Transmission Assembly 633CSi Transmission Assembly 635CSi Transmission Assembly 640i Transmission Assembly 645Ci Transmission Assembly 650i Transmission Assembly 733i Transmission Assembly 735i Transmission Assembly 735iL Transmission Assembly 740i Transmission Assembly 740iL Transmission Assembly 745Li Transmission Assembly 745i Transmission Assembly 750Li Transmission Assembly 750i Transmission Assembly 750iL Transmission Assembly 840Ci Transmission Assembly 850CSi Transmission Assembly 850Ci Transmission Assembly Alpina B7 Transmission Assembly M2 Transmission Assembly M235i Transmission Assembly M240i Transmission Assembly M3 Transmission Assembly M340i Transmission Assembly M4 Transmission Assembly M5 Transmission Assembly M6 Transmission Assembly M8 Transmission Assembly X1 Transmission Assembly X2 Transmission Assembly X3 Transmission Assembly X4 Transmission Assembly X5 M Transmission Assembly X5 Transmission Assembly X6 Transmission Assembly X7 Transmission Assembly XM Transmission Assembly Z3 M Transmission Assembly Z3 Transmission Assembly Z4 Transmission Assembly Z8 Transmission Assembly i3 Transmission Assembly i8 Transmission Assembly
View More