×
- Hello
- Login or Register
- Quick Links
- Live Chat
- Track Order
- Parts Availability
- RMA
- Help Center
- Contact Us
- Shop for
- BMW Parts
- BMW Accessories
My Garage
My Account
Cart
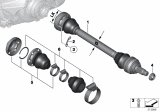
Genuine BMW X3 CV Boot
Axle Boot- Select Vehicle by Model
- Select Vehicle by VIN
Select Vehicle by Model
orSeries
Model
Year
Select Vehicle by VIN
For the most accurate results, select vehicle by your VIN (Vehicle Identification Number).
16 CV Boots found


BMW X3 Interior Repair Kit Bellows
Part Number: 31608680223$97.24 MSRP: $139.95You Save: $42.71 (31%)Ships in 1 Business Day


BMW X3 Exterior Repair Kit Bellows
Part Number: 31607608096$86.15 MSRP: $123.98You Save: $37.83 (31%)Ships in 1-3 Business Days


BMW X3 Exterior Repair Kit Bellows
Part Number: 31607549468$73.94 MSRP: $106.41You Save: $32.47 (31%)Ships in 1-3 Business Days
BMW X3 Repair Kit Bellows
Part Number: 32106890060$69.93 MSRP: $98.98You Save: $29.05 (30%)Ships in 1-3 Business Days
BMW X3 Exterior Repair Kit Bellows
Part Number: 31607529203$54.15 MSRP: $71.71You Save: $17.56 (25%)Ships in 1-3 Business Days
BMW X3 Repair Kit Bellows
Part Number: 34216888077$21.22 MSRP: $30.03You Save: $8.81 (30%)Ships in 1-3 Business Days
BMW X3 Exterior Repair Kit Bellows
Part Number: 33217529915$81.46 MSRP: $109.68You Save: $28.22 (26%)Ships in 1-3 Business Days
BMW X3 Interior Repair Kit Bellows
Part Number: 31607620599$69.52 MSRP: $92.06You Save: $22.54 (25%)Ships in 1-3 Business Days
BMW X3 Interior Repair Kit Bellows
Part Number: 31607529204$69.52 MSRP: $92.06You Save: $22.54 (25%)Ships in 1-3 Business Days
BMW X3 Exterior Repair Kit Bellows
Part Number: 33217529919$80.29 MSRP: $108.10You Save: $27.81 (26%)Ships in 1-3 Business Days
BMW X3 Exterior Repair Kit Bellows
Part Number: 33213421366$97.89 MSRP: $131.79You Save: $33.90 (26%)Ships in 1-3 Business Days
BMW X3 Exterior Repair Kit Bellows
Part Number: 33217540117$99.13 MSRP: $133.47You Save: $34.34 (26%)Ships in 1-3 Business Days
BMW X3 Interior Repair Kit Bellows
Part Number: 33217540118$107.72 MSRP: $145.03You Save: $37.31 (26%)Ships in 1-3 Business Days
BMW X3 Interior Repair Kit Bellows
Part Number: 33217529920$107.72 MSRP: $145.03You Save: $37.31 (26%)Ships in 1-3 Business DaysBMW X3 Interior Repair Kit Bellows
Part Number: 33217529916$107.72 MSRP: $145.03You Save: $37.31 (26%)Ships in 1-3 Business DaysBMW X3 Interior Repair Kit Bellows
Part Number: 33213421367$107.72 MSRP: $145.03You Save: $37.31 (26%)Ships in 1-3 Business Days
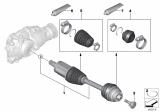
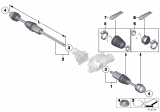
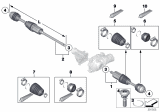
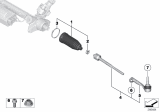
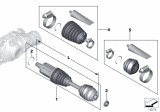
BMW X3 CV Boot
If you are looking for OEM BMW X3 CV Boot, we highly recommend to shop with us. Not only do we offer budget friendly prices, but we also provide fast delivery. In addition, we have a hassle-free return policy on all genuine BMW X3 CV Boot that come backed by the manufacturer's warranty.
BMW X3 CV Boot Parts Questions & Experts Answers
- Q: How to replace a front outer CV boot using a complete boot repair kit from an authorized BMW dealer on BMW X3?A:When replacing a CV boot, use a complete boot repair kit available from an authorized BMW dealer parts department, which includes a new boot, clamping bands, special lubricant, and a new CV joint shaft circlip. Begin by removing the drive axle and placing it in a shop vice with aluminum jaws. Release the boot clamps from both ends of the outer CV boot, cut off the boot, and discard it. Use a soft-faced hammer to pound the outer CV joint off the drive axle, then pry the spring clip off the drive axle splines with a flat blade screwdriver. Clean the old lubricant off the axle splines and inspect the CV joint for galling, pitting, and other signs of wear or physical damage, noting that polished surfaces or visible ball tracks alone are not necessarily cause for replacement, while discoloration indicates a lack of lubrication. Place the new clamping bands and CV boot over the drive axle, replace the spring clip on the splined end, and pack the joint with fresh CV joint grease. Tap the CV joint onto the splined end of the drive axle until the spring clip snaps audibly into place, then use clamp pliers to secure the retaining clamp tightly, sealing the large end of the boot against the CV joint. Before installing the small boot clamp, flex the CV joint as far over as it will go and insert a small screwdriver between the boot and Axle Shaft to eliminate any air. With the outer boot full of grease and air removed, secure the small end of the boot on the CV joint by pinching the clamp with pliers. The remainder of the installation follows the reverse order of removal, and it is important to check the differential oil level afterward.
