×
- Hello
- Login or Register
- Quick Links
- Live Chat
- Track Order
- Parts Availability
- RMA
- Help Center
- Contact Us
- Shop for
- BMW Parts
- BMW Accessories
My Garage
My Account
Cart
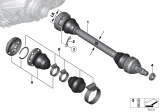
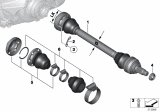
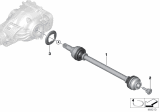
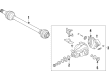
Genuine BMW Z4 Axle Shaft
Car Axle Shaft- Select Vehicle by Model
- Select Vehicle by VIN
Select Vehicle by Model
orSeries
Model
Year
Select Vehicle by VIN
For the most accurate results, select vehicle by your VIN (Vehicle Identification Number).
26 Axle Shafts found


BMW Z4 OUTPUT SHAFT RIGHT REAR
Part Number: 33205A733B6$1182.91 MSRP: $1547.74You Save: $364.83 (24%)Ships in 1-2 Business Days
BMW Z4 Cv Axle Assembly Rear Right
Part Number: 33211229708$595.92 MSRP: $623.66You Save: $27.74 (5%)Ships in 1-3 Business Days
BMW Z4 Passenger Rear Axle Shaft
Part Number: 33207632150$644.86 MSRP: $843.74You Save: $198.88 (24%)Ships in 1-3 Business DaysBMW Z4 Cv Axle Assembly Rear Left
Part Number: 33207632149$1038.64 MSRP: $1358.98You Save: $320.34 (24%)Ships in 1-3 Business Days
BMW Z4 Output Shaft Rear Left
Part Number: 33208666073$1113.58 MSRP: $1457.03You Save: $343.45 (24%)Ships in 1-3 Business Days
BMW Z4 RP OUTPUT SHAFT, LEFT
Part Number: 33207587791$1159.70 MSRP: $1517.38You Save: $357.68 (24%)Ships in 1-2 Business Days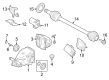
BMW Z4 OUTPUT SHAFT REAR LEFT
Part Number: 33205A74AC7$1182.91 MSRP: $1547.74You Save: $364.83 (24%)Ships in 1-2 Business Days
BMW Z4 Cv Axle Assembly Left
Part Number: 33207566233$238.06 MSRP: $247.46You Save: $9.40 (4%)Ships in 1-3 Business DaysBMW Z4 Axle Assy
Part Number: 33207589057$648.57 MSRP: $843.74You Save: $195.17 (24%)Ships in 1-3 Business DaysBMW Z4 Output Shaft Rear Left
Part Number: 33209896323$1182.91 MSRP: $1547.74You Save: $364.83 (24%)Ships in 1-3 Business DaysBMW Z4 Cv Axle Assembly Left
Part Number: 33211229707$595.92 MSRP: $623.66You Save: $27.74 (5%)Ships in 1-3 Business Days
BMW Z4 RP OUTPUT SHAFT, RIGHT
Part Number: 33207587792$1159.70 MSRP: $1517.38You Save: $357.68 (24%)Ships in 1-2 Business DaysBMW Z4 Axle Assy
Part Number: 33207580772$1159.70 MSRP: $1517.38You Save: $357.68 (24%)Ships in 1-3 Business DaysBMW Z4 Output Shaft Rear Right
Part Number: 33209896324$1182.91 MSRP: $1547.74You Save: $364.83 (24%)Ships in 1-3 Business Days
BMW Z4 Output Shaft Rear Right
Part Number: 33209452904$1182.91 MSRP: $1547.74You Save: $364.83 (24%)Ships in 1-3 Business Days
BMW Z4 OUTPUT SHAFT REAR LEFT
Part Number: 33205A733B3$1182.91 MSRP: $1547.74You Save: $364.83 (24%)Ships in 1-2 Business Days
BMW Z4 Cv Axle Shaft Right
Part Number: 33207566232$729.55 MSRP: $806.54You Save: $76.99 (10%)Ships in 1-3 Business DaysBMW Z4 Rear Axle Shaft
Part Number: 33211229592$592.20 MSRP: $623.66You Save: $31.46 (6%)Ships in 1-3 Business DaysBMW Z4 Cv Axle Assembly Rear Left
Part Number: 33211229591$595.92 MSRP: $623.66You Save: $27.74 (5%)Ships in 1-3 Business DaysBMW Z4 Cv Axle Assembly Rear Right
Part Number: 33207571054$782.65 MSRP: $823.12You Save: $40.47 (5%)Ships in 1-3 Business Days
| Page 1 of 2 |Next >
1-20 of 26 Results
BMW Z4 Axle Shaft
If you are looking for OEM BMW Z4 Axle Shaft, we highly recommend to shop with us. Not only do we offer budget friendly prices, but we also provide fast delivery. In addition, we have a hassle-free return policy on all genuine BMW Z4 Axle Shaft that come backed by the manufacturer's warranty.
BMW Z4 Axle Shaft Parts Questions & Experts Answers
- Q: How to remove and install Axle Shaft on BMW Z4?A:New driveshaft retaining fasteners will be required on installation. To remove the axle shaft, first, take off the wheel trim or hub cap if applicable, and loosen the axle shaft retaining nut while the vehicle is on its wheels, also loosening the wheel bolts. Chock the front wheels, raise the rear of the vehicle, and support it on jackstands before removing the relevant rear wheel. If removing the left-hand axle shaft, detach the exhaust system tailpipe for better access. Loosen and remove the left and right-hand stabilizer bar mountings, pivoting the bar downwards. Next, remove the axle shaft nut, make alignment marks, and then loosen and remove the bolts securing the axle shaft constant velocity joint to the Differential unit, recovering any retaining plates if equipped. Position the axle shaft clear of the flange and tie it to the vehicle underbody with wire, ensuring it does not hang under its own weight to avoid damaging the CV joint. Withdraw the axle shaft outer constant velocity joint from the hub assembly, using a soft-faced hammer to carefully tap it out if it is tight, or press it out with a suitable tool if necessary, then remove the axle shaft from underneath the vehicle. For installation, reverse the removal steps, applying a drop of clean oil to the new axle shaft nut where it contacts the flange before installing and tightening it to the specified torque. If needed, wait until the vehicle is lowered to the ground to tighten the nut fully, then stake it using a hammer and punch. Finally, install new inner joint retaining bolts and plates if equipped, tightening them to the specified torque.

Related BMW Z4 Parts
 BMW Z4 Wheel Bearing
 BMW Z4 Transmission Assembly
 BMW Z4 Engine Mount
 BMW Z4 Transmission Pan
 BMW Z4 Motor And Transmission Mount
 BMW Z4 Torque Converter
 BMW Z4 Transmission Oil Cooler
Browse by Year
2025 Axle Shaft 2024 Axle Shaft 2023 Axle Shaft 2022 Axle Shaft 2021 Axle Shaft 2020 Axle Shaft 2019 Axle Shaft 2016 Axle Shaft 2015 Axle Shaft 2014 Axle Shaft 2013 Axle Shaft 2012 Axle Shaft 2011 Axle Shaft 2010 Axle Shaft 2009 Axle Shaft 2008 Axle Shaft 2007 Axle Shaft 2006 Axle Shaft 2005 Axle Shaft 2004 Axle Shaft 2003 Axle Shaft