×
- Hello
- Login or Register
- Quick Links
- Live Chat
- Track Order
- Parts Availability
- RMA
- Help Center
- Contact Us
- Shop for
- BMW Parts
- BMW Accessories
My Garage
My Account
Cart
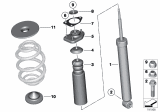
Genuine BMW Z4 Shock Absorber
Suspension Shock Absorber- Select Vehicle by Model
- Select Vehicle by VIN
Select Vehicle by Model
orSeries
Model
Year
Select Vehicle by VIN
For the most accurate results, select vehicle by your VIN (Vehicle Identification Number).
45 Shock Absorbers found


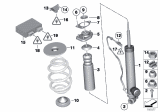
BMW Z4 Rear Left Shock Absorber
Part Number: 37126790001$430.08 MSRP: $681.89You Save: $251.81 (37%)Ships in 1-3 Business Days


BMW Z4 Rear Right Shock Absorber
Part Number: 37126790002$430.08 MSRP: $681.89You Save: $251.81 (37%)Ships in 1-3 Business Days


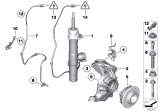
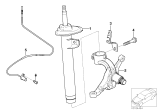
BMW Z4 Front Left Suspension Strut
Part Number: 37116792835$815.85 MSRP: $1258.09You Save: $442.24 (36%)Ships in 1-3 Business Days


BMW Z4 Front Right Suspension Strut
Part Number: 37116792836$815.85 MSRP: $1258.09You Save: $442.24 (36%)

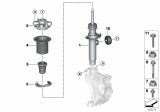
BMW Z4 Front Left Suspension Strut
Part Number: 37116792891$815.85 MSRP: $1258.09You Save: $442.24 (36%)Ships in 1-3 Business Days
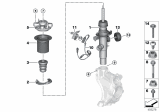
BMW Z4 Spring Strut Front Left VDC
Part Number: 37106895065$743.63 MSRP: $1146.73You Save: $403.10 (36%)Ships in 1-3 Business DaysBMW Z4 Spring Strut Front Left VDC
Part Number: 37106895067$743.63 MSRP: $1146.73You Save: $403.10 (36%)Ships in 1-3 Business DaysBMW Z4 Spring Strut Front Right VDC
Part Number: 37106895066$743.63 MSRP: $1146.73You Save: $403.10 (36%)Ships in 1-3 Business Days
BMW Z4 Front Right Spring Strut
Part Number: 31316879192$333.36 MSRP: $509.66You Save: $176.30 (35%)Ships in 1-3 Business DaysBMW Z4 Front Right Spring Strut
Part Number: 31316879194$376.70 MSRP: $575.93You Save: $199.23 (35%)Ships in 1-3 Business DaysBMW Z4 Left Front Spring Strut
Part Number: 31316879193$376.70 MSRP: $575.93You Save: $199.23 (35%)Ships in 1-3 Business Days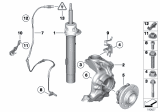
BMW Z4 Front Right Suspension Strut
Part Number: 31316784918$323.65 MSRP: $494.82You Save: $171.17 (35%)Ships in 1-3 Business DaysBMW Z4 Front Left Suspension Strut
Part Number: 31316784917$323.65 MSRP: $494.82You Save: $171.17 (35%)Ships in 1-3 Business Days
BMW Z4 Front Right Spring Strut
Part Number: 31316785586$412.29 MSRP: $543.06You Save: $130.77 (25%)Ships in 1-3 Business DaysBMW Z4 Left Front Spring Strut
Part Number: 31316879191$333.36 MSRP: $509.66You Save: $176.30 (35%)Ships in 1-3 Business Days
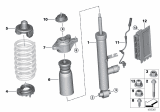
BMW Z4 SPRING STRUT, EDC, REAR
Part Number: 37106895295$634.23 MSRP: $912.82You Save: $278.59 (31%)Ships in 1-3 Business Days
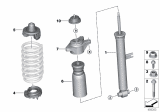
BMW Z4 Rear Spring Strut
Part Number: 33526879207$251.60 MSRP: $359.02You Save: $107.42 (30%)Ships in 1-3 Business DaysBMW Z4 Rear Spring Strut
Part Number: 33526879208$284.33 MSRP: $405.72You Save: $121.39 (30%)Ships in 1-3 Business DaysBMW Z4 Front Left Suspension Strut
Part Number: 31316761895$412.29 MSRP: $543.06You Save: $130.77 (25%)Ships in 1-3 Business Days
BMW Z4 Rear Shock Absorber
Part Number: 33526784950$167.64 MSRP: $263.54You Save: $95.90 (37%)Ships in 1-3 Business Days
| Page 1 of 3 |Next >
1-20 of 45 Results
BMW Z4 Shock Absorber
If you are looking for OEM BMW Z4 Shock Absorber, we highly recommend to shop with us. Not only do we offer budget friendly prices, but we also provide fast delivery. In addition, we have a hassle-free return policy on all genuine BMW Z4 Shock Absorber that come backed by the manufacturer's warranty.
BMW Z4 Shock Absorber Parts Questions & Experts Answers
- Q: How to remove, inspect, and replace the rear shock absorber on BMW Z4?A:New shock absorber upper mounting nuts and a new mounting gasket will have to be provided for fixing. Start with the front wheels and then proceed to lift the rear part of the car and secure it with jack stands, remove the rear wheel for ease of access. For Sedan and Coupe models, remove the carpet and the shock absorber liner in the trunk, also, take out the warning triangle and its bracket, side trim cover and insulation panel to gain access to the nuts and bolts securing the upper end of the shock absorber. As for wagon models, it is necessary to take out the interior trim panel. Place a jack under the Trailing Arm so that the latter would not fall down when the nut for the shock absorber is removed. Unfasten and unravel the shock absorber to trailing arm bolt while the upper mounting bolts can be accessed from inside the boot, after which the shock absorber should be lowered with the gasket being retrieved. During the overhaul a new piston nut will be necessary; unscrew the trim cap on top of the shock absorber, wash it then free and take off the piston nut and dished washer paying attention to their position. Raise the upper mounting plate, undo the dust cover and slide off the spacer and rubber stop on the shock absorbent piston. Check for leakage of the fluids, pitting on the piston and also check the body of the shock absorber, and test for smooth resistance when operating. Check for signs of wear of tear in all the parts and replace any that may be badly affected. Reassemble by fitting the rubber stop and spacer in position on the shock piston, then the dust cover, upper mounting plate, dished washer and the new piston nut should be fitted before tightening. Position the upper mounting plate and the body contact surfaces for the installation; it is recommended that a new gasket should always be used. Roll the shock absorber in place and then fit the new upper mounting nuts. Align the lower end of the shock absorber in such a manner that the mounting bushing spacer washer is towards the bolt before tightening the lower mounting bolt, but only manually at first. In the specified torque tighten the upper mounting nuts then re-fix the insulation panel luggage compartment trim panel rear light access cover and loudspeaker as required. Last, retighten the wheel bolt and lower the car until the wheel touches the ground, and the tighten the shock absorber lower mounting bolt to the recommended torque.

Related BMW Z4 Parts


Browse by Year
2025 Shock Absorber 2024 Shock Absorber 2023 Shock Absorber 2022 Shock Absorber 2021 Shock Absorber 2020 Shock Absorber 2019 Shock Absorber 2016 Shock Absorber 2015 Shock Absorber 2014 Shock Absorber 2013 Shock Absorber 2012 Shock Absorber 2011 Shock Absorber 2010 Shock Absorber 2009 Shock Absorber 2008 Shock Absorber 2007 Shock Absorber 2006 Shock Absorber 2005 Shock Absorber 2004 Shock Absorber 2003 Shock Absorber