×
- Hello
- Login or Register
- Quick Links
- Live Chat
- Track Order
- Parts Availability
- RMA
- Help Center
- Contact Us
- Shop for
- BMW Parts
- BMW Accessories
My Garage
My Account
Cart
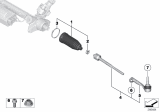
Genuine BMW Z4 Tie Rod End
Steering Rod End- Select Vehicle by Model
- Select Vehicle by VIN
Select Vehicle by Model
orSeries
Model
Year
Select Vehicle by VIN
For the most accurate results, select vehicle by your VIN (Vehicle Identification Number).
6 Tie Rod Ends found


BMW Z4 Steering Tie Rod End Left
Part Number: 32106767781$105.63 MSRP: $107.52You Save: $1.89 (2%)Ships in 1-3 Business Days


BMW Z4 Tie Rod End, Right
Part Number: 32106774221$132.64 MSRP: $184.59You Save: $51.95 (29%)Ships in 1-3 Business Days
BMW Z4 Tie Rod End, Right
Part Number: 32106767782$105.63 MSRP: $107.52You Save: $1.89 (2%)Ships in 1-3 Business Days


BMW Z4 Steering Tie Rod End Left
Part Number: 32106774220$132.64 MSRP: $184.59You Save: $51.95 (29%)Ships in 1-3 Business Days
BMW Z4 BALL JOINT, LEFT
Part Number: 32106887400$115.01 MSRP: $177.78You Save: $62.77 (36%)Ships in 1-3 Business Days
BMW Z4 BALL JOINT, RIGHT
Part Number: 32106887402$115.01 MSRP: $177.78You Save: $62.77 (36%)Ships in 1-3 Business Days
BMW Z4 Tie Rod End
If you are looking for OEM BMW Z4 Tie Rod End, we highly recommend to shop with us. Not only do we offer budget friendly prices, but we also provide fast delivery. In addition, we have a hassle-free return policy on all genuine BMW Z4 Tie Rod End that come backed by the manufacturer's warranty.
BMW Z4 Tie Rod End Parts Questions & Experts Answers
- Q: How to remove and reinstall Tie Rod End on BMW Z4?A:If re-assembly, then a new tie-rod end ball joint retaining nut will be needed. First use the parking brake, lift the front of the car and place it on jackstands and then take off the respective front wheel. Stain a point on of the tie-rod and take the dimension of the marked point and the center of the balljoint thus keeping records for wheel alignment when subsequently reinstalling the unit. Lay hold of the nut on the tie-rod and unwind the balljoint locknut; turn and detach the nut fixing the tie-rod end to the steering-knuckle with a universal balljoint separator to free the balljoint tapered shank. Determine the very number of rotations so that it is possible to unscrew the tie-rod end and being very delicate, clean the threads on the ballstud. If the balljoint shows excessive lateral movement, binds, appears worn or damaged, the tie-rod end should be replaced, along with checking stud taper and threads; should the rubber boot on the balljoint be damaged, the tie-rod end must be replaced since the boot is not sold separately. In the position described, you can take out the tie-rod freeing the locknut and collar, if necessary, between the tie-rod-end and the car; then screw on the new tie-rod end by the number of turns recorded at the time of removal to position the ball-joint correctly. Put back the balljoint shank at the Steering Knuckle then fit a new nut at the end of the balljoint and tighten it to the recommended torque while the locknut is also tightened. Fit back the wheel, bring down the car to the ground and finally, tighten the wheel bolts to the required torque. Last of all, measure and reset the front wheel toe as possible before final tightening the tie-rod end locknut to the standard torque.


