×
- Hello
- Login or Register
- Quick Links
- Live Chat
- Track Order
- Parts Availability
- RMA
- Help Center
- Contact Us
- Shop for
- BMW Parts
- BMW Accessories
My Garage
My Account
Cart
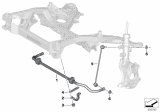
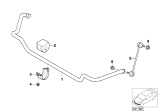
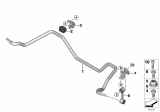
Genuine BMW Z4 Sway Bar Kit
Stabilizer Sway Bar Set- Select Vehicle by Model
- Select Vehicle by VIN
Select Vehicle by Model
orSeries
Model
Year
Select Vehicle by VIN
For the most accurate results, select vehicle by your VIN (Vehicle Identification Number).
17 Sway Bar Kits found

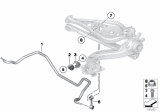
BMW Z4 Rear Stabilizer
Part Number: 33556784923$200.13 MSRP: $257.41You Save: $57.28 (23%)Ships in 1-3 Business Days
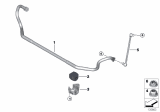
BMW Z4 Stabilizer Front With Rubber Mounting
Part Number: 31356793171$237.12 MSRP: $307.59You Save: $70.47 (23%)Ships in 1-3 Business Days
BMW Z4 Stabilizer Front With Rubber Mounting
Part Number: 31356793190$237.12 MSRP: $307.59You Save: $70.47 (23%)Ships in 1-3 Business Days
BMW Z4 Rear Axle Stabilizer
Part Number: 33505A4F1C7$233.48 MSRP: $300.30You Save: $66.82 (23%)Ships in 1-3 Business Days
BMW Z4 Rear Stabilizer
Part Number: 33506881582$233.48 MSRP: $300.30You Save: $66.82 (23%)Ships in 1-3 Business Days
BMW Z4 Rear Stabilizer
Part Number: 33506881581$233.48 MSRP: $300.30You Save: $66.82 (23%)Ships in 1-3 Business Days
BMW Z4 Rear Stabilizer
Part Number: 33506881579$233.48 MSRP: $300.30You Save: $66.82 (23%)Ships in 1-3 Business Days
BMW Z4 Stabilizer Front With Rubber
Part Number: 31306873994$257.43 MSRP: $333.94You Save: $76.51 (23%)Ships in 1-3 Business Days
BMW Z4 Stabilizer Front With Rubber
Part Number: 31306873993$262.08 MSRP: $339.97You Save: $77.89 (23%)Ships in 1-3 Business Days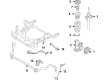
BMW Z4 Stabilizer Front With Rubber
Part Number: 31305A56448$262.08 MSRP: $339.97You Save: $77.89 (23%)Ships in 1-2 Business DaysBMW Z4 Stabilizer Front With Rubber
Part Number: 31305A56447$262.08 MSRP: $339.97You Save: $77.89 (23%)Ships in 1-2 Business DaysBMW Z4 Stabilizer Front With Rubber
Part Number: 31305A08AB9$262.08 MSRP: $339.97You Save: $77.89 (23%)Ships in 1-2 Business Days
BMW Z4 Front Stabilizer
Part Number: 31351096364$161.01 MSRP: $189.83You Save: $28.82 (16%)Ships in 1-3 Business Days

BMW Z4 Front Stabilizer
Part Number: 31351094542$326.63 MSRP: $388.40You Save: $61.77 (16%)Ships in 1-3 Business Days
BMW Z4 Rear Stabilizer
Part Number: 33551095758$174.36 MSRP: $194.75You Save: $20.39 (11%)Ships in 1-3 Business DaysBMW Z4 Rear Stabilizer
Part Number: 33551094545$229.49 MSRP: $256.33You Save: $26.84 (11%)Ships in 1-3 Business DaysBMW Z4 Stabilizer Front With Rubber
Part Number: 31306873995$257.43 MSRP: $333.94You Save: $76.51 (23%)Ships in 1-3 Business Days
BMW Z4 Sway Bar Kit
If you are looking for OEM BMW Z4 Sway Bar Kit, we highly recommend to shop with us. Not only do we offer budget friendly prices, but we also provide fast delivery. In addition, we have a hassle-free return policy on all genuine BMW Z4 Sway Bar Kit that come backed by the manufacturer's warranty.
BMW Z4 Sway Bar Kit Parts Questions & Experts Answers
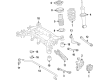
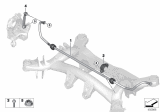
- Q: How to remove, inspect, and reinstall the rear Sway Bar Kit on BMW Z4?A:New mounting clamp nuts and connecting link nuts will be required on installation. Begin by chocking the front wheels, raising the rear of the vehicle, and securely supporting it on jackstands. For better access, remove the rear wheels. Loosen and remove the nut and bolt securing each connecting link to the upper control arms, and also remove the nut and bolt securing the Sway Bar Kit link to the control arm. Make alignment marks between the mounting bushings and Sway Bar Kit, then loosen the Sway Bar Kit clamp retaining nuts and bolts, marking the relationship of the bushings to the Sway Bar Kit. Remove both clamps from the subframe and maneuver the Sway Bar Kit and connecting link assembly out from underneath the car, then take off the bushings and connecting links from the bar. Carefully examine the Sway Bar Kit components for signs of wear, damage, or deterioration, particularly the bushings, and replace any worn components as necessary. For installation, place the rubber mounting bushings onto the Sway Bar Kit, aligning them with the previously made marks, and rotate each bushing so that its flat surface faces forwards. Position the Sway Bar Kit and locate the connecting links in the upper control arms, then install the new retaining nuts and tighten securely. Reinstall the mounting clamps, ensuring their ends are correctly located in the hooks on the subframe, and install the bolts and new retaining nuts, making sure the bushing markings remain aligned with the marks on the bars before securely tightening the mounting clamp retaining nuts. Finally, reinstall the wheels, lower the car to the ground, and tighten the wheel bolts to the specified torque.

Related BMW Z4 Parts
 BMW Z4 Steering Wheel
 BMW Z4 Steering Column
 BMW Z4 Sway Bar Link
 BMW Z4 Sway Bar Bushing
 BMW Z4 Sway Bar Bracket
Browse by Year
2025 Sway Bar Kit 2024 Sway Bar Kit 2023 Sway Bar Kit 2022 Sway Bar Kit 2021 Sway Bar Kit 2020 Sway Bar Kit 2019 Sway Bar Kit 2016 Sway Bar Kit 2015 Sway Bar Kit 2014 Sway Bar Kit 2013 Sway Bar Kit 2012 Sway Bar Kit 2011 Sway Bar Kit 2010 Sway Bar Kit 2009 Sway Bar Kit 2008 Sway Bar Kit 2007 Sway Bar Kit 2006 Sway Bar Kit 2005 Sway Bar Kit 2004 Sway Bar Kit 2003 Sway Bar Kit