×
- Hello
- Login or Register
- Quick Links
- Live Chat
- Track Order
- Parts Availability
- RMA
- Help Center
- Contact Us
- Shop for
- BMW Parts
- BMW Accessories
My Garage
My Account
Cart
Genuine 2010 BMW 335i Cylinder Head
Head- Select Vehicle by Model
- Select Vehicle by VIN
Select Vehicle by Model
orSeries
Model
Year
Select Vehicle by VIN
For the most accurate results, select vehicle by your VIN (Vehicle Identification Number).
1 Cylinder Head found

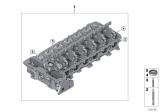
2010 BMW 335i Cylinder Head
Part Number: 11127588249$5653.26 MSRP: $7179.29You Save: $1526.03 (22%)Ships in 1-3 Business DaysProduct Specifications- Replaces: 11-12-7-566-709, 11-12-7-574-298
- Item Weight: 34.60 Pounds
- Condition: New
- Fitment Type: Direct Replacement
- SKU: 11127588249
- Warranty: This genuine part is guaranteed by BMW's factory warranty.
2010 BMW 335i Cylinder Head
Are you in need of a high-quality yet affordable OEM 2010 BMW 335i Cylinder Head? Look no further. Our website boasts an extensive selection of genuine 2010 BMW 335i Cylinder Head, all priced competitively. Plus, our top-notch customer service and speedy delivery options ensure a seamless shopping experience for you.
2010 BMW 335i Cylinder Head Parts Questions & Experts Answers
- Q: What are the steps involved in cleaning and reassembling the engine block sealing surface and cylinder head in N51,N52,N52KP six cylinder engine on 2010 BMW 335i?A: Before proceeding to clean the sealing surface of the engine block, fill any holes in the oil ways with plugs and if possible identify the cylinder head gasket ID on the right front corner of the gasket. Scrape off rough deposits on the sealing faces of the cylinder head and crankcase; use no metal cutting tools in order not to mar the surface. Scrub each blind hole using a grindstone, to ensure each of them is free from coolant, water or engine oil. Check the cylinder head for cracks or other visible defects and clean the gasket contact surfaces of the block and chain housing and make sure they are free of foreign matter of liquid in bolt holes in order no to damage the engine block. It is used a hard wooden or plastic scraper only in exceptional cases, and the abrasive discs for cleaning the metal surfaces, with the help of an electric drill. Verify conditions of cylinder head for warpage by disconnecting and removing intake and exhaust camshafts and intermediate intake levers and keeping components identified, if necessary. This can be done by using a straight edge to level off the sealing surface of the cylinder head in both longitudinal and transverse sections, the cylinder head must also be examined for leaks and or cracks. If the surface is warped slightly but is still sound, machine it a maximum of 0.3 mm away from the sealing surface and then refit the cylinder head or use a recast cylinder head. Check that the two cylinder head aligning sleeves are in proper position and free from any damage before reinstalling the cylinder head gasket, Whilst if head is machined the gasket which used is special gasket. Positioning of the cylinder head on engine block, then installing it on the aligning sleeves, fix new aluminum cylinder head bolts which are of correct lengths. Torque all bolts in the sequence shown and using the following BMW special tools, apply the third stage only to M10 bolts. Bolt the cylinder head on the timing chain housing using new aluminum bolts; replace the eccentric shaft stop screw, magnet wheel, and the sensor and get the timing chain out of the housing. Put the chain across the chain module, engage it to the lower chain rail, and replace the chain module attaching screws. New bolts should be fitted to reattach the camshaft adjustment units and it has been found that the exhaust units are thinner than the intake ones. Secure the camshafts with special tools, and install the chain tensioner and sprockets with the camshaft timing set in place, this is done while draining the oil chamber if the tensioner is the one that is reused, and the use of the new sealing O-ring must be made. The rest of the installation entails the reverse of removal, which entails the removal of the locking tools, putting back the cylinder head cover together with a new gasket, reconnecting the ground cables, reinstalling the fuel rail together with the new O-ring seals and the cooling system refilling and bleeding.
Related 2010 BMW 335i Parts
 2010 BMW 335i Rocker Arm
 2010 BMW 335i Rocker Shaft Spring Kit
 2010 BMW 335i Cylinder Head Gasket
 2010 BMW 335i Camshaft
 2010 BMW 335i Intake Valve
 2010 BMW 335i Exhaust Valve