×
- Hello
- Login or Register
- Quick Links
- Live Chat
- Track Order
- Parts Availability
- RMA
- Help Center
- Contact Us
- Shop for
- BMW Parts
- BMW Accessories
My Garage
My Account
Cart
Genuine BMW 335i Cylinder Head
Head- Select Vehicle by Model
- Select Vehicle by VIN
Select Vehicle by Model
orSeries
Model
Year
Select Vehicle by VIN
For the most accurate results, select vehicle by your VIN (Vehicle Identification Number).
3 Cylinder Heads found

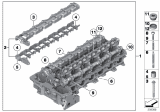
BMW 335i Valve Gear Cylinder Head
Part Number: 11127624429$7865.39 MSRP: $9988.56You Save: $2123.17 (22%)Ships in 1-3 Business Days
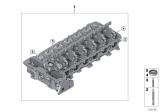
BMW 335i Cylinder Head
Part Number: 11127588249$5653.26 MSRP: $7179.29You Save: $1526.03 (22%)Ships in 1-3 Business Days
BMW 335i Valve Gear Cylinder Head
Part Number: 11127646131$7865.39 MSRP: $9988.56You Save: $2123.17 (22%)Ships in 1-3 Business Days
BMW 335i Cylinder Head
If you are looking for OEM BMW 335i Cylinder Head, we highly recommend to shop with us. Not only do we offer budget friendly prices, but we also provide fast delivery. In addition, we have a hassle-free return policy on all genuine BMW 335i Cylinder Head that come backed by the manufacturer's warranty.
BMW 335i Cylinder Head Parts Questions & Experts Answers
- Q: What are the steps and precautions for removing cylinder head in N55 six cylinder engine on BMW 335i?A:To remove the N55 engine cylinder head, first remove the engine, as special tools and procedures are necessary for the removal and installation of camshaft adjustment units and for timing camshafts. It is important to read the entire procedure before beginning repairs. Disassembly, removal, and assembly of camshafts, camshaft adjustment units, or the cylinder head without BMW special tools can lead to damage or breakage, such as bent valves from contact with piston crowns or a camshaft snapping if bent by valve springs. If a cylinder head requires significant reconditioning work after removal, a remanufactured cylinder head is available from an authorized BMW dealer.
- Q: What special tools and procedures are necessary for removing and installing the cylinder head in N51,N52,N52KP six cylinder engine on BMW 335i?A:When removing and installing the cylinder head, BMW special tools and procedures are necessary for the removal and installation of camshaft adjustment units and the valvetronic eccentric shaft, as well as for timing the camshafts. It is important to read the entire procedure before beginning repairs. Disassembly, removal, and assembly of camshafts, camshaft adjustment units, or the cylinder head without special tools can lead to damage or breakage, with the risk of valves being bent due to contact with piston crowns. Camshaft timing is addressed in a separate section. Procedures for cylinder head removal and installation are outlined distinctly. If a cylinder head is removed and found to need significant reconditioning work, a remanufactured cylinder head can be obtained from an authorized BMW dealer.
- Q: How to clean, inspect, machining and reassemble the cylinder head in N54 six cylinder engine on BMW 335i?A:Before cleaning the sealing surface of an engine block, install plugs into the oil holes. Scraping of coarse residues on sealing surfaces of the cylinder head and crankcase has to be done non-metallistic scraper to avoid damage. Unwilling fine residues must first be removed by using a grindstone where no metal-cutting tools are allowed. For all blind holes it is necessary to remove any coolant, water, engine oil to ensure that there will be no cracking or corrosion, visually examine the cylinder head for presence of any crack/defect. To check for warpage, the intake and exhaust camshafts, roller cam followers, valve lifters and the valves have to be removed. A straight edge should also be used to ensure that the sealing surface is straight in the longitudinal and transverse direction; cylinder head should also be checked for coolant leaks and crack. If helical but within tolerance which may be at most 0.3 mm deviated off the sealing surface, then machine flat as much as possible of the sealing surface and use a reconditioned cylinder head or reassemble the machine. Whenthe cylinder head is assembled with the valves and camshafts, the cylinder head should be placed on its side on a work bench so that the valves are protected. Make sure that the two aligning sleeves are well placed and free from defects, before calling it a day for fastening the cylinder head gasket. If machined, use a special gasket from the authorised dealer; this is 0.3mm thicker than the other standard gaskets. Locate the cylinder head on the engine block and position it so that aligning sleeves fit into the cylinders and install new aluminum cylinder head bolts of length as required. Apply the special tools as recommended while tightening the bolts to the right sequence; it is to be noted that stage three is only applicable to M11 bolts. Fasten cylinder head bolts in the timing chain housing to avoid dropping the lower ones into the crankcase used a mechanical grippers. Remove the timing chain from inside the housing, position the chain over the chain module and fasten the module to the lower chain rail with the convoluted screw; replace the mounting bolts of the chain module. New bolts are to be used in the reassembly of the camshaft adjustment units, showing that the exhaust and intake units are distinguishable. Safely secure the cams with specific tools, fit in the chain protractor and adjust the cam shaft timing. If the chain tensioner is to be reused then drain the oil chamber and then slowly compress the tensioner. The chain tensioner comes from the factory without a sealing ring thus when reassembling the sealing O-ring should be new. The rest of the installation proceeds in the reverse direction of the removal - it is important to clear up locking tools and to install the cylinder head cover with the new gasket; to reconnect the grounded cables, to assemble the new O-ring seals and to install the fuel rail; to reinstall the engine; and, finally, to fill in and bleed the cooling system.


