×
- Hello
- Login or Register
- Quick Links
- Live Chat
- Track Order
- Parts Availability
- RMA
- Help Center
- Contact Us
- Shop for
- BMW Parts
- BMW Accessories
My Garage
My Account
Cart
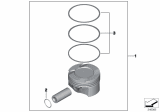
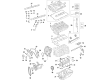
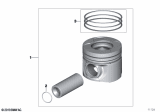
Genuine BMW Piston
Engine Pistons- Select Vehicle by Model
- Select Vehicle by VIN
Select Vehicle by Model
orSeries
Model
Year
Select Vehicle by VIN
For the most accurate results, select vehicle by your VIN (Vehicle Identification Number).
220 Pistons found


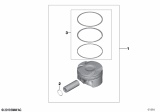
BMW Piston
Part Number: 11257613626$324.76 MSRP: $421.29You Save: $96.53 (23%)Ships in 1-3 Business DaysProduct Specifications- Replaces: 11-25-7-576-475


BMW Piston
Part Number: 11258607933$373.47 MSRP: $484.47You Save: $111.00 (23%)Ships in 1-3 Business Days


BMW Piston
Part Number: 11258606459$311.23 MSRP: $403.73You Save: $92.50 (23%)Ships in 1-2 Business Days
BMW Piston
Part Number: 11258618504$446.54 MSRP: $579.26You Save: $132.72 (23%)Ships in 1-2 Business Days
BMW Piston
Part Number: 11258637807$311.23 MSRP: $403.73You Save: $92.50 (23%)Ships in 1-3 Business Days
BMW Piston
Part Number: 11255A24670$311.23 MSRP: $403.73You Save: $92.50 (23%)Ships in 1-3 Business Days
BMW Piston Kit
Part Number: 11259468869$1419.30 MSRP: $1857.05You Save: $437.75 (24%)Ships in 1-3 Business DaysProduct Specifications- Other Name: Piston
- Replaces: 11-25-8-618-503, 11-25-8-638-450
BMW Piston
Part Number: 11258619196$311.23 MSRP: $403.73You Save: $92.50 (23%)Ships in 1-3 Business Days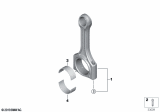
BMW Piston
Part Number: 11257647339$311.23 MSRP: $403.73You Save: $92.50 (23%)Ships in 1-3 Business DaysProduct Specifications- Replaced by: 11258653978
BMW Mahle Piston
Part Number: 11257506224$428.29 MSRP: $502.32You Save: $74.03 (15%)Ships in 1-3 Business DaysBMW Piston
Part Number: 11258606461$311.23 MSRP: $403.73You Save: $92.50 (23%)Ships in 1-3 Business DaysBMW Mahle Piston
Part Number: 11257558528$322.27 MSRP: $383.22You Save: $60.95 (16%)Ships in 1-3 Business DaysProduct Specifications- Other Name: Piston

BMW Mahle Piston
Part Number: 11251748458$240.13 MSRP: $321.23You Save: $81.10 (26%)Ships in 1-3 Business Days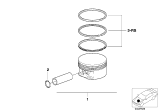
BMW Mahle Piston
Part Number: 11257843750$354.52 MSRP: $474.27You Save: $119.75 (26%)Ships in 1-3 Business DaysProduct Specifications- Replaces: 11-25-7-832-693, 11-25-7-831-717, 11-25-1-407-848

BMW Mahle Piston
Part Number: 11257799883$473.87 MSRP: $620.02You Save: $146.15 (24%)Ships in 1-3 Business DaysProduct Specifications- Other Name: Piston
BMW Mahle Piston
Part Number: 11257840922$751.43 MSRP: $983.18You Save: $231.75 (24%)Ships in 1-3 Business DaysProduct Specifications- Other Name: Piston
- Replaces: 11-25-7-835-400
BMW Piston
Part Number: 11258638450$1419.30 MSRP: $1857.05You Save: $437.75 (24%)Ships in 1-3 Business DaysProduct Specifications- Replaced by: 11259468869
BMW Mahle Piston
Part Number: 11257560131$311.10 MSRP: $403.56You Save: $92.46 (23%)Ships in 1-3 Business DaysProduct Specifications- Other Name: Piston
BMW Piston
Part Number: 11258744761$311.23 MSRP: $403.73You Save: $92.50 (23%)Ships in 1-3 Business DaysBMW Piston
Part Number: 11258678934$311.23 MSRP: $403.73You Save: $92.50 (23%)Ships in 1-3 Business Days
| Page 1 of 11 |Next >
1-20 of 220 Results
BMW Piston
Keeping the smooth operation of a BMW vehicle relies on the condition of the Piston. A broken BMW Piston can lead to big performance issues and even a complete vehicle breakdown. To prevent such problems, you could regularly maintain your car and replace your parts. At BMWPartsDeal, we offer high-quality BMW Piston, all designed to keep your vehicle running at its best. Choose BMWPartsDeal for your auto parts needs, you will get your vehicle back to great performance, and save a lot by avoiding costly future repair jobs.
BMW Piston Parts Questions & Experts Answers
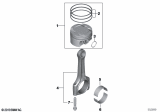
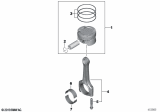
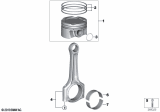
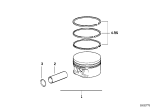
- Q: How to assemble and install the pistons, connecting rods, and bearing shells on BMW 2002?A:Assemble the no. 1 piston to the connecting rod, ensuring the arrow on the piston crown faces forwards and the oil hole below the small end bush on the rod aligns in the same direction, with sequence numbers on the cap and rod facing to the right when viewed from the front of the engine. Push the gudgeon pin into position using finger pressure and insert two new cir clips. Install the piston rings by reversing the removal process, noting the fitting sequence and ring cross sections. Stagger the piston ring end gaps at equal points of a circle. Insert the bearing shell into the connecting rod, apply oil liberally to the bearing and piston rings, and smear some up and down the cylinder bore before fitting a piston ring compressor. Carefully insert the connecting rod into the cylinder bore to avoid scratching the surfaces, ensuring the compressor is squarely on the top of the cylinder block and the piston rings are well compressed but not tight. Use a wooden shaft of a hammer to tap the piston/rod assembly down the bore, then remove the ring compressor. Turn the crankshaft so the number 1 big-end journal is at its lowest point of travel and pull down the connecting rod onto it, ensuring the bearing shell remains in place. Fit the shell to the big-end cap, oil it, and install it, making sure the numbers on the cap and rod are adjacent while rechecking that the piston crown arrow faces the front of the engine. Install the big-end bolts and nuts, tightening them to the specified torque with the narrower diameter of the nut nearest the big-end cap. Repeat these operations for the remaining three piston/connecting rod assemblies.

Related BMW Parts
 BMW PCV Valve
 BMW Brake Pad Sensor
 BMW Alternator Bracket
 BMW Brake Caliper Bolt
 BMW Transmission Mount
 BMW Automatic Transmission Seal
 BMW Belt Tensioner Bolt
 BMW Brake Caliper Bracket
 BMW Intake Manifold Temperature Sensor
 BMW Oil Drain Plug Gasket
 BMW Transfer Case Mount
Browse by Model
128i Piston 135i Piston 1602 Piston 2002 Piston 2002tii Piston 228i Piston 2800CS Piston 318i Piston 318is Piston 318ti Piston 320i Piston 323Ci Piston 323i Piston 325Ci Piston 325e Piston 325i Piston 325is Piston 325ix Piston 325xi Piston 328Ci Piston 328i Piston 328i xDrive Piston 328is Piston 328xi Piston 330Ci Piston 330e Piston 330i Piston 330xi Piston 335d Piston 335i Piston 335xi Piston 340i Piston 428i Piston 430i Piston 435i Piston 440i Piston 524td Piston 525i Piston 528e Piston 528i Piston 530i Piston 533i Piston 535d Piston 535i Piston 535i xDrive Piston 540i Piston 545i Piston 550i Piston 633CSi Piston 635CSi Piston 640i Piston 645Ci Piston 650i Piston 733i Piston 735i Piston 735iL Piston 740i Piston 740iL Piston 745i Piston 745Li Piston 750i Piston 750iL Piston 750Li Piston 840Ci Piston 850Ci Piston 850CSi Piston Alpina B7 Piston Bavaria Piston i3 Piston i8 Piston M2 Piston M235i Piston M240i Piston M3 Piston M340i Piston M4 Piston M440i Piston M5 Piston M6 Piston M8 Piston X1 Piston X2 Piston X3 Piston X4 Piston X5 M Piston X5 Piston X6 Piston X7 Piston XM Piston Z3 M Piston Z3 Piston Z4 Piston Z8 Piston
View More