×
- Hello
- Login or Register
- Quick Links
- Live Chat
- Track Order
- Parts Availability
- RMA
- Help Center
- Contact Us
- Shop for
- BMW Parts
- BMW Accessories
My Garage
My Account
Cart
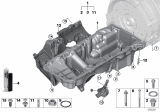
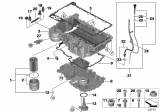
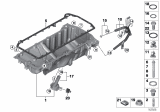
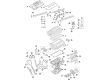
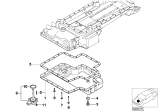
Genuine BMW X5 Oil Pan
Oil Drain Pan- Select Vehicle by Model
- Select Vehicle by VIN
Select Vehicle by Model
orSeries
Model
Year
Select Vehicle by VIN
For the most accurate results, select vehicle by your VIN (Vehicle Identification Number).
26 Oil Pans found


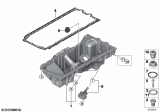
BMW X5 Engine Oil Pan
Part Number: 11137635651$901.50 MSRP: $1179.55You Save: $278.05 (24%)Ships in 1-2 Business Days


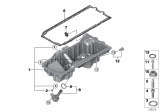
BMW X5 Engine Oil Pan
Part Number: 11137560308$901.50 MSRP: $1179.55You Save: $278.05 (24%)Ships in 1-3 Business Days


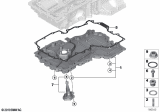
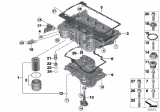
BMW X5 Oil Pan
Part Number: 11137566803$445.55 MSRP: $577.97You Save: $132.42 (23%)Ships in 1-3 Business Days


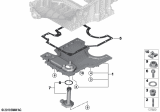
BMW X5 Oil Pan
Part Number: 11137551630$445.55 MSRP: $577.97You Save: $132.42 (23%)Ships in 1-3 Business Days


BMW X5 Oil Pan
Part Number: 11137637608$1064.28 MSRP: $1392.53You Save: $328.25 (24%)Ships in 1-3 Business Days
BMW X5 Oil Pan
Part Number: 11138643438$1135.87 MSRP: $1486.20You Save: $350.33 (24%)Ships in 1-3 Business Days
BMW X5 Engine Oil Pan
Part Number: 11137796325$856.41 MSRP: $1120.55You Save: $264.14 (24%)Ships in 1-3 Business Days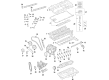
BMW X5 Oil Pan
Part Number: 11138595464$946.56 MSRP: $1238.50You Save: $291.94 (24%)Ships in 1-2 Business Days
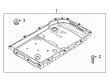
BMW X5 KIT OIL PAN AUTOMATIC TRANSM
Part Number: 24115A13223$421.55 MSRP: $546.85You Save: $125.30 (23%)Ships in 1-2 Business Days

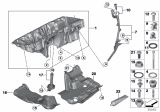
BMW X5 Engine Oil Pan Upper
Part Number: 11137621072$1871.87 MSRP: $2245.10You Save: $373.23 (17%)Ships in 1-3 Business Days
BMW X5 Oil Pan
Part Number: 11138643444$445.55 MSRP: $577.97You Save: $132.42 (23%)Ships in 1-3 Business Days
BMW X5 Oil Pan
Part Number: 11138515773$901.50 MSRP: $1179.55You Save: $278.05 (24%)Ships in 1-3 Business Days
BMW X5 Engine Oil Pan
Part Number: 11137540750$445.55 MSRP: $577.97You Save: $132.42 (23%)Ships in 1-3 Business Days
BMW X5 Oil Pan
Part Number: 11139845701$499.33 MSRP: $653.33You Save: $154.00 (24%)Ships in 1-3 Business Days
BMW X5 Oil Pan
Part Number: 11137852271$574.25 MSRP: $751.36You Save: $177.11 (24%)Ships in 1-3 Business Days
BMW X5 Oil Pan
Part Number: 11137629210$901.50 MSRP: $1179.55You Save: $278.05 (24%)Ships in 1-3 Business Days
BMW X5 OIL PAN UPPER PART
Part Number: 11139845700$1284.04 MSRP: $1680.06You Save: $396.02 (24%)Ships in 1-3 Business Days
BMW X5 Upper Oil Pan
Part Number: 11137852270$1476.65 MSRP: $1932.08You Save: $455.43 (24%)Ships in 1-3 Business Days
BMW X5 Engine Oil Pan
Part Number: 11137500210$423.27 MSRP: $549.08You Save: $125.81 (23%)Ships in 1-3 Business Days
| Page 1 of 2 |Next >
1-20 of 26 Results
BMW X5 Oil Pan
If you are looking for OEM BMW X5 Oil Pan, we highly recommend to shop with us. Not only do we offer budget friendly prices, but we also provide fast delivery. In addition, we have a hassle-free return policy on all genuine BMW X5 Oil Pan that come backed by the manufacturer's warranty.
BMW X5 Oil Pan Parts Questions & Experts Answers
- Q: How to remove and reinstall the oil pan in six cylinder engine on BMW X5?A:The front differential is secured to the left side of the oil pan and the right front drive axle innrer bearing pedestal to the right side. To replace the oil pan, first lower the front subframe and then detach the front steering knuckles, the drive axles and differential. Starting the process is done by removing the negative terminal of the battery while being cautious enough to go through the battery disconnection cautions. In the engine compartment plenum chamber, remove the ventilation microfilter and plenum cover and then 'snap off' the plenum seal and the plenum bulkhead. Then remove the air intake hood on top of the radiator and the upper half of the engine cover and the air filter housing. Lift the car in the engine hood assembly position and continue. Lose the splash shield and front end reinforcement under the engine, then fabricate an engine support brace across the engine compartment and lift the engine about 1/4-inch off its mounts. Removing from below, take off the right and left engine mount upper nuts, the steering knuckles, the front-drive axles, and the front driveshaft. Place a marker on the direction of rotation on the alternator belt before removing it, unscrew the power steering pump and suspend it to one side but do not disconnect its lines. Remove the electrical harness connector at the oil level sensor and, if necessary, drain the engine oil. Take off the return hose on the crankcase breather oil separator and the dipstick guide pipe as well. Disconnect the key of the steering spindle from the rack and screw back the left and right steering knuckles loosely on the two bolts from the front strut, the front control arms and the tie rods connecting them to the steering knuckles. Place the front subframe on a block of wood on a transmission jack in a way that will allow the steering rack remain bolted on the front subframe. Slowly lower the subframe again while being extremely careful not to pinch or squash the power steering lines, although it should provide enough support. Take off the front differential and the last screws of the oil pan, to be able to pull the oil pan backward to slide it out. If the oil pan cannot pull apart, gently strike with rubber mallet to free the part and avoid damaging it with a pry bar. Scrub the sealing surface of the engine block, and paint beads of 3-Bond 1209 sealer or another one on the timing cover so as well as rear main seal carrier weld lines. On reinstalling oil pan reinstall is clean the gasket material from the sealing surface and use new gasket insert oil pan bolts and tighten front oil pan bolts and the last is to tighten the transmission bellhousing bolts. The rest of the installation is performed in the backwards order of the removal. Add oil to the engine, start the engine and look for any drips, always following the right procedure of the front end reinforcement installation. When through with this procedure, there is no need to adjust the front end any further.

Related BMW X5 Parts
 BMW X5 Oil Filter
 BMW X5 Crankshaft Thrust Washer Set
 BMW X5 Oil Cooler
 BMW X5 Crankshaft
 BMW X5 Piston Ring
 BMW X5 Rod Bearing
 BMW X5 Oil Pressure Switch
 BMW X5 Oil Pump
 BMW X5 Crankshaft Pulley
 BMW X5 Oil Pan Gasket
 BMW X5 Engine Oil Cooler
Browse by Year
2025 Oil Pan 2024 Oil Pan 2023 Oil Pan 2022 Oil Pan 2021 Oil Pan 2020 Oil Pan 2019 Oil Pan 2018 Oil Pan 2017 Oil Pan 2016 Oil Pan 2015 Oil Pan 2014 Oil Pan 2013 Oil Pan 2012 Oil Pan 2011 Oil Pan 2010 Oil Pan 2009 Oil Pan 2008 Oil Pan 2007 Oil Pan 2006 Oil Pan 2005 Oil Pan 2004 Oil Pan 2003 Oil Pan 2002 Oil Pan 2001 Oil Pan 2000 Oil Pan