×
- Hello
- Login or Register
- Quick Links
- Live Chat
- Track Order
- Parts Availability
- RMA
- Help Center
- Contact Us
- Shop for
- BMW Parts
- BMW Accessories
My Garage
My Account
Cart
Genuine BMW 335i Drive Belt
Serpentine Belt- Select Vehicle by Model
- Select Vehicle by VIN
Select Vehicle by Model
orSeries
Model
Year
Select Vehicle by VIN
For the most accurate results, select vehicle by your VIN (Vehicle Identification Number).
3 Drive Belts found


BMW 335i Ribbed V-Belt
Part Number: 11287628661$41.50 MSRP: $63.09You Save: $21.59 (35%)Ships in 1-3 Business Days


BMW 335i Ribbed V-Belt
Part Number: 11287628653$41.50 MSRP: $63.09You Save: $21.59 (35%)Ships in 1-3 Business Days


BMW 335i Ribbed V-Belt
Part Number: 11287628652$41.50 MSRP: $63.09You Save: $21.59 (35%)Ships in 1-3 Business Days
BMW 335i Drive Belt
If you are looking for OEM BMW 335i Drive Belt, we highly recommend to shop with us. Not only do we offer budget friendly prices, but we also provide fast delivery. In addition, we have a hassle-free return policy on all genuine BMW 335i Drive Belt that come backed by the manufacturer's warranty.
BMW 335i Drive Belt Parts Questions & Experts Answers
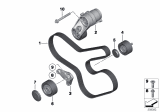
- Q: How to replace Drive Belt in N54 six cylinder engine on BMW 335i?A:To work above the radiator, unscrew the air intake duct and pull backward till it is off the crossbar on the radiator support and take off the bellows connected to the air filter housing. After that, strip the electric engine cooling fan and fan cowl, then unlike most cooling systems, the engine splash shield should be removed too. In case of intending to reinstall the old drive belt, make it a point to note the direction of its rotation. If working on tasks at the extreme left of the engine compartment, first, release the hose clamp A and then remove the air duct from the air filter housing, turn the quick release clamp B on the boost pressure duct in anti-clockwise direction and remove the air ducts. Down below the radiator, unbolt line A from clip B, and on the top front of the cylinder head, disconnect coolant hose A from bracket B. Do not disconnect or take out the air duct but fold it up, without removing its brackets at the front of the engine. Now apply a Torx socket on the drive belt tensioner and turn it anticlockwise until the drive belt tension is released and apply an awl shaped tool on it to make it locked in its released state. Slacken the drive belt off the pulleys and take it off. First, if the drive belt tensioner has needed to be replaced, then it is necessary to pull out the special tool, then unscrew the bolt, and the tensioner itself will be removed. Fit the new tensioner in replacement of the crashed one tying the bolt with a new one and at last, turn the new drive belt tensioner clockwise so as to lock this in the released manner using the above mentioned special tool. Last of all, fit the drive belt with reference to the diagram below and, if the previously used drive belt is being refitted, ensure that it follows the direction-of-rotation mark.


