×
- Hello
- Login or Register
- Quick Links
- Live Chat
- Track Order
- Parts Availability
- RMA
- Help Center
- Contact Us
- Shop for
- BMW Parts
- BMW Accessories
My Garage
My Account
Cart
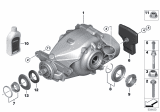
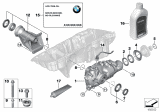
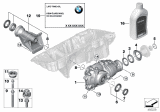
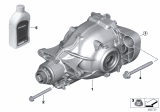
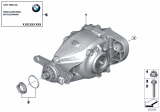
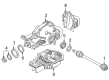
Genuine BMW Differential
Front Differential- Select Vehicle by Model
- Select Vehicle by VIN
Select Vehicle by Model
orSeries
Model
Year
Select Vehicle by VIN
For the most accurate results, select vehicle by your VIN (Vehicle Identification Number).
448 Differentials found


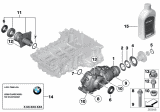
BMW M Performance Limited Slip Differential / Automatic Transmission
Part Number: 33108659989$3043.92 MSRP: $3370.00You Save: $326.08 (10%)Ships in 1-3 Business DaysProduct Specifications- Other Name: M Performance lim. slip differential; Carrier


BMW AT-FRONT DIFFERENTIAL
Part Number: 31507934393$2736.77 MSRP: $3580.85You Save: $844.08 (24%)Ships in 1-3 Business DaysProduct Specifications- Other Name: Carrier Assembly, Differential Assembly
- Position: Front
- Replaced by: 31507934392

 Product Specifications
- Other Name: Carrier Assembly, Differential Assembly
- Position: Front
- Replaces: 31-50-7-934-393

BMW Front Differential
Part Number: 31508679973$2736.77 MSRP: $3580.85You Save: $844.08 (24%)Ships in 1-3 Business DaysProduct Specifications- Other Name: Final Drive (Front Axle); Carrier, Differential
- Position: Front
- Replaces: 31-50-8-679-974

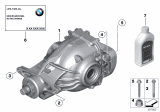
BMW Rear-Axle-Drive
Part Number: 33108686219$2646.03 MSRP: $3462.12You Save: $816.09 (24%)Ships in 1-3 Business DaysProduct Specifications- Other Name: Carrier, Differential Assembly
- Position: Rear
- Replaces: 33-10-8-643-135, 33-10-8-686-220, 33-10-8-643-134

BMW Rear Axle Drive Differential
Part Number: 33107636992$2821.30 MSRP: $3668.76You Save: $847.46 (24%)Ships in 1-3 Business DaysProduct Specifications- Other Name: Rear-Axle-Drive; Axle Assembly, Carrier Assembly, Differential
- Position: Rear
- Replaces: 33-10-7-636-993
 Product Specifications
- Other Name: Carrier Assembly, Differential Assembly
- Position: Front
- Replaces: 31-50-7-934-391

BMW Final Drive (Front Axle)
Part Number: 31508487445$2530.23 MSRP: $3310.61You Save: $780.38 (24%)Ships in 1-3 Business DaysProduct Specifications- Other Name: Carrier Assembly, Differential Assembly
- Position: Front
- Replaced by: 31508850592
- Replaces: 31-50-8-488-202, 31-50-8-679-981, 31-50-8-679-982

BMW Front Differential
Part Number: 31507619364$2657.05 MSRP: $3476.55You Save: $819.50 (24%)Ships in 1-3 Business DaysProduct Specifications- Other Name: Exchange-Front Differential; Differential
- Position: Front
BMW AT-FRONT DIFFERENTIAL
Part Number: 31507934391$2736.77 MSRP: $3580.85You Save: $844.08 (24%)Ships in 1-3 Business DaysProduct Specifications- Other Name: Carrier Assembly, Differential Assembly
- Position: Front
- Replaced by: 31507934390

BMW Differential
Part Number: 33107603747$2273.13 MSRP: $2951.52You Save: $678.39 (23%)Ships in 1-3 Business DaysProduct Specifications- Other Name: Exchange Final Drive; Differential Assembly, Final Drive Assembly
BMW Rear Axle Differential Carrier
Part Number: 33107616972$2273.13 MSRP: $2951.52You Save: $678.39 (23%)Ships in 1-3 Business DaysProduct Specifications- Other Name: Exchange Final Drive
- Position: Rear

BMW Front Axle Differential
Part Number: 31507648883$2736.77 MSRP: $3580.85You Save: $844.08 (24%)Ships in 1-3 Business DaysProduct Specifications- Other Name: Rp Front Axle Transmission; Differential
- Position: Front
- Replaces: 31-50-7-648-882

BMW FINAL DRIVE WITH DIFFERENTIA
Part Number: 33108686989$3768.87 MSRP: $4931.27You Save: $1162.40 (24%)Ships in 1-3 Business DaysProduct Specifications- Other Name: Carrier, Differential Assembly
- Replaces: 33-10-8-686-990

BMW Rear Axle Drive Differential
Part Number: 33107630828$3044.61 MSRP: $3960.94You Save: $916.33 (24%)Ships in 1-3 Business DaysProduct Specifications- Other Name: Rear-Axle-Drive; Carrier, Differential
- Position: Rear
- Replaces: 33-10-7-630-829

BMW FINAL DRIVE (FRONT AXLE)
Part Number: 31508635860$2506.64 MSRP: $3279.74You Save: $773.10 (24%)Ships in 1-2 Business DaysProduct Specifications- Replaces: 31-50-7-590-899, 31-50-8-635-861

BMW Front Differential
Part Number: 31508623110$2506.64 MSRP: $3279.74You Save: $773.10 (24%)Ships in 1-3 Business DaysProduct Specifications- Other Name: Final Drive (Front Axle); Carrier Assembly, Differential
- Position: Front
- Replaces: 31-50-8-623-111, 31-50-7-591-996, 31-50-7-591-995
BMW Rear Axle Drive Differential
Part Number: 33107603748$2566.38 MSRP: $3335.21You Save: $768.83 (24%)Ships in 1-3 Business DaysProduct Specifications- Other Name: Rear-Axle-Drive; Differential Assembly, Final Drive Assembly
- Position: Rear
- Replaces: 33-10-7-603-749

BMW Rear-Axle-Drive
Part Number: 33109468291$2910.66 MSRP: $3808.36You Save: $897.70 (24%)Ships in 1-3 Business DaysProduct Specifications- Other Name: Differential
- Position: Rear
BMW Rear Axle Drive Differential
Part Number: 33107636996$2920.54 MSRP: $3798.61You Save: $878.07 (24%)Ships in 1-3 Business DaysProduct Specifications- Other Name: Rear-Axle-Drive; Axle Assembly, Carrier Assembly, Differential
- Position: Rear
- Replaces: 33-10-7-636-997
| Page 1 of 23 |Next >
1-20 of 448 Results
BMW Differential
The BMW differential is a device couples the drive to the haft-shafts that connect to the rear drive wheels and splits the engine torque two ways, allowing the wheels to spin at different speeds. Most importantly, differential enables the outer drive wheel to rotate faster than the inner drive. This is necessary because when the vehicle turns, the wheel on the outside of the turning curve needs to roll farther and faster than the other.
BMW Differential Parts Questions & Experts Answers
- Q: How to remove and install a front differential on BMW 328i?A:This is a difficult procedure for the home mechanic, as it requires an engine lifting device and a transmission jack. Disconnect the negative battery cable. Block the rear wheels. Raise the front of the vehicle and securely support it on jackstands. Remove the fasteners, engine splash shield, and the shield below the radiator. Remove the cabin air filter housing. Remove the engine air filter housing. Open the hood to the most upright position and attach an engine lift or engine support assembly to lifting points on the engine. The engine only needs to be raised enough to remove the weight from the engine mounts. On the left side, disconnect the tie-rod end, tension strut, control arm, and the strut-to-steering knuckle pinch-bolt. Remove the driveaxles. Remove the bolts and the front subframe reinforcement panel, if equipped. Disconnect the vent hose from the differential case. Make match-marks on the front differential flange and the front of the driveshaft, as well as the rear of the driveshaft and the flange at the transfer case. Remove the bolts securing the driveshaft front yoke to the differential flange. Remove the bolts securing the driveshaft rear flange to the transfer case, and remove the driveshaft from the vehicle. Remove one subframe mounting bolt and purchase new bolts that are 2.5 inches longer. With a suitable support under the subframe, replace each of the subframe mounting bolts with the longer bolts. Lower the subframe two inches to access the differential-to-oil pan mounting bolts. Remove the differential from the vehicle. Installation is the reverse of removal, noting the following points: This is a good time to replace the driveaxle oil seals while the differential is out of the vehicle. Use a new O-ring between the oil pan and the differential. Use the original subframe bolts or new bolts of the same length as the original. Check and top-off the lubricant in the differential.
- Q: What steps should be taken if the differential produces a low pitched rumbling noise or a howling noise on BMW M3?A:What if the differential results in a low pitched rumbling sound, the first way is to examine the fluid level, type and quality, the second way is to drain the fluid and replace it with a recommended lubricant. Also, check the differential bearings and remove it to check the drive and the driven gears, other components should also be replaced if damaged. For howling noise from the differential also check the level of, kind of and quantity of lubricant, replace with recommended lubricant for the differential, Examine the differential drive and driven gears for signs of wear or damages replace with the new as advised.
- Q: What is the configuration and function of the front axle differential, right side bearing pedestal, and related components on BMW X5?A:The front axle differential and the right side bearing pedestal are bolted to each side of a modified oil pan. Power is transmitted to the front differential from the transfer case via a driveshaft, and out to front drive hubs through two drive axles. The right drive axle inner constant velocity (CV) joint shaft extends through the oil pan into the front differential.


Related BMW Parts
 BMW Transfer Case
 BMW Axle Shaft
 BMW Wheel Bearing
 BMW Shift Cable
 BMW Cruise Control Switch
 BMW Clutch Master Cylinder
 BMW Torque Converter
 BMW Clutch Disc
 BMW Flywheel
 BMW Transmission Assembly
 BMW Drive Shaft
 BMW Wheel Seal
Browse by Model
128i Differential 135i Differential 1602 Differential 2002 Differential 2002tii Differential 228i Differential 318i Differential 318is Differential 318ti Differential 320i Differential 323Ci Differential 323i Differential 325Ci Differential 325e Differential 325i Differential 325is Differential 325ix Differential 325xi Differential 328Ci Differential 328i Differential 328i xDrive Differential 328is Differential 328xi Differential 330Ci Differential 330e Differential 330i Differential 330xi Differential 335d Differential 335i Differential 335xi Differential 340i Differential 428i Differential 430i Differential 435i Differential 440i Differential 524td Differential 525i Differential 528e Differential 528i Differential 530i Differential 533i Differential 535d Differential 535i Differential 535i xDrive Differential 540i Differential 545i Differential 550i Differential 633CSi Differential 635CSi Differential 640i Differential 645Ci Differential 650i Differential 733i Differential 735i Differential 735iL Differential 740i Differential 740iL Differential 745i Differential 745Li Differential 750i Differential 750iL Differential 750Li Differential 840Ci Differential 850Ci Differential 850CSi Differential Alpina B7 Differential M2 Differential M235i Differential M240i Differential M3 Differential M340i Differential M4 Differential M440i Differential M5 Differential M6 Differential M8 Differential X1 Differential X2 Differential X3 Differential X4 Differential X5 Differential X5 M Differential X6 Differential X7 Differential XM Differential Z3 Differential Z3 M Differential Z4 Differential Z8 Differential
View More