×
- Hello
- Login or Register
- Quick Links
- Live Chat
- Track Order
- Parts Availability
- RMA
- Help Center
- Contact Us
- Shop for
- BMW Parts
- BMW Accessories
My Garage
My Account
Cart
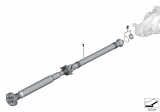
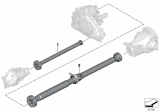
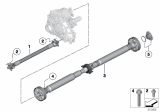
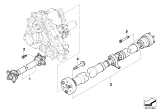
Genuine BMW Drive Shaft
Axle Shaft- Select Vehicle by Model
- Select Vehicle by VIN
Select Vehicle by Model
orSeries
Model
Year
Select Vehicle by VIN
For the most accurate results, select vehicle by your VIN (Vehicle Identification Number).
457 Drive Shafts found


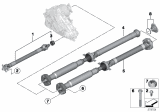
BMW Front Drive Shaft Assembly
Part Number: 26208605866$1078.78 MSRP: $1411.50You Save: $332.72 (24%)Ships in 1-3 Business DaysProduct Specifications- Other Name: Drive Shaft Assy Front; Drive Shaft
- Position: Front
- Replaces: 26-20-7-597-649


BMW Five Speed Gearbox Drive Shaft Assembly
Part Number: 26111227827$923.59 MSRP: $1265.98You Save: $342.39 (28%)Ships in 1-3 Business DaysProduct Specifications- Other Name: Drive Shaft Assy Five Speed Gearbox; Drive Shaft


BMW Automatic Gearbox Drive Shaft
Part Number: 26108680320$1426.39 MSRP: $1866.32You Save: $439.93 (24%)Ships in 1-3 Business DaysProduct Specifications- Other Name: Automatic Drive Shaft Gearbox; Drive Shaft, Drive Shaft Assembly

BMW DRIVE SHAFT ASSY FRONT
Part Number: 26209452673$1198.18 MSRP: $1567.73You Save: $369.55 (24%)Ships in 1-3 Business DaysProduct Specifications- Other Name: Drive Shaft, Drive Shaft Assembly
- Position: Front
- Replaces: 26-20-9-425-911, 26-20-5-A41-FB1, 26-20-9-488-487, 26-20-8-632-583

BMW DRIVE SHAFT ASSY FRONT
Part Number: 26209425910$1141.13 MSRP: $1493.08You Save: $351.95 (24%)Ships in 1-3 Business DaysProduct Specifications- Other Name: Drive Shaft
- Position: Front
- Replaces: 26-20-8-626-955, 26-20-7-632-650

BMW Automatic Gearbox Drive Shaft
Part Number: 26108676286$1358.46 MSRP: $1777.44You Save: $418.98 (24%)Ships in 1-3 Business DaysProduct Specifications- Other Name: Automatic Drive Shaft Gearbox; Drive Shaft, Drive Shaft Assembly
- Replaces: 26-10-7-626-353

BMW Automatic Transmission
Part Number: 26111229784$1036.61 MSRP: $1297.35You Save: $260.74 (21%)Ships in 1-3 Business DaysProduct Specifications- Other Name: Automatic Drive Shaft Gearbox; Drive Shaft

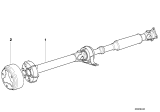
BMW Rear Drive Shaft Assembly
Part Number: 26107589128$1528.27 MSRP: $1999.62You Save: $471.35 (24%)Ships in 1-3 Business DaysProduct Specifications- Other Name: Drive Shaft Assy Rear; Drive Shaft
- Position: Rear

BMW Rear-Propeller Shaft
Part Number: 26107857629$4279.17 MSRP: $5598.95You Save: $1319.78 (24%)Ships in 1-3 Business DaysProduct Specifications- Other Name: Propeller Shaft Cfrp; Propeller Shaft
- Position: Rear

BMW Drive Shaft
Part Number: 26108692917$1426.39 MSRP: $1866.32You Save: $439.93 (24%)Ships in 1-3 Business DaysProduct Specifications- Other Name: Drive Shaft Assembly


BMW Drive Shaft
Part Number: 26108868375$2420.80 MSRP: $3167.42You Save: $746.62 (24%)Ships in 1-2 Business DaysProduct Specifications- Other Name: Drive Shaft Assembly
- Replaces: 26-10-8-859-169

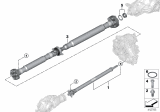
BMW Rear Drive Shaft
Part Number: 26107614396$1426.39 MSRP: $1866.32You Save: $439.93 (24%)Ships in 1-3 Business DaysProduct Specifications- Other Name: Automatic Drive Shaft Gearbox; Drive Shaft
- Position: Rear
- Replaces: 26-10-7-574-678

BMW Rear Drive Shaft Assembly
Part Number: 26107503101$1473.13 MSRP: $1927.47You Save: $454.34 (24%)Ships in 1-3 Business DaysProduct Specifications- Other Name: Drive Shaft Assy Rear; Drive Shaft
- Position: Rear

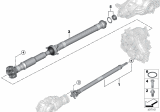
BMW Drive Shaft
Part Number: 26118837559$1287.31 MSRP: $1684.35You Save: $397.04 (24%)Ships in 1-3 Business DaysProduct Specifications- Other Name: Drive Shaft Assembly
- Replaces: 26-11-8-844-285, 26-10-2-397-117, 26-10-8-605-878

BMW Front Drive Shaft Assembly
Part Number: 26208698362$1347.96 MSRP: $1763.70You Save: $415.74 (24%)Ships in 1-3 Business DaysProduct Specifications- Other Name: Drive Shaft Assy Front; Drive Shaft, Drive Shaft Assembly
- Position: Front
- Replaced by: 26205A41094
BMW Automatic Gearbox Drive Shaft
Part Number: 26108680379$1426.39 MSRP: $1866.32You Save: $439.93 (24%)Ships in 1-3 Business DaysProduct Specifications- Other Name: Automatic Drive Shaft Gearbox; Drive Shaft, Drive Shaft Assembly

BMW DRIVE SHAFT ASSY FRONT
Part Number: 26209425906$1540.51 MSRP: $2015.64You Save: $475.13 (24%)Ships in 1-3 Business DaysProduct Specifications- Other Name: Drive Shaft
- Position: Front
- Replaces: 26-20-7-629-988, 26-20-8-628-043, 26-20-7-593-164

BMW Drive Shaft Assy Rear
Part Number: 26108663951$1684.95 MSRP: $2204.62You Save: $519.67 (24%)Ships in 1-3 Business DaysProduct Specifications- Other Name: Drive Shaft, Drive Shaft Assembly
- Position: Rear

BMW Drive Shaft
Part Number: 26108676285$1358.46 MSRP: $1777.44You Save: $418.98 (24%)Ships in 1-3 Business DaysProduct Specifications- Other Name: Manual Drive Shaft Gearbox
- Replaces: 26-10-7-641-643

BMW Rear Drive Shaft Assembly
Part Number: 26107573493$1524.45 MSRP: $1994.62You Save: $470.17 (24%)Ships in 1-3 Business DaysProduct Specifications- Other Name: Drive Shaft Assy Rear; Drive Shaft
- Position: Rear
- Replaces: 26-10-7-557-158
| Page 1 of 23 |Next >
1-20 of 457 Results
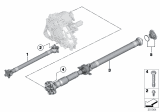
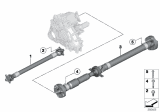
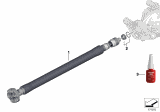
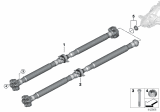
BMW Drive Shaft
Generally speaking, the function of driveshaft is to transmit the power produced by the engine to some part as it required. Specifically, for front wheel-drive, the power is transmitted to the front. Similarly, the rear for rear wheel-drive; for four wheel-drive, they have two drive shafts and send power to the front and rear. For your reminder, if you change the height of your BMW car, there is a high possibility that the driveshaft gets damaged. What's more, once you change your driveshaft, some related parts like U-joints, should be checked and lubricated as well. Here are some symptoms showing that your driveshaft may goes wrong: if you hear a clunking noise when you accelerate of shift between drive and reverse; if you feel a vibration when you are driving; if you hear a squeaking noise when you drive your BMW, you are supposed to check it immediately. Once you decide to change your driveshaft, we are glad to offer you all BMW genuine OEM driveshaft with a discounted price.
BMW Drive Shaft Parts Questions & Experts Answers
- Q: What are the causes and solutions for clunking noises, excessive vibration, and misalignment issues in the drive shaft on BMW M3?A:In a rear wheel, all wheel or a four-wheel drive vehicle, a clunking sound that originates from the centre of the vehicle when shifting from forward to reverse, could compel the car owner to effect a change in a worn.udsa universal joint; the process, however, would entail pulling out the driveshaft and replacing the joint. There is also an added possibility that perhaps the center is vibrating excessively during acceleration due to the wearing down of the universal joint in question and in case such is the situation then repair shall involve the removal of the said universal joint for replacement. Also, the driveshaft could be out of balance or needing replacement if the engine and transmission mounts have worn out, or are damaged and have collapsed. A bent or out of balance driveshaft simply means that part of the driveshaft that is damaged must be replaced and the driveshaft put back in place, an out of balance driveshaft must therefore be removed and either balanced by a technician or replaced entirely. What should be understood is due to the fact that most driveshafts employ universal joints; however, some manufacturers may resort to Constant Velocity (CV) joints or rubber flex couplers.
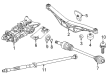
- Q: How to safely remove and reinstall the rear drive shaft while ensuring proper alignment and component integrity on BMW X3?A:Raise the vehicle and support it safely, then remove the exhaust system and exhaust heat shields. Mark the mounting flanges and driveshaft sections with paint to preserve the original orientation. At the front flex-disc, remove the three bolts holding the flex disc to the transfer case flange and discard the old fasteners. For 2007-2010 models, a dual stage flex disc is shown, while earlier models have a similar single stage flex disc. On 2004-2006 models, loosen the threaded clamping sleeve on the driveshaft a few turns. At the driveshaft rear universal joint, remove the Torx bolts at the differential input flange and discard them; if necessary, use a pry bar at the groove to free the universal joint. Hang the rear section of the driveshaft from the body using shift wire and remove the center support bearing mounting nuts. Pull down on the center of the driveshaft to remove it, using a pry bar if needed to free the flex disc from the centering dowel on the transfer case. Before installation, inspect the centering dowel on the transfer case output flange and the centering sleeve inside the driveshaft flex-disc, replacing any damaged components. When installing the centering sleeve over the centering dowel, apply a thin coat of molybdenum disulfide grease. Bend the driveshaft at the center universal joint for installation, aligning the match marks on the driveshaft with those on the differential and transfer case flanges. Using new ZNS fasteners, alternately tighten the bolts to draw the joint evenly into the flange, and once seated, tighten down the bolts. It is important not to reuse fasteners as they are designed for one-time use and to ensure the driveshaft is not left hanging unsupported. Finally, install the heat shields and exhaust system, then conduct a road test to check for noise or vibration.
- Q: How to remove rear Drive Shaft on BMW X5?A:Raise the vehicle and support it safely. For the 3.0i, 4.4i, or 4.6is models, remove the complete exhaust system, while for the 4.8is model, only the center muffler needs to be removed. Next, take off the exhaust heat shields. At the transfer case output flange and rear differential input flange, use paint to matchmark the rear driveshaft flanges. At the rear driveshaft front flex-disc, counterhold the bolt heads and remove the nuts at the transfer case output flange, discarding the old fasteners. To avoid damaging the flex-disc rubber, hold the bolts stationary while loosening the nuts. Hang the driveshaft front section from the body using stiff wire. For the driveshaft rear CV joint, remove the mounting nuts at the differential input flange and discard them, using a pry bar at the groove to free the CV joint. Hang the driveshaft rear section from the body with stiff wire. Remove the mounting nuts for the driveshaft center support bearing and then remove the driveshaft by pulling down on its center to facilitate removal, ensuring to protect the CV joint with a plastic cover.


Related BMW Parts
 BMW Transfer Case
 BMW Axle Shaft
 BMW Wheel Bearing
 BMW Shift Cable
 BMW CV Joint
 BMW Cruise Control Switch
 BMW Clutch Master Cylinder
 BMW Torque Converter
 BMW Clutch Disc
 BMW Flywheel
 BMW Transmission Assembly
 BMW Wheel Seal
Browse by Model
128i Drive Shaft 135i Drive Shaft 1602 Drive Shaft 2002 Drive Shaft 2002tii Drive Shaft 228i Drive Shaft 318i Drive Shaft 318is Drive Shaft 318ti Drive Shaft 320i Drive Shaft 323Ci Drive Shaft 323i Drive Shaft 325Ci Drive Shaft 325e Drive Shaft 325i Drive Shaft 325is Drive Shaft 325ix Drive Shaft 325xi Drive Shaft 328Ci Drive Shaft 328i Drive Shaft 328i xDrive Drive Shaft 328is Drive Shaft 328xi Drive Shaft 330Ci Drive Shaft 330e Drive Shaft 330i Drive Shaft 330xi Drive Shaft 335d Drive Shaft 335i Drive Shaft 335xi Drive Shaft 340i Drive Shaft 428i Drive Shaft 430i Drive Shaft 435i Drive Shaft 440i Drive Shaft 524td Drive Shaft 525i Drive Shaft 528e Drive Shaft 528i Drive Shaft 530i Drive Shaft 533i Drive Shaft 535d Drive Shaft 535i Drive Shaft 535i xDrive Drive Shaft 540i Drive Shaft 545i Drive Shaft 550i Drive Shaft 633CSi Drive Shaft 635CSi Drive Shaft 640i Drive Shaft 645Ci Drive Shaft 650i Drive Shaft 733i Drive Shaft 735i Drive Shaft 735iL Drive Shaft 740i Drive Shaft 740iL Drive Shaft 745i Drive Shaft 745Li Drive Shaft 750i Drive Shaft 750iL Drive Shaft 750Li Drive Shaft 840Ci Drive Shaft 850Ci Drive Shaft Alpina B7 Drive Shaft Bavaria Drive Shaft M2 Drive Shaft M235i Drive Shaft M240i Drive Shaft M3 Drive Shaft M340i Drive Shaft M4 Drive Shaft M440i Drive Shaft M5 Drive Shaft M6 Drive Shaft M8 Drive Shaft X1 Drive Shaft X2 Drive Shaft X3 Drive Shaft X4 Drive Shaft X5 Drive Shaft X5 M Drive Shaft X6 Drive Shaft X7 Drive Shaft XM Drive Shaft Z3 Drive Shaft Z3 M Drive Shaft Z4 Drive Shaft Z8 Drive Shaft
View More