×
- Hello
- Login or Register
- Quick Links
- Live Chat
- Track Order
- Parts Availability
- RMA
- Help Center
- Contact Us
- Shop for
- BMW Parts
- BMW Accessories
My Garage
My Account
Cart
Genuine BMW X3 Crankshaft Seal
- Select Vehicle by Model
- Select Vehicle by VIN
Select Vehicle by Model
orSeries
Model
Year
Select Vehicle by VIN
For the most accurate results, select vehicle by your VIN (Vehicle Identification Number).
13 Crankshaft Seals found


BMW X3 Shaft Seal
Part Number: 11117587168$35.38 MSRP: $58.10You Save: $22.72 (40%)Ships in 1-2 Business Days

BMW X3 Shaft Seal
Part Number: 11118618864$33.71 MSRP: $55.36You Save: $21.65 (40%)Ships in 1-3 Business Days


BMW X3 Front Shaft Seal
Part Number: 11117547842$37.08 MSRP: $60.88You Save: $23.80 (40%)Ships in 1-2 Business Days

BMW X3 Shaft Seal
Part Number: 11148664904$33.71 MSRP: $55.36You Save: $21.65 (40%)Ships in 1-3 Business Days


BMW X3 Shaft Seal
Part Number: 11118604931$33.71 MSRP: $55.36You Save: $21.65 (40%)Ships in 1-2 Business Days


BMW X3 Shaft Seal
Part Number: 11142249532$91.31 MSRP: $97.36You Save: $6.05 (7%)Ships in 1-3 Business Days


BMW X3 Shaft Seal
Part Number: 11117584398$37.08 MSRP: $60.88You Save: $23.80 (40%)Ships in 1-3 Business Days


BMW X3 Shaft Seal
Part Number: 11148602594$33.71 MSRP: $55.36You Save: $21.65 (40%)Ships in 1-2 Business Days


BMW X3 Set Of Covers
Part Number: 11141438274$121.97 MSRP: $167.00You Save: $45.03 (27%)Ships in 1-3 Business Days
BMW X3 Shaft Seal
Part Number: 11118664905$33.71 MSRP: $55.36You Save: $21.65 (40%)Ships in 1-3 Business Days
BMW X3 Shaft Seal
Part Number: 11147797490$35.38 MSRP: $58.10You Save: $22.72 (40%)Ships in 1-3 Business Days
BMW X3 Shaft Seal
Part Number: 11117802665$33.71 MSRP: $55.36You Save: $21.65 (40%)Ships in 1-3 Business Days
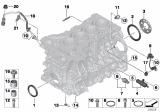
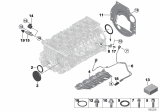
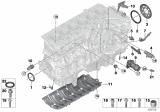
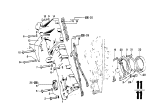
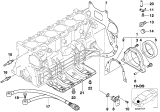
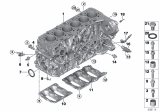
BMW X3 Crankshaft Seal
This part termed the Crankshaft Seal is placed in front of the engine in BMW X3 cars and is used to minimize leakage of the engine oil from the crankcase. Usually made of metal and rubber, this round seal is effectively used in maintaining amount of lubrication for some vital Engine parts with the aim of reducing friction and thus prolonging the Engine lifespan. As is the case with most parts in a car, crankshaft seals are also known to wear or degrade with time and this situation is even more likely in high mileage cars. Therefore, one should not overlook the symptoms that indicate that the crankshaft seal is failing because it requires replacement for the optimal engine performance. The design minima of course do not change but the actual body lines may be different across different models of X3 reflecting changes in material used or in engineering techniques employed.
If you are looking for OEM BMW X3 Crankshaft Seal, we highly recommend to shop with us. Not only do we offer budget friendly prices, but we also provide fast delivery. In addition, we have a hassle-free return policy on all genuine BMW X3 Crankshaft Seal that come backed by the manufacturer's warranty.
BMW X3 Crankshaft Seal Parts Questions & Experts Answers
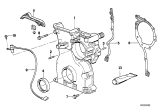
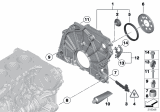
- Q: How to remove and install the front crankshaft seal on BMW X3?A:When replacing the crankshaft seal, it is important to fill the grooves and crankcase seams with special Loctite sealant to prevent oil leaks. To begin, raise the vehicle and remove the splash shield underneath the engine. Next, remove the engine accessory belt and the vibration damper (front pulley), taking care not to remove the vibration damper hub bolt to avoid valve damage. Use BMW special tool 11 9 221 to push the crankshaft seal inward, loosening it for removal. Then, screw BMW special tool 11 O 371 into the seal and rotate it clockwise to pull out the seal. Clean the crankshaft seal seating surface and degrease the area around the crankcase seam. Lightly oil the sealing surface on the vibration damper hub. Attach BM special tool 119 232 to the hub and place the crankshaft seal and installation sleeve over the tool and crankcase opening. Coat the seal grooves with Loctite 171000 primer and ensure they center on the crankcase seam. Use BMW special tools 11 9 231 and 11 9 233 to press in the seal. Coat the seal grooves and crankcase seams with Loctite 171000 primer and fill them with Loctite 128357 sealant using an injector kit. Finally, coat the sealed areas with Loctite 171000 primer and reinstall the crankshaft vibration damper. The remaining assembly is the reverse of the disassembly process.

Related BMW X3 Parts
 BMW X3 PCV Valve
 BMW X3 Oil Dipstick
 BMW X3 Harmonic Balancer
 BMW X3 Engine Mount Bracket
 BMW X3 Exhaust Hanger
 BMW X3 Oil Filler Cap
 BMW X3 Piston
 BMW X3 Belt Tensioner Bolt
 BMW X3 Fuel Tank Filler Neck
 BMW X3 Intake Manifold Temperature Sensor
 BMW X3 PCV Valve Hose
Browse by Year
2025 Crankshaft Seal 2024 Crankshaft Seal 2023 Crankshaft Seal 2022 Crankshaft Seal 2021 Crankshaft Seal 2020 Crankshaft Seal 2019 Crankshaft Seal 2018 Crankshaft Seal 2017 Crankshaft Seal 2016 Crankshaft Seal 2015 Crankshaft Seal 2014 Crankshaft Seal 2013 Crankshaft Seal 2012 Crankshaft Seal 2011 Crankshaft Seal 2010 Crankshaft Seal 2009 Crankshaft Seal 2008 Crankshaft Seal 2007 Crankshaft Seal 2006 Crankshaft Seal 2005 Crankshaft Seal 2004 Crankshaft Seal