×
- Hello
- Login or Register
- Quick Links
- Live Chat
- Track Order
- Parts Availability
- RMA
- Help Center
- Contact Us
- Shop for
- BMW Parts
- BMW Accessories
My Garage
My Account
Cart
Genuine BMW 328i Brake Disc
Disc Rotor- Select Vehicle by Model
- Select Vehicle by VIN
Select Vehicle by Model
orSeries
Model
Year
Select Vehicle by VIN
For the most accurate results, select vehicle by your VIN (Vehicle Identification Number).
28 Brake Discs found


BMW 328i Ventilated Brake Disc
Part Number: 34216864900$110.24 MSRP: $170.41You Save: $60.17 (36%)Ships in 1-2 Business Days


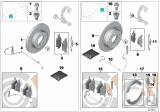
BMW 328i Ventilated Brake Disc
Part Number: 34116792219$103.10 MSRP: $159.37You Save: $56.27 (36%)Ships in 1-3 Business Days


BMW 328i Ventilated Brake Disc
Part Number: 34216864899$110.24 MSRP: $170.41You Save: $60.17 (36%)Ships in 1-3 Business Days


BMW 328i Ventilated Brake Disc
Part Number: 34216864901$94.26 MSRP: $145.70You Save: $51.44 (36%)Ships in 1-3 Business Days
BMW 328i Ventilated Brake Disc
Part Number: 34216792227$99.22 MSRP: $153.37You Save: $54.15 (36%)Ships in 1-3 Business Days


BMW 328i Ventilated Brake Disc
Part Number: 34116792221$117.13 MSRP: $181.06You Save: $63.93 (36%)Ships in 1-3 Business Days

BMW 328i Replacement Front Brake Discs
Part Number: 34106797603$383.90 MSRP: $498.00You Save: $114.10 (23%)Ships in 1-3 Business Days


BMW 328i Ventilated Brake Disc
Part Number: 34116854998$89.02 MSRP: $137.61You Save: $48.59 (36%)Ships in 1-3 Business Days

BMW 328i Ventilated Brake Disc
Part Number: 34216855007$94.26 MSRP: $145.70You Save: $51.44 (36%)Ships in 1-3 Business Days

BMW 328i Ventilated Brake Disc
Part Number: 34116855006$97.92 MSRP: $151.37You Save: $53.45 (36%)Ships in 1-3 Business Days

BMW 328i Ventilated Brake Disc
Part Number: 34116864058$183.19 MSRP: $235.62You Save: $52.43 (23%)Ships in 1-3 Business Days

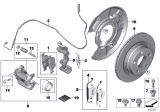
BMW 328i M Performance Rear Brake Discs
Part Number: 34206797600$255.93 MSRP: $332.00You Save: $76.07 (23%)Ships in 1-3 Business Days

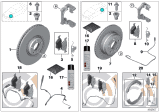
BMW 328i Brake Disc, Ventilated, W/Holes, Rear
Part Number: 34206797598$255.93 MSRP: $332.00You Save: $76.07 (23%)Ships in 1-3 Business Days


BMW 328i Ventilated Brake Disc
Part Number: 34216864903$152.68 MSRP: $212.48You Save: $59.80 (29%)Ships in 1-3 Business DaysBMW 328i Brake Disc, Lightweight, Ventilated
Part Number: 34116792223$175.10 MSRP: $275.26You Save: $100.16 (37%)Ships in 1-3 Business Days
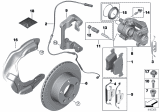
BMW 328i Brake Disc, Ventilated, W/Holes, Front
Part Number: 34106797602$319.92 MSRP: $415.00You Save: $95.08 (23%)Ships in 1-3 Business DaysBMW 328i Ventilated Brake Disc
Part Number: 34216864056$150.42 MSRP: $193.47You Save: $43.05 (23%)Ships in 1-3 Business Days
BMW 328i Brake Disc
Part Number: 34216864051$102.86 MSRP: $140.75You Save: $37.89 (27%)Ships in 1-3 Business Days
BMW 328i Brake Disc, Lightweight, Ventilated
Part Number: 34206797607$169.37 MSRP: $266.26You Save: $96.89 (37%)Ships in 1-3 Business DaysBMW 328i Ventilated Brake Disc
Part Number: 34116864060$141.20 MSRP: $181.61You Save: $40.41 (23%)Ships in 1-3 Business Days
| Page 1 of 2 |Next >
1-20 of 28 Results
BMW 328i Brake Disc
If you are looking for OEM BMW 328i Brake Disc, we highly recommend to shop with us. Not only do we offer budget friendly prices, but we also provide fast delivery. In addition, we have a hassle-free return policy on all genuine BMW 328i Brake Disc that come backed by the manufacturer's warranty.
BMW 328i Brake Disc Parts Questions & Experts Answers
- Q: How to inspect, removal, and install the brake disc on BMW 328i?A:Firmly block the front wheels, then raise the rear of the vehicle and support it securely on jackstands. Remove the appropriate rear wheel. Release the parking brake. Inspect the disc. Removal: Remove the Brake Pads. Remove the bolts and remove the caliper mounting bracket. Discard the bolts; new ones must be installed. Loosen and remove the brake disc retaining bolt. It should now be possible to remove the brake disc from the stub axle by hand. If it is tight, lightly tap its rear face with a plastic mallet. If the Parking Brake Shoes are binding, check that the parking brake is fully released. Fully release the Parking Brake Cable tension to obtain maximum freeplay in the cable. Insert a screwdriver through one of the wheel bolt holes in the brake disc, and rotate the adjuster star wheel on the upper pivot to retract the shoes. The brake disc can then be removed. Installation: Ensure that the mating surfaces of the disc and hub are clean and flat. Align the marks made on removal, and tighten the disc retaining bolt to the specified torque. If a new disc has been installed, use solvent to wipe any anti-corrosion preservative coating from the disc before installing the caliper. Ensure the disc mounting surface on the hub is free from dirt and corrosion. Slide the caliper into position over the disc, making sure the pads slide pass either side of the disc. Tighten the caliper mounting bolts to the specified torque. Install the wheel, then lower the vehicle to the ground and tighten the wheel bolts to the specified torque. Adjust the parking-brake shoes and cable. Depress the brake pedal a few times to bring the brake pads into contact with the disc. Bleeding won't be necessary unless the brake hose is disconnected from the caliper. Check the operation of the brakes carefully before driving the vehicle. Recheck the parking brake.


