×
- Hello
- Login or Register
- Quick Links
- Live Chat
- Track Order
- Parts Availability
- RMA
- Help Center
- Contact Us
- Shop for
- BMW Parts
- BMW Accessories
My Garage
My Account
Cart
Genuine BMW 335i Fuel Rail
Engine Fuel Rail- Select Vehicle by Model
- Select Vehicle by VIN
Select Vehicle by Model
orSeries
Model
Year
Select Vehicle by VIN
For the most accurate results, select vehicle by your VIN (Vehicle Identification Number).
4 Fuel Rails found

BMW 335i High-Pressure Rail
Part Number: 13537649710$641.06 MSRP: $790.84You Save: $149.78 (19%)Ships in 1-3 Business Days
BMW 335i High-Pressure Rail
Part Number: 13537628049$641.06 MSRP: $790.84You Save: $149.78 (19%)Ships in 1-3 Business Days
BMW 335i High-Pressure Rail
Part Number: 13537576779$320.66 MSRP: $442.81You Save: $122.15 (28%)Ships in 1-3 Business Days
BMW 335i High-Pressure Rail
Part Number: 13537575480$320.66 MSRP: $442.81You Save: $122.15 (28%)Ships in 1-3 Business Days
BMW 335i Fuel Rail
The BMW 335i Fuel Rail conducts fuel pressure distribution from the fuel pump toward the injectors until they produce atomized fuel for combustion chamber purposes and emission control and efficiency. The system depends on electronic multiport fuel injection that connects the BMW Fuel Rail to specific port fuel injectors installed on the intake manifold or cylinder head. The powertrain control module (PCM) uses different engine sensor inputs to modify fuel injection timing through this system design. Different fuel injection technologies have been implemented throughout time with throttle body injection (TBI) and gasoline direct injection (GDI) constituting two of these developments. GDI marks the ultimate technological achievement through its capability to administer fuel directly inside the combustion chamber at elevated pressure levels which achieves better combustion results. Each advance in BMW 335i Fuel Rail design incorporates new technology because common 335i Fuel Rail direct fuel injection produces better performance results and conserves more fuel than previous injection systems.
If you are looking for OEM BMW 335i Fuel Rail, we highly recommend to shop with us. Not only do we offer budget friendly prices, but we also provide fast delivery. In addition, we have a hassle-free return policy on all genuine BMW 335i Fuel Rail that come backed by the manufacturer's warranty.
BMW 335i Fuel Rail Parts Questions & Experts Answers
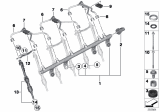
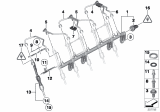
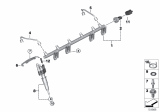
- Q: How to safely disconnect and remove the fuel rail injector on the BMW 335i?A:Disconnect the battery negative (-) cable in the cargo compartment, ensuring to read the battery disconnection cautions beforehand. Remove the cabin microfilter housing, followed by the ignition coil cover and ignition coils, while maintaining a high level of cleanliness to prevent fuel or oil residue from causing a breakdown of the electrical resistance qualities of silicone, which can lead to ignition coil failure. Label the position and remove high-pressure fuel lines by using the special tool to loosen the nut while holding the injector with a wrench. Maintain a clean work area to avoid contaminants that could cause system malfunctions, sealing all fuel system openings with protective caps and replacing high-pressure fuel lines if tightened ten times. Seal the injector with a cap and the fuel rail connection with a plug from the special tool kit, and seal the removed high-pressure fuel lines with caps. Unlock and remove the electrical connector from the fuel injector rail, as well as the electrical connector holders and the fuel rail pressure sensor electrical connector. While working at the fuel injector rail, loosen the fuel line nut, plug open fuel lines and fittings, and wrap a clean shop towel around the fitting before disconnecting due to residual fuel pressure. Finally, remove the fasteners and the fuel injector rail, sealing connections at the high-pressure line and fuel rail.


