×
- Hello
- Login or Register
- Quick Links
- Live Chat
- Track Order
- Parts Availability
- RMA
- Help Center
- Contact Us
- Shop for
- BMW Parts
- BMW Accessories
My Garage
My Account
Cart
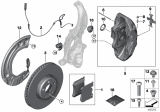
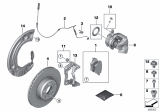
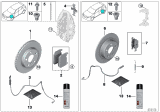
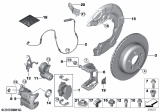
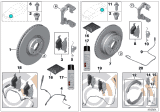
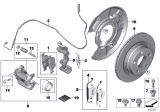
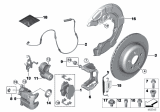
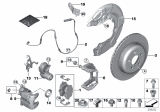
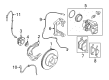
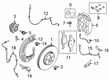
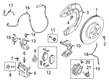
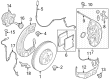
Genuine BMW Brake Disc
Disc Rotor- Select Vehicle by Model
- Select Vehicle by VIN
Select Vehicle by Model
orSeries
Model
Year
Select Vehicle by VIN
For the most accurate results, select vehicle by your VIN (Vehicle Identification Number).
314 Brake Discs found


BMW Disc Brake Rotor Left
Part Number: 34116875283$251.83 MSRP: $399.28You Save: $147.45 (37%)Ships in 1-3 Business DaysProduct Specifications- Other Name: Brake Disc, Lightweight, Ventilated,Left; Rotor
- Position: Driver Side


BMW Brake Disc, Lightweight, Ven
Part Number: 34106880072$151.18 MSRP: $237.67You Save: $86.49 (37%)Ships in 1-3 Business DaysProduct Specifications- Other Name: Rotor
- Replaces: 34-11-6-860-907


BMW Brake Disc, Lightweight, Ventilated
Part Number: 34116860907$151.18 MSRP: $237.67You Save: $86.49 (37%)Ships in 1-3 Business DaysProduct Specifications- Other Name: Rotor
- Replaced by: 34106880072


BMW Brake Disc, Lightweight, Ventilated, Right
Part Number: 34106887398$305.78 MSRP: $484.81You Save: $179.03 (37%)Ships in 1-2 Business DaysProduct Specifications- Other Name: Brake disc, lightweight,ventilated,right; Rotor
- Position: Passenger Side
- Replaces: 34-11-6-860-920


BMW Ventilated Brake Disc
Part Number: 34206880079$165.79 MSRP: $260.63You Save: $94.84 (37%)Ships in 1-3 Business DaysProduct Specifications- Other Name: BRAKE DISC, VENTILATED; Rotor
- Replaced by: 34208887187


BMW Brake Disc, Lightweight, Ventilated,Left
Part Number: 34116860911$211.65 MSRP: $332.72You Save: $121.07 (37%)Ships in 1-3 Business DaysProduct Specifications- Other Name: Rotor
- Position: Driver Side
- Replaced by: 34108858705


BMW Brake Disc, Lightweight, Ventilated, Right
Part Number: 34106875284$251.83 MSRP: $399.28You Save: $147.45 (37%)Ships in 1-3 Business DaysProduct Specifications- Other Name: Brake disc, lightweight,ventilated,right; Rotor
- Position: Passenger Side

BMW Brake Disc, Lightweight, Ventilated,Left
Part Number: 34116887397$305.78 MSRP: $484.81You Save: $179.03 (37%)Ships in 1-2 Business DaysProduct Specifications- Other Name: Rotor
- Position: Driver Side
- Replaces: 34-11-6-860-919


BMW Ventilated Brake Disc
Part Number: 34116886478$133.07 MSRP: $209.19You Save: $76.12 (37%)Ships in 1-2 Business DaysProduct Specifications- Other Name: Brake disc, ventilated; Rotor
- Replaces: 34-11-6-771-985, 34-11-6-793-245


BMW Ventilated Brake Disc
Part Number: 34216864900$110.24 MSRP: $170.41You Save: $60.17 (36%)Ships in 1-2 Business DaysProduct Specifications- Other Name: Brake disc, ventilated; Brake Rotor, Rotor
- Replaces: 34-21-6-792-229


BMW Brake Disc, Lightweight, Ventilated, Right
Part Number: 34116860912$211.65 MSRP: $332.72You Save: $121.07 (37%)Ships in 1-3 Business DaysProduct Specifications- Other Name: Brake disc, lightweight,ventilated,right; Rotor
- Position: Passenger Side
- Replaced by: 34108858706


 Product Specifications
- Other Name: Brake disc, ventilated; Rotor
- Replaces: 34-21-6-771-970, 34-21-6-793-247


BMW BRAKE DISC, VENTILATED, LEFT
Part Number: 34206896673$173.01 MSRP: $271.98You Save: $98.97 (37%)Ships in 1-3 Business DaysProduct Specifications- Other Name: Rotor
- Position: Driver Side

BMW Brake Disc, Lightweight, Ventilated,Left
Part Number: 34216882245$142.28 MSRP: $223.67You Save: $81.39 (37%)Ships in 1-3 Business DaysProduct Specifications- Other Name: Rotor
- Position: Driver Side

BMW Ventilated Brake Disc
Part Number: 34118848417$103.10 MSRP: $159.37You Save: $56.27 (36%)Ships in 1-3 Business DaysProduct Specifications- Other Name: BRAKE DISC, VENTILATED; Rotor
- Replaces: 34-11-6-792-219, 34-11-6-774-875

BMW VENTILATED BRAKE DISC
Part Number: 34108853555$199.55 MSRP: $313.70You Save: $114.15 (37%)Ships in 1-2 Business DaysProduct Specifications- Other Name: Rotor
- Replaces: 34-11-6-860-909

BMW Brake Disc, Lightweight, Ventilated, Right
Part Number: 34216882246$142.28 MSRP: $223.67You Save: $81.39 (37%)Ships in 1-3 Business DaysProduct Specifications- Other Name: Brake disc, lightweight,ventilated,right; Rotor
- Position: Passenger Side
- Replaces: 34-21-6-860-923

 Product Specifications
- Other Name: Rotor
- Replaces: 34-21-6-860-925

BMW Brake Disc, Lightweight, Ven
Part Number: 34108858705$211.65 MSRP: $332.72You Save: $121.07 (37%)Ships in 1-2 Business DaysProduct Specifications- Other Name: Rotor
- Position: Driver Side
- Replaces: 34-11-6-860-911, 34-10-6-880-075
BMW BRAKE DISK LIGHTWEIGHT VENTI
Part Number: 34108858706$211.65 MSRP: $332.72You Save: $121.07 (37%)Ships in 1-2 Business DaysProduct Specifications- Other Name: Rotor
- Position: Passenger Side
- Replaces: 34-10-6-880-076, 34-11-6-860-912
| Page 1 of 16 |Next >
1-20 of 314 Results
BMW Brake Disc
In your BMW brake system, there is an important component named brake disc. When you succeed slowing down your speed to zero, at the same time, the brake disc connects the brake pads to produce a brake torque, further leading to a deceleration. Owing to the extreme high mechanical and thermal loads, and other factors like spray water, road grime, brake disc will fail one day. The brake disc in your car will be checked during the inspection, and if your brake disc doesn't reach the standard, then it has to be replaced without negotiation. However, you can do the replacement by yourself. When you need to find a right place to buy the right part for you BMW car, we are glad to be your first choice. We, as promised, offer all BMW genuine brake disc with a beautiful price.
BMW Brake Disc Parts Questions & Experts Answers
- Q: How to remove and install the brake disc on a BMW M3?A:M3 brake rotors work best when positioned a specific way. The left takes an odd-numbered part number, while the right uses an even-numbered end. Start by locking the rear wheels and using the parking brake. Loosen front wheel bolts just a little, then lift the car up and remove the front wheels. Keep the brake caliper fluid hose connected during wheel removal, and hold the caliper assembly with mechanic's wire to give it support. Pull the brake caliper and bracket out, use your 6mm socket tool to take off the tight special shouldered recessed hex fastener, and apply penetrating lubricant if needed. You can free a stuck brake rotor by first loosening the hold-down bolt then spraying lubricant around the rotor's edge, using two wheel studs to gently tap the rotor off without damaging the flat part of the hub. When putting the parts back on, check and clean the rotor first. Apply anti-seizing compound to protect it, and tighten the retention bolt to 12 foot-pounds. Do the reverse to put it all together. Make sure you tighten the lug nuts in a crossing pattern, applying 66-81 foot-pounds of force to each pair. Simultaneously press down slowly on the brake pedal to set brake strength, then released it with repeated stops to get rid of buildup on the rotors. Check the rotor for surface defects, like pits and cracks, look for unevenness, and size up excessive ridges. Measure surface flatness and overall thickness, and replace if you spot any problems. A little surface wear is OK, but severe markings and bowing needs fresh finish or replacement. Before fitting new rotors, remove any protective covering from them. Then check that your hub runs straight, keeping in mind that too much run-out should be under 0.002 inch. To check your rotors right, lift the vehicle, take off the tire, fit the lug nuts back in place, then take out the brake pads. When measuring runout, use a dial indicator. You should replace rotors when the number exceeds 0.004 inches. Then check for thinness and flatness.
- Q: How do the brake discs work, and how do they remove and install on BMW Z3?A:Put blocks behind the car's back wheels, then put on the parking brake. When you can, turn each front wheel bolt 1/4 turn counterclockwise. Lift the car up, keep the front wheels on while you push down on the brake caliper fluid line, supporting the caliper with wire to avoid damaging the hose. Separate the brake caliper and its bracket. Detach the special bolt that needs a 6mm hex key to remove it. If the bolt is hard to loosen, use a spray lubricant to break it free, and hit it gently with an electric impact driver. Pull off the brake rotor. To free it if stuck, unscrew the bolt holding it in place about 3 turns, spray lubricant near the hub and rotor connection, put back the two wheel bolts, and hit a flat surface between them with a light blow - but don't touch the machined surface. Take out the rotor, and make sure any new rotor is not covered in protective material. Wash the hub and the brake rotor part where they touch. Spread a thin layer of anti-stick solution on them. Fasten the brake rotor with its bolt, then tighten it to 12 foot-pounds. Drive down slowly on the brake pedal until it reaches firm pressure. Start by hand-tightening the wheel bolts, slowly lower the vehicle onto the surface, and then torque each bolt into place following an X-pattern from 66 to 81 foot-pounds of force. Warm up your brakes by stopping slowly 5 times at 30 mph, letting your brakes cool down, and finishing with 5 extra stops to rub off the layers. Check the machined surface of the brake rotor for damage, replace if you find deep scars, cracks, or unevenness, or if the surface is covered in rough ridges. Look for warpage and uneven thickness in rotors; a pulsing brake pedal or steering wheel means thickness is uneven. Look at the rotors for damage while changing the other parts, because cracks and wonky shapes can make braking dangerous. Little scoring is fine, but rotors must be resurfaced or replaced when scoring or warping gets intense. Soak new rotor protection film off with the right dissolving solution before putting it in your vehicle. Measure the space between the rotor's outer edge and center hub. Keep the measurement under 0.002 inch when the rotor is separated from its job. Only coat brakes with the thinnest legal thickness when planning repairs. To inspect a brake rotor, lift the vehicle, position jacks, put lug nuts back on the tire/wheel assembly reinstalled with washers, and tighten them to 80 foot-pounds, unwrap brake pads, then look at the brake surface. With a dial indicator, measure rotor runout, keeping values under 0.004 inches; on-car brake lathe can then machine the rotor for use. Use a micrometer to measure thickness and rotor alignment. Compare the thinnest part of the rotor against the brake manufacturer's thickness requirements. If your reading is lower than the limit, change the rotor before reinstalling. Use a brake lathe to machine the rotor if its thickness differences between highest and lowest points are larger than 0.0008 inches. Replace the rotor if the lathe makes it thinner than minimum specs.


Related BMW Parts
 BMW Brake Booster
 BMW Brake Caliper
 BMW Speed Sensor
 BMW Brake Line
 BMW Parking Brake Cable
 BMW Brake Master Cylinder
 BMW Brake Backing Plate
 BMW Brake Drum
 BMW Wheel Cylinder
 BMW Parking Brake Shoe
 BMW Master Cylinder Repair Kit
 BMW ABS Control Module
Browse by Model
128i Brake Disc 135i Brake Disc 1602 Brake Disc 2002 Brake Disc 2002tii Brake Disc 228i Brake Disc 2500 Brake Disc 2800CS Brake Disc 318i Brake Disc 318is Brake Disc 318ti Brake Disc 320i Brake Disc 323Ci Brake Disc 323i Brake Disc 325Ci Brake Disc 325e Brake Disc 325i Brake Disc 325is Brake Disc 325ix Brake Disc 325xi Brake Disc 328Ci Brake Disc 328i Brake Disc 328i xDrive Brake Disc 328is Brake Disc 328xi Brake Disc 330Ci Brake Disc 330e Brake Disc 330i Brake Disc 330xi Brake Disc 335d Brake Disc 335i Brake Disc 335xi Brake Disc 340i Brake Disc 428i Brake Disc 430i Brake Disc 435i Brake Disc 440i Brake Disc 524td Brake Disc 525i Brake Disc 528e Brake Disc 528i Brake Disc 530i Brake Disc 533i Brake Disc 535d Brake Disc 535i Brake Disc 535i xDrive Brake Disc 540i Brake Disc 545i Brake Disc 550i Brake Disc 633CSi Brake Disc 635CSi Brake Disc 640i Brake Disc 645Ci Brake Disc 650i Brake Disc 733i Brake Disc 735i Brake Disc 735iL Brake Disc 740i Brake Disc 740iL Brake Disc 745i Brake Disc 745Li Brake Disc 750i Brake Disc 750iL Brake Disc 750Li Brake Disc 840Ci Brake Disc 850Ci Brake Disc 850CSi Brake Disc Alpina B7 Brake Disc Bavaria Brake Disc i3 Brake Disc i4 Brake Disc i5 Brake Disc iX Brake Disc M2 Brake Disc M235i Brake Disc M240i Brake Disc M3 Brake Disc M340i Brake Disc M4 Brake Disc M440i Brake Disc M5 Brake Disc M6 Brake Disc M8 Brake Disc X1 Brake Disc X2 Brake Disc X3 Brake Disc X4 Brake Disc X5 Brake Disc X5 M Brake Disc X6 Brake Disc X7 Brake Disc XM Brake Disc Z3 Brake Disc Z3 M Brake Disc Z4 Brake Disc Z8 Brake Disc
View More