×
- Hello
- Login or Register
- Quick Links
- Live Chat
- Track Order
- Parts Availability
- RMA
- Help Center
- Contact Us
- Shop for
- BMW Parts
- BMW Accessories
My Garage
My Account
Cart
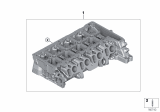
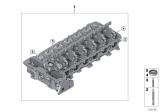
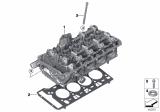
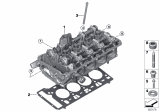
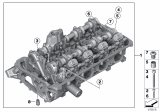
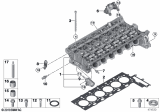
Genuine BMW Cylinder Head
Head- Select Vehicle by Model
- Select Vehicle by VIN
Select Vehicle by Model
orSeries
Model
Year
Select Vehicle by VIN
For the most accurate results, select vehicle by your VIN (Vehicle Identification Number).
121 Cylinder Heads found


BMW Cylinder Head
Part Number: 11127573933$4845.64 MSRP: $6153.66You Save: $1308.02 (22%)Ships in 1-3 Business Days


BMW Cylinder Head Motor
Part Number: 11127573937$4845.64 MSRP: $6153.66You Save: $1308.02 (22%)Ships in 1-3 Business DaysProduct Specifications- Other Name: Cylinder Head

BMW Valve Gear Cylinder Head
Part Number: 11127624778$5618.14 MSRP: $7134.69You Save: $1516.55 (22%)Ships in 1-3 Business DaysProduct Specifications- Other Name: Cylinder Head With Valve Gear; Cylinder Head

BMW Valve Gear Cylinder Head
Part Number: 11127624429$7865.39 MSRP: $9988.56You Save: $2123.17 (22%)Ships in 1-3 Business DaysProduct Specifications- Other Name: Cylinder Head With Valve Gear; Cylinder Head


BMW Valve Gear Cylinder Head
Part Number: 11128482777$3564.00 MSRP: $4526.06You Save: $962.06 (22%)Ships in 1-3 Business DaysProduct Specifications- Other Name: Cylinder Head With Valve Gear; Cylinder Head

BMW Valve Gear Cylinder Head
Part Number: 11128482778$5091.44 MSRP: $6465.81You Save: $1374.37 (22%)Ships in 1-3 Business DaysProduct Specifications- Other Name: Cylinder Head With Valve Gear; Cylinder Head
- Replaces: 11-12-2-117-508

BMW Cylinder Head With Valve Gear
Part Number: 11121019167$5091.44 MSRP: $6465.81You Save: $1374.37 (22%)Ships in 1-3 Business DaysProduct Specifications- Other Name: CYLINDER HEAD WITH VALVE GEA; Cylinder Head

BMW Cylinder Head
Part Number: 11121433913$2102.67 MSRP: $2111.37You Save: $8.70 (1%)Ships in 1-3 Business DaysProduct Specifications- Replaces: 11-12-1-743-478

BMW Bearing Ledges Cylinder Head
Part Number: 11127514543$2946.51 MSRP: $2958.70You Save: $12.19 (1%)Ships in 1-3 Business DaysProduct Specifications- Other Name: Cylinder Head With Bearing Ledges; Cylinder Head
- Replaces: 11-12-7-514-540, 11-12-1-436-790, 11-12-1-439-724


BMW Bearing Ledges Cylinder Head
Part Number: 11121739913$2994.60 MSRP: $3006.99You Save: $12.39 (1%)Ships in 1-3 Business DaysProduct Specifications- Other Name: Cylinder Head With Bearing Ledges; Cylinder Head
- Replaces: 11-12-1-727-880

BMW Cylinder Head
Part Number: 11127500036$3371.69 MSRP: $4281.84You Save: $910.15 (22%)Ships in 1-3 Business Days
BMW Cylinder Head
Part Number: 11127810463$3511.32 MSRP: $4459.16You Save: $947.84 (22%)Ships in 1-3 Business Days
BMW Cylinder Head With Valve Gear
Part Number: 11121019165$5091.44 MSRP: $6465.81You Save: $1374.37 (22%)Ships in 1-3 Business DaysProduct Specifications- Other Name: CYLINDER HEAD WITH VALVE GEA; Cylinder Head

BMW Cylinder Head
Part Number: 11127586173$5477.66 MSRP: $6956.29You Save: $1478.63 (22%)Ships in 1-3 Business Days
BMW Cylinder Head
Part Number: 11127588249$5653.26 MSRP: $7179.29You Save: $1526.03 (22%)Ships in 1-3 Business DaysProduct Specifications- Replaces: 11-12-7-566-709, 11-12-7-574-298

BMW Valve Gear Cylinder Head
Part Number: 11122906619$6741.76 MSRP: $8561.62You Save: $1819.86 (22%)Ships in 1-3 Business DaysProduct Specifications- Other Name: Cylinder Head With Valve Gear; Cylinder Head, Valve Cover

BMW Right Engine Cylinder Head Assembly
Part Number: 11122906618$6741.76 MSRP: $8561.62You Save: $1819.86 (22%)Ships in 1-3 Business DaysProduct Specifications- Other Name: Cylinder Head With Valve Gear; Cylinder Head
- Position: Passenger Side

BMW Cylinder Head With Valve Gear
Part Number: 11122120714$6741.76 MSRP: $8561.62You Save: $1819.86 (22%)Ships in 1-3 Business DaysProduct Specifications- Other Name: CYLINDER HEAD WITH VALVE GEA; Cylinder Head

BMW Valve Gear Cylinder Head
Part Number: 11122118177$7120.96 MSRP: $9043.18You Save: $1922.22 (22%)Ships in 1-3 Business DaysProduct Specifications- Other Name: Cylinder Head With Valve Gear; Cylinder Head
- Replaces: 11-12-1-559-899

BMW Valve Gear Cylinder Head
Part Number: 11128482779$7128.01 MSRP: $9052.13You Save: $1924.12 (22%)Ships in 1-3 Business DaysProduct Specifications- Other Name: Cylinder Head With Valve Gear; Cylinder Head
| Page 1 of 7 |Next >
1-20 of 121 Results
BMW Cylinder Head
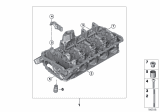
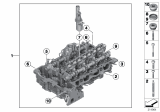
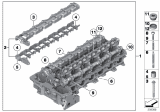
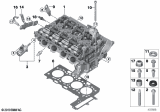
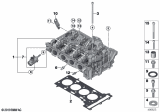
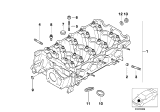
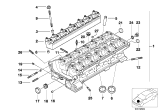
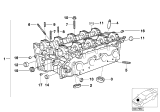
There is an important part in the mechanics named the cylinder head. The location of the cylinder head is on the top of the engine block. Along with the head gasket, there is a seal over the cylinder, allowing the pistons to function and protects the engine's delicate components. It is necessary for the engine to work with vacuum condition. So if the cylinder head leaks, cracks, or sustains other damage, it can affect the engine in a negative way. Don't wait too late until the engine needs to be changed since it gets hurt by cylinder head too much. If you find anything wrong with the cylinder head, you need to stop driving immediately and check it if the replacement is necessary. Once you decide to change, we are glad to offer you all BMW genuine OEM cylinder head with a discounted price.
BMW Cylinder Head Parts Questions & Experts Answers
- Q: How to properly install and inspect a cylinder head in N55 six cylinder engine on BMW 335i?A:Insert BMW special tool 11 4 430 or equivalent sealing plugs into bore holes and remove coarse residues on sealing surfaces from the cylinder head and crankcase, taking care not to use metal-cutting tools to avoid damage. Use BMW special tool 11 4 472 or equivalent grindstone to remove fine residues, ensuring all blind holes are cleaned to eliminate coolant, water, or engine oil to prevent cracking or corrosion. Inspect the cylinder head for visible cracks or defects, and check for warpage by removing intake and exhaust camshafts, roller cam followers, valve lifters, and valves. Use a straight edge to assess the evenness of the sealing surface in both longitudinal and transverse directions, and have the cylinder head tested for coolant leaks and cracks. If warped but sound, machine a maximum of 0.3 mm (0.011 in) off the sealing surface, then reassemble or use a reconditioned BMW cylinder head, ensuring it is placed on its side to avoid valve damage. Replace the cylinder head gasket with a special one from an authorized BMW dealer if machined, as it is 0.3 mm (0.011 in) thicker than standard. Position the cylinder head on the engine block, fitting it to the aligning sleeves, and install new cylinder head bolts using the appropriate BMW special tools. Retrieve the timing chain from the housing, place it over the chain module, and reattach the module with new bolts, noting the differences between exhaust and intake camshaft adjustment units. Lock down the camshafts with the specified tools, install the chain tensioner, and set the camshaft timing. If reusing the chain tensioner, drain its oil chamber and compress it slowly. Ensure a new sealing O-ring is used during reassembly. The remainder of the installation follows the reverse order of removal, including removing locking tools, assembling the cylinder head cover with a new gasket, reattaching ground cables, reinstalling the engine, adding fresh engine oil, checking the oil level, and filling and bleeding the cooling system.
- Q: What special tools and procedures are necessary for removing and installing the cylinder head in N52 six sylinder engine on BMW X3?A:During dismantling and assembly of the cylinder head of the N52 engine, it is required to use special tools and means for dismantling and assembling the camshaft adjustment units and the valvetronic eccentric shaft and for the camshafts' phasing. When making the repairs, one needs to read through the whole of the procedure. Camshaft or cylinder head disassembly, camshaft adjustment unit removal, and assembly, and related operations may harmfully affect camshaft, camshaft adjustment unit gears or cylinders and cylinder heads or may cause valve bendings due to impact by piston crowns if special tools are not used. Further, while camshaft timing is discussed separately, remanufactured cylinder heads are available through an authorized BMW distributor.
- Q: What are the key considerations and procedures for removing and installing the cylinder head in six cylinder engine on BMW X5?A:The 6-cylinder engine uses double-VANOS on Cylinder head; detachment of the VANOS unit requires extra tools and processes. Before doing repair, it is important to know the process, because if camshafts are disassembled, or removed and assembled, or cylinder head is removed and assembled without enough tools, it is possible to damage or break something. Valves may get bent from contact with the piston crown as can the camshafts which may break if improperly stressed during removal or installation. 'VANOS' is an abbreviation for 'VAriable NOckenwellen Steuerung' which is a German name. The process of removal and installation of cylinder heads is somewhat different as the intake manifold has to be removed before the cylinder head. For such a substantial amount of reconditioning after pulling a cylinder head, there is a remanufactured version obtainable from an original equipment BMW parts supplier.


Related BMW Parts
 BMW Cylinder Head Gasket
 BMW Timing Cover
 BMW Rocker Arm
 BMW Camshaft
 BMW Intake Valve
 BMW Exhaust Valve
 BMW Rocker Shaft Spring Kit
Browse by Model
128i Cylinder Head 135i Cylinder Head 1602 Cylinder Head 2002 Cylinder Head 2002tii Cylinder Head 228i Cylinder Head 2500 Cylinder Head 2800CS Cylinder Head 318i Cylinder Head 318is Cylinder Head 318ti Cylinder Head 320i Cylinder Head 323Ci Cylinder Head 323i Cylinder Head 325Ci Cylinder Head 325e Cylinder Head 325i Cylinder Head 325is Cylinder Head 325ix Cylinder Head 325xi Cylinder Head 328Ci Cylinder Head 328i Cylinder Head 328i xDrive Cylinder Head 328is Cylinder Head 328xi Cylinder Head 330Ci Cylinder Head 330e Cylinder Head 330i Cylinder Head 330xi Cylinder Head 335d Cylinder Head 335i Cylinder Head 335xi Cylinder Head 340i Cylinder Head 428i Cylinder Head 430i Cylinder Head 435i Cylinder Head 440i Cylinder Head 524td Cylinder Head 525i Cylinder Head 528e Cylinder Head 528i Cylinder Head 530i Cylinder Head 533i Cylinder Head 535d Cylinder Head 535i Cylinder Head 535i xDrive Cylinder Head 540i Cylinder Head 545i Cylinder Head 550i Cylinder Head 633CSi Cylinder Head 635CSi Cylinder Head 640i Cylinder Head 645Ci Cylinder Head 650i Cylinder Head 733i Cylinder Head 735i Cylinder Head 735iL Cylinder Head 740i Cylinder Head 740iL Cylinder Head 745i Cylinder Head 745Li Cylinder Head 750i Cylinder Head 750iL Cylinder Head 750Li Cylinder Head 840Ci Cylinder Head 850Ci Cylinder Head 850CSi Cylinder Head Alpina B7 Cylinder Head Bavaria Cylinder Head i3 Cylinder Head i8 Cylinder Head M2 Cylinder Head M235i Cylinder Head M240i Cylinder Head M3 Cylinder Head M340i Cylinder Head M4 Cylinder Head M440i Cylinder Head M5 Cylinder Head M6 Cylinder Head M8 Cylinder Head X1 Cylinder Head X2 Cylinder Head X3 Cylinder Head X4 Cylinder Head X5 Cylinder Head X5 M Cylinder Head X6 Cylinder Head X7 Cylinder Head XM Cylinder Head Z3 Cylinder Head Z3 M Cylinder Head Z4 Cylinder Head Z8 Cylinder Head
View More